Using blocks in AutoCAD has many benefits, as we covered here before: Why you should use AutoCAD blocks. However, there is one thing that people can find annoying: To insert a block, you must use the insertion point as reference. It works fine in many cases, but sometimes we need to use other point as reference. It could be when we insert the block, or when we need to move or rotate it.
For the last one, this tip would be useful if you like to use grips. If you use MOVE command, you can define any point as reference.
So let’s see some tips to work with other reference points in blocks.

Add point parameters in block editor
Since AutoCAD 2006, Autodesk introduce Dynamic Block feature. You can use point parameter in block authoring palette to add invisible insertion points. When you insert a block, you can easily switch between insertion points by pressing CTRL key.
If you want to learn how to use it, Lynn Allen posted this tip on Cadalyst YouTube channel as embedded below. You can see how easy to do it.
If you can’t see the video above, you can see it here: Adding multiple insertion point for a block.
Enable grips within blocks
Above trick is very helpful when you insert a block. As mentioned before, if you prefer to move block by using grip you will only have option to select insertion point. In below example, this bed was created as a block. The insertion point is only at the left top corner of the bed.
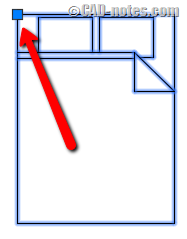
You can show all the grips from the objects inside the block by activating Show grips within blocks in AutoCAD options, selection tab. Or set the GRIPBLOCK system variable to 1.
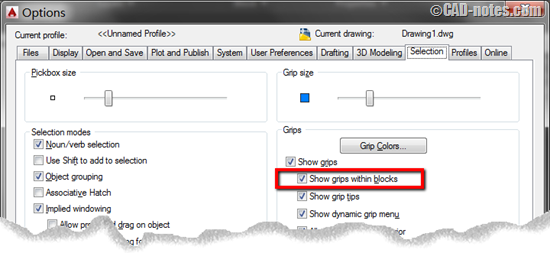
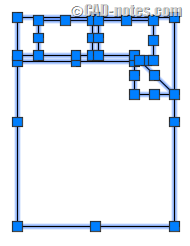
After you activate the option, you will see all grips when you select the block. You can select any grips to move the block.
Changing the base point
Showing grips within blocks isn’t always the best option. If you have complex geometry inside your block, you will see too many grips. It can be confusing.
The other option is to select the insertion point until you can see the grip turns to red and the block is at your pointer, right click and choose Base Point from context menu.
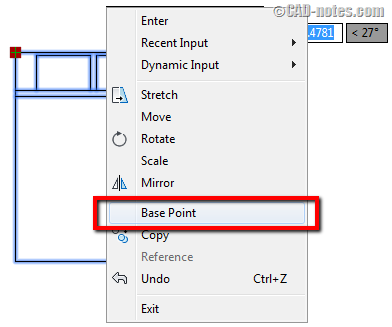
Now you can select any point as the new base point. Certainly, you can also choose Base Point from command line.
Cycling between commands
After you select a grip, the default action is to stretch the grip. In this case, it will move your block to new location.
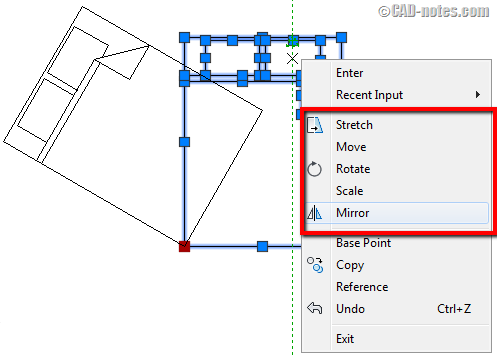
You can press ENTER or SPACE to cycle between all other possible action. Check the command line, you will see the action is changing between stretch, move, rotate, scale and mirror.
** STRETCH **
Specify stretch point or [Base point/Copy/Undo/eXit]:
** MOVE **
Specify move point or [Base point/Copy/Undo/eXit]:
** ROTATE **
Specify rotation angle or [Base point/Copy/Undo/Reference/eXit]:
** SCALE **
Specify scale factor or [Base point/Copy/Undo/Reference/eXit]:
** MIRROR **
Specify second point or [Base point/Copy/Undo/eXit]:
You can also right click and change the action from context menu.
Bonus tip: Change GRIPBLOCK variable quickly with LISP
If you want to use grips within block and want to turn it on/off quickly, you can use this LISP program below. After you load it, just type GB then enter to change the variable quickly.
(defun c:GB (/ CURGRIPBLOCK)

(setq CURGRIPBLOCK (getvar "GRIPBLOCK"))

(if (= CURGRIPBLOCK 0)

(setvar "GRIPBLOCK" 1)

(setvar "GRIPBLOCK" 0)

)
)
If you’re not familiar with using AutoLISP code, you can use the LISP program by following this article: Saving, using and managing your AutoLISP program.
Insertion point isn’t the only reference point in block!
As you can see above, insertion point isn’t the only reference point in block. You can change insertion point easily during insertion and you can use other points when you modify your block.
You can quickly pick a grip if you set GRIPBLOCK to 1. Or you can change the base point later.
Using grips probably isn’t the preferred way for AutoCAD veterans, but many people do use it. Using grips allow you to remember less command, I think occasional users find this useful.
What about you? Which method do you prefer? Or you have other method that you can share with us?


Very interesting Edwin. Thanks again for your useful tips …