In this Article...

Andres Rodriguez – Fotolia.com
We covered several basic AutoLISP tutorial already. You should be able to use the programs. Now it’s time to manage them in AutoCAD.
This is not only for you who want to learn AutoLISP, but also for you who want to simply use AutoLISP program. We know that we can find many AutoLISP program on internet now.
Saving an AutoLISP program
You may find people giving you LISP program written in code like this.
In CADTutor forum, you’ll find mostly the program is given to you written in code. You need to copy the code to your clipboard (by selecting them and pressing ctrl + c).
(defun c:cnlabel (/ p x y ptcoord textloc)

(while ;start while

(setq p (getpoint "

Pick Point to Label: "))

(setq textloc (getpoint p "

Pick Text Location"))

(setq x (rtos (car p)))

(setq y (rtos (cadr p)))

(setq ptcoord (strcat "x=" x ", " "y=" y))

(command "_leader" p textloc "" ptcoord "")

(princ)

) ;end while

)
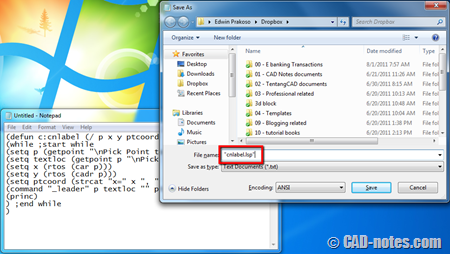
You can use visual lisp editor to save it as a program. Or notepad will work. But don’t use Microsoft Word or other Word Processing program.
Paste your code there. Save it as LISP program. If you use Visual LISP editor, then by default it will save your code as .lsp file. But if you use notepad, then you must define the .lsp extension when saving your file.
Type “YourProgramName.lsp” (with double quote to force notepad save it as it is). Of course, change the blue text with your program name.
Save your file to a location that allow people easily access it.
Loading AutoLISP Program
Now you have your LISP program. Before you can use it, you need to load it to AutoCAD. Go to AutoCAD ribbon> manage tab> applications panel. Click load application.
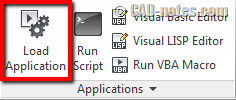
hint: AutoCAD veterans use APPLOAD in command line
In load/unload applications dialog, browse and find your AutoLISP file you saved before. Select it and click load.
Automatically load AutoLISP program when AutoCAD start
If you use your LISP program repeatedly, then you will want AutoCAD automatically load it every time it starts. So you don’t have to load it in every new AutoCAD session. To load it automatically, add the LISP program to startup suite.
The cool way to do it is by dragging the file to startup suite.
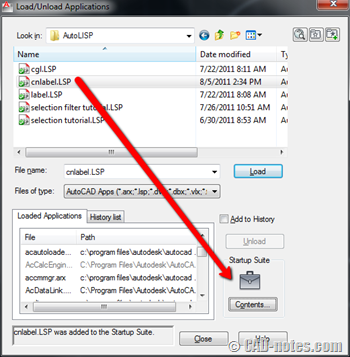
The less cool way to do it is by clicking contents button below startup suite briefcase.
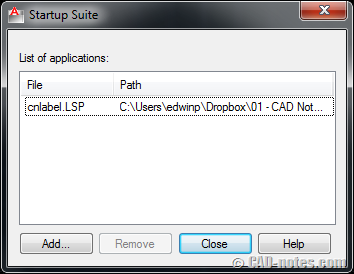
Here you can add or remove LISP from startup suite. Just in case one day you don’t want a LISP program to load automatically anymore, you know where to remove it now, right?
Using AutoLISP program
So how you can use the program?
Again, if you copy it from internet, you can see on top of the program like this.
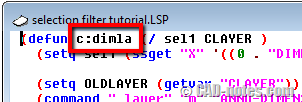
DEFUN is defining the function. In this sample, the function can be loaded by typing DIMLA in command line then press [enter].
As simple as that. What you should do next, depends on your AutoLISP program.
Placing AutoLISP in AutoCAD Interface
If you’re a command line freaks, then you can stop here. However, not all of us like using command line. You may want to have it on your ribbon (well uh, or toolbar/menu if you use classic interface).
In ribbon panel/toolbar/menu
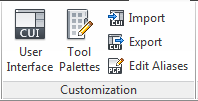
Type CUI then press [enter] to load Customize User Interface dialog. Or click User Interface in customization panel.
If you’re not familiar how to create a command here, read this tutorial first.
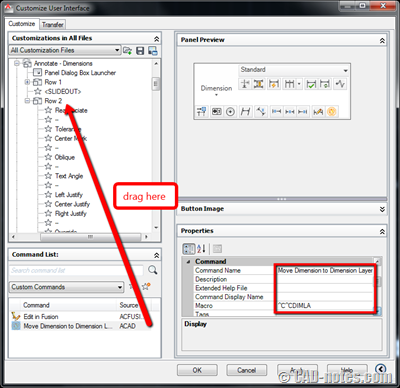
You have to make a command, change the command name and macro.
The macro should be ^C^CDIMLA. Or whatever command you want to activate using this macro. ^C^C means you press esc twice to cancel all running command.
After you’ve done, drag the command to ribbon panel, toolbar, or menu as you like.
In tool palettes
What about tool palettes? Can we place the command there?
Sure you can. You can use palettes to activate AutoLISP command too.
The process is similar with adding action recorder command in this tutorial.
What we learned
Now you know how to save a LISP code, load it to AutoCAD, and use it.
You also know how to use AutoLISP command from ribbon/toolbar. And even using from tool palette.
So how do you use AutoLISP? Do you load it automatically? And do you use command line or place it to ribbon?


sore mas edwin, punya versi indonesianya nggak, bhs inggrisku kurang..
makasih
hanafi
Selamat pagi Edwin.
I need a lisp routine. Please can you help..I have not found any that work. :-(
1st is to insert a block along a polyline, at user specified intervals, so for example every 1000m and as the block is inserted, an attribute is updated in the block. I have seen this many times in the past, but all the ones I have found seem to fail. I would like the routine to work in Model space aswell..
harap Anda dapat membantu
Phillip