• Home
  • Training Books
  • Subscribe to Our Email Newsletter
  • About
    • Contributors
    • Feedback
    • Contact
    • Privacy policy
    • Cookie Policy

CADnotes

CAD Tutorials and Best Practices for professionals and students

  • Featured
  • AutoCAD
    • AutoLISP
  • Revit
    • Revit Architecture Basic
    • Revit MEP Basic Tutorial
  • Inventor
  • MicroStation
    • MicroStation Basic Tutorial
  • CADnotes on YouTube
You are here: Home / AutoCAD / Change layer when using AutoCAD command with Macro

Change layer when using AutoCAD command with Macro

November 5, 2015 by Edwin Prakoso 6 Comments

In this Article...

  • The command macro
  • Using the macro
  • A more advanced macro
  • What is your favorite macro command?

AutoCAD layer is a great feature to manage objects in your drawings. What we don’t like about it is we often need to change layer before we draw. For example when we want to draw dimensions, we need to change the layer to dimension layer. Then change the layer again when we need to draw other objects.

You can create a macro command to do this automatically. Of course, you can use LISP. But the good thing about macro is you can use it in AutoCAD LT too.

AutoCAD macro command

The command macro

If you are not familiar with AutoCAD command macro, you can read this excellent tutorial by Paul Munford.

The macro code for this macro is very simple:

^C^C-layer;set;DIMENSIONLAYERNAME; _DIMLINEAR

Replace DIMENSIONLAYERNAME with your dimension layer. This layer must exist in your drawing for this macro to works.

Using the macro

There are various ways how you can use the macro. The easiest way is to place it in tool palettes as described in this tutorial.

If you are familiar with AutoCAD CUI, you can place the command in a ribbon tab or toolbar. You can also use it as a shortcut. For example ctrl+D to activate this macro.

A more advanced macro

Programming code abstract screen of software developer.

The macro above will work great. We can make the macro to change the layer back to the previous layer immediately after the command is finished. So when you are working with wall layer, create a dimension on dimension layer, then the current layer is back to wall layer.

The macro will be:

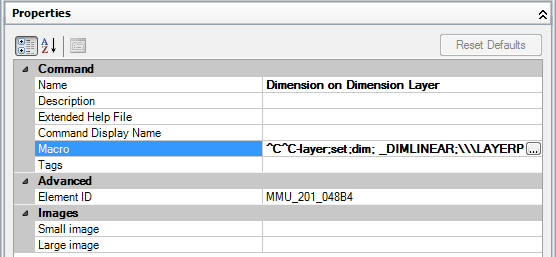
^C^C-layer;set;DIMENSIONLAYERNAME; _DIMLINEAR;\\\LAYERP

This macro will allow you to create dimension on dimension layer. Then change the layer back to previous. However, if you press Esc key before the dimension is drawn, the layer previous command won’t be executed.

What is your favorite macro command?

There are many ways to customize AutoCAD commands. A custom command can help you to work easier, even if it’s only a simple customization.

What about you? Do you use command macros? If yes, can you share it with us in this article’s comment section?

Thank you to Hai Le for sharing this command macro!

About Edwin Prakoso

I work as a Solution Consultant in Datech Solutions, Tech Data Indonesia. I've been using AutoCAD since R14 and Revit since Revit Building 9. I occasionally write for AUGIWorld magazine and I am also active in Autodesk discussion forum. I'm a member of Autodesk Expert Elite, an appreciation for individuals who give contributions to the Autodesk community.
Connect with me on twitter or LinkedIn. If you want to have my new articles sent to your email inbox, you can subscribe to the newsletter.

Filed Under: AutoCAD Tagged With: autocad tips

0 0 votes
Article Rating
Subscribe
Login
Notify of
guest

guest

This site uses Akismet to reduce spam. Learn how your comment data is processed.

6 Comments
Inline Feedbacks
View all comments
Maradei
Maradei
7 years ago

Hi! Such a good tip! But for me it only works if I click on the tab “dimension” and then select “linear”. It won’t work if a use da command “dli”. Am I doing something wrong? Thank you

0
Reply
Edwin Prakoso
Edwin Prakoso
Author
Reply to  Maradei
7 years ago

Maradei,

This macro will only work on where you use the macro. It can be on toolbar, ribbon, shortcut key or tool palettes. But if you want to use it on command line, you need AutoLISP to do that. Macro can’t work on command alias.

0
Reply
Maradei
Maradei
Reply to  Edwin Prakoso
7 years ago

Ok! Thank you very much again, Mr. Prakoso. Have a nice week!

0
Reply
ramaiah m
ramaiah m
7 years ago

I am a beginner in auticad

0
Reply
Isaac
Isaac
7 years ago

Love it! Always good to build in safeguards for correct layering.

To save the risk of escaping the command early and leaving your current layer as the dim layer, the macro can start with the dimlinear command and move the object into the layer after the fact by finishing the macro with:

Change;Properties;Last;;LAyer;DimLayerName;;

0
Reply
Edwin Prakoso
Edwin Prakoso
Author
Reply to  Isaac
7 years ago

That is excellent workaround! I’ve never thought of it. Thanks for the tip!

0
Reply
wpdiscuz   wpDiscuz
Join Our Free Email Newsletter
  Thank you for Signing Up
Please correct the marked field(s) below.
1,true,6,Contact Email,2 1,false,1,First Name,2 1,false,1,Last Name,2

Featured

One AutoCAD, Seven Specialized Toolsets

AutoCAD 2019 has been released, with a big change. This is the special announcement Autodesk has been teasing you in the last few days. It’s not only AutoCAD 2019. You also get 7 specialized toolsets!

Recent Articles

  • Revit 2024.1 Update is Released
  • What’s New in Revit 2024: Bending Detail
  • What’s New in Revit 2024: The Dark Theme

Advertisement

New on CADnotes

  • Revit 2024.1 Update is Released
  • What’s New in Revit 2024: Bending Detail
  • What’s New in Revit 2024: The Dark Theme
  • Autodesk Build: Using Assets for Progress Tracking
  • My Home on the ACC Unified Platform

Meet the Authors

avatar for
avatar for
avatar for
avatar for
avatar for
avatar for

Get Connected

CADnotes on FacebookCADnotes on InstagramCADnotes on TwitterCADnotes on YouTube

© 2009 – 2023 CADnotes · Feedback · Privacy Policy · Become an affiliate

wpDiscuz