• Home
  • Training Books
  • Subscribe to Our Email Newsletter
  • About
    • Contributors
    • Feedback
    • Contact
    • Privacy policy
    • Cookie Policy

CADnotes

CAD Tutorials and Best Practices for professionals and students

  • Featured
  • AutoCAD
    • AutoLISP
  • Revit
    • Revit Architecture Basic
    • Revit MEP Basic Tutorial
  • Inventor
  • MicroStation
    • MicroStation Basic Tutorial
  • CADnotes on YouTube
You are here: Home / AutoCAD / AutoCAD tip: remove alternate unit bracket in dimension

AutoCAD tip: remove alternate unit bracket in dimension

April 11, 2011 by Edwin Prakoso 12 Comments

In this Article...

  • Removing the Brackets
    • Change the bracket type
  • Changing Alternate Text Font
    • Defining font type in dimension style
    • Defining font type in AutoCAD options

Do you use alternate unit in your AutoCAD dimensions? If you do, you should notice that the that units are written inside bracket like below.
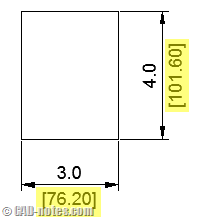
alternate_dimension_bracket

If you wish to remove the bracket, or change it to other type of prefix/suffix, you can do it using simple steps below: by modifying dimension style.

Removing the Brackets

To remove the bracket, open dimension style. You can type in command line for DIMSTYLE then press [enter].

Go to primary units tab. Leave the prefix field empty, and type \X\f in suffix field. If you already enable display alternate units, then you will see it disappear in preview window. Don’t worry, we will make it appear again in the next step.
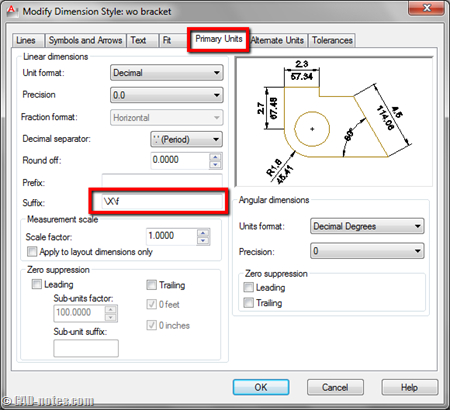
primary_units_suffix

Now go to alternate units tab. If you haven’t activate it, activate it now.

In prefix field, type ;

Then in suffix field, type \f

You should see the alt units appear in preview again. Click OK and try to create a dimension using this style!
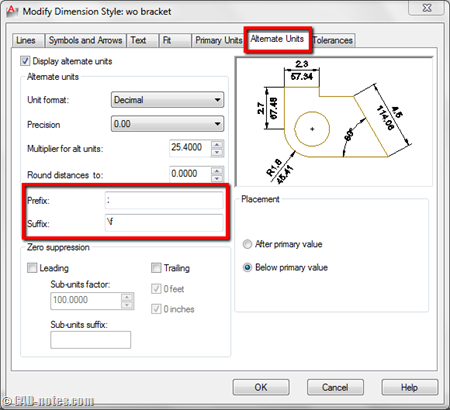
alternate_units

Change the bracket type

What if you want to change the bracket type? Not [ ] but maybe () or | |.

Easy. Just add ( in the alt unit prefix, and ) in suffix like below.

Changing Alternate Text Font

Defining font type in dimension style

You will see the alt units’ font be different with the primary. This method will remove any formatting used in text style. It will use font type that’s defined in options (see later in this post).

To fix this, you need to add the font type in the prefix. So instead of typing ; only, add ;\fArial; to define the font type. Arial is the font name. You can try to use other type if you want.

Credit to Paul Munford from CAD Setter Out who found this method.

Defining font type in AutoCAD options

The default font for alternate units is defined in options. If you want to change the default font, go to AutoCAD options. Go to files tab.

Expand text editor, dictionary, and font file names. Find alternate font file, then change it to match the font you use in dimension style. You may need to restart AutoCAD (close and reopen AutoCAD, not restarting the Windows) to see the changes.
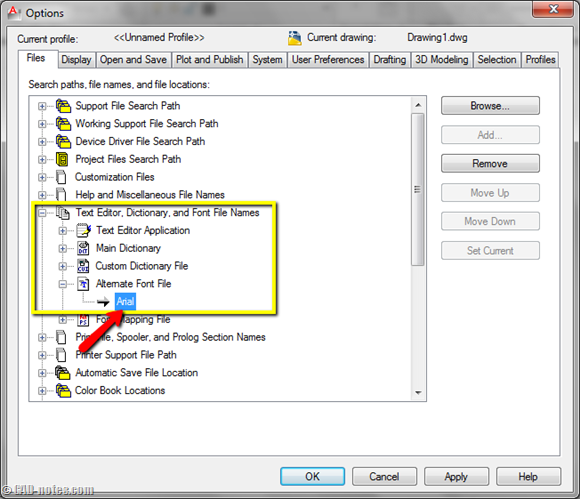
alternate_font_file

Credit to Patchy and ToanDN who gave this solution in Autodesk forum.

About Edwin Prakoso

I work as a Solution Consultant in Datech Solutions, Tech Data Indonesia. I've been using AutoCAD since R14 and Revit since Revit Building 9. I occasionally write for AUGIWorld magazine and I am also active in Autodesk discussion forum. I'm a member of Autodesk Expert Elite, an appreciation for individuals who give contributions to the Autodesk community.
Connect with me on twitter or LinkedIn.

Filed Under: AutoCAD Tagged With: alternate units, dimension, dimension styles

0 0 votes
Article Rating
Subscribe
Login
Notify of
guest

guest

This site uses Akismet to reduce spam. Learn how your comment data is processed.

12 Comments
Inline Feedbacks
View all comments
Eric Remelius
Eric Remelius
1 year ago

Lovely tip! I cannot, however, get the leading Bracket to disappear. The \X does not work no matter what order or location I place the \X

Screenshot 2021-12-29 125234.jpg
0
Reply
« Previous 1 2
wpdiscuz   wpDiscuz
Join Our Free Email Newsletter
  Thank you for Signing Up
Please correct the marked field(s) below.
1,true,6,Contact Email,2 1,false,1,First Name,2 1,false,1,Last Name,2

Featured

How to add dimensions in Revit 3D view

You can create a 3D view with dimension in Revit. Using visual effects on this view will make it a stunning image for your presentation!

Recent Articles

  • Model-Based Progress Tracking in Autodesk Build
  • Understanding Surface and Cut Patterns in Revit
  • Revit 2024.1 Update is Released

Advertisement

New on CADnotes

  • Model-Based Progress Tracking in Autodesk Build
  • Understanding Surface and Cut Patterns in Revit
  • Revit 2024.1 Update is Released
  • What’s New in Revit 2024: Bending Detail
  • What’s New in Revit 2024: The Dark Theme

Meet the Authors

avatar for
avatar for
avatar for
avatar for
avatar for
avatar for

Get Connected

CADnotes on FacebookCADnotes on InstagramCADnotes on TwitterCADnotes on YouTube

© 2009 – 2023 CADnotes · Feedback · Privacy Policy · Become an affiliate

wpDiscuz