Previously, I wrote about isometric drawing in AutoCAD. It’s not actually AutoCAD 3D drawing. But changing your cursor orientation will make it easier to draw isometric drawings. But have you tried to annotate your isometric drawings? How about dimensions and text, is it appear properly? No, it’s not. The drawing looks isometric, but not the annotations.
So how can you create isometric annotations?
If you use vanilla AutoCAD, there is no direct or easy way to do it. But a little workaround could achieve what you want.
Isometric Text
First, create two styles. Use oblique angle 30 deg for one style and -30 deg for the other.

Now place your text (single or multi line), change the rotation to 30 deg or -30 deg. It depends on where you want to put it. See next image as reference.
Specify rotation angle of text <0>: -30
Try to create it with several style and text angle combination. Well, basically these three are all you need.

Isometric Dimension
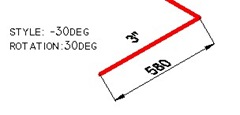
What about dimensions? You also have to create two styles. One of the style use 30 deg text style, and the other one use -30deg.

Now place aligned dimension.

Now we have to do a little modification.
Activate DIMEDIT [enter], choose OBLIQUE, then give 30 or -30 as oblique angle. Once again, depends where your dimension is.
Command: DIMEDIT
Enter type of dimension editing [Home/New/Rotate/Oblique] <Home>: O
Select objects: 1 found
Select objects:
Enter obliquing angle (press ENTER for none): -30
See this image as reference.

Now if you examine the drawing carefully, the dimension arrows don’t look right. They don’t look isometric yet. We will cover this on the next tutorial: how you can create isometric dimension arrow.
I know it’s not fun to do those steps, but it’s the only way if you use vanilla AutoCAD. If you have experience in macro, you can create your own command in CUI or even create an AutoLISP program.


When in isometric mode I offset a line, the measurement appears to be longer than what offset. How can set the precision to get accurate offset in isometric mode? Thanks
Thanks again Edwin for the good article for beginners.
Good day guys, one question please. Is there a way to set leader text to follow the line or angle of the leader?
i understand it
Thanks for you great site!
Any idea how I can annotate an isometric view from a 3D drawing? The isometric view is generated in Layout with “Create view from Base’.
I can follow this workflow, but the values aren’t correct.
Hope you, or someone else can help.
Unfortunately, isometric view from “Create View from Base” is not scaled correctly. You can only dimension orthogonal views only.
how to place an image on an isomatric view (like text obliqe)
I’m not very sure about what you want to achieve. But AutoCAD has very limited capability for drawing editing. You can’t skew the image.
However, you can change the UCS then place the image reference there.
Thanks for explaining it in such an easy way. I was searching for the method to align text and dimensions for isometric drawings. I browsed through various websites but none of them explained it as easily and simply as you did. Thanks.
I’m glad that you find it helpful Monil!