In this Article...
In a building design, you might need to create multi-phase design. It can be existing and new construction phase for renovation projects. Or it can be you need to create some temporary construction that you will need to demolish later. Or the project itself require us to build it in multiple phases.
Understanding How Design Phase Works
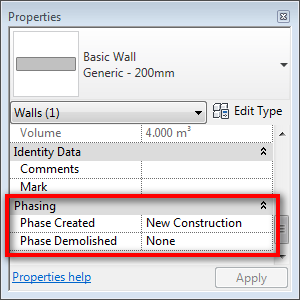
Let us open a project. You can use any project or simply create a new one. Just place a wall and select it.
In instance properties, you will see phasing category. There are two parameters here: phase created and phase demolished.
By default, Revit has two phases: existing and new construction. New construction will be used as default, your newly created building elements will be in this phase. If you are working on renovation project or building expansion project, you can change the element phase to previous phase: existing. If there are any building elements you need to demolish, you can define when the element should be demolished.
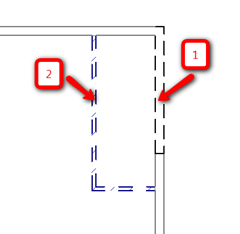
Let us try a simple case, we want to demolish the wall (1) for building extension. I changed the phase created to existing, and change the phase demolished to none. To close the existing area, I created a temporary wall (2). This wall is created during building extension project, and also will be demolished in this phase. So I change the phase created to new construction, and phase demolished to new construction as well. See how they are represented differently.
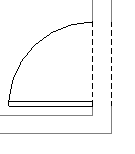
Let us see another sample. This door below is created on new construction, while the wall created in existing. Revit will automatically tell us the wall need to be demolished to place the door. The wall in the door location is not removed like usual, but shown in dashed lines.
Managing Phases
We can rename, add, remove and arrange the phases sequence in phasing dialog box. You can access it from Revit ribbon, manage tab, phasing panel. Click phases button.
There are three tabs in this dialog box. In project phases, you can manage the phases.
Phase Filters
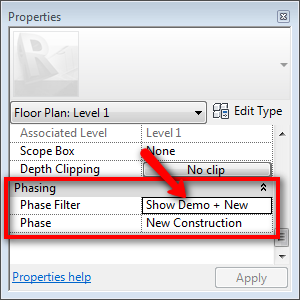
In phase filters tab, you can manage how to show your objects. For example, show demo + new filter will only show all objects that demolished and objects that are created in new phases.
You can use the filters in properties palette (or in view properties dialog box for pre-2011).
Try to play with this filter. And don’t forget, schedules are views too. So you can separate how many walls need to be demolished, and how many walls need to be built, separate from existing walls! Isn’t that cool?
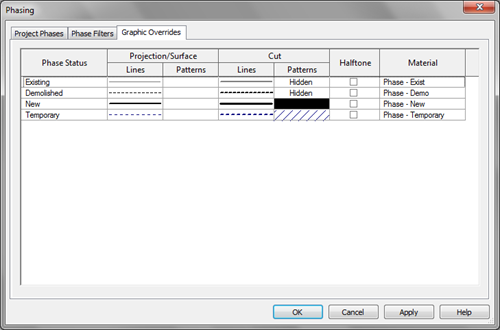
Graphic Overrides
The last tab controls how your object should be shown. You might want to create more phases, and want to control each phases graphical representation. You can manage them here.




My new walls don´t show as new walls with patterns on my sheets. They look like the existing walls, how do i change this? The demolished walls looks like they should.
Hi Adam,
Do you have graphic overrides or filters? They may override your settings.
You can read more about graphic overrides and filters here: https://www.cad-notes.com/controlling-plot-thickne…
I got the walls to work but only when i showed them in demo + new or when i use new. I want them to look like new always. So when i use show all i want the new wall to be with pattern.
I´m new to phases so i don´t really understand everything of it yet, but i´ll try.
Is there anyway to make new doors and windows cut through the wall?