In this Article...
We have discussed how we can apply AutoCAD rendering materials from available Autodesk library. The next problem is, what if what we want doesn’t exist in the library? We have to create our own! But don’t worry. It is not that difficult. It does need several trials and errors, and rendering it.
The nice thing about creating rendering materials these days, it is a lot easier than it used to be.
Let us start.
Open your material browser. On the left top of browser palette, you can see create material dropdown menu. Click it, and you will see several types of rendering materials are available. Autodesk has introduced this several versions ago in AutoCAD. It make us easier to create our own. However, if you want to achieve certain effects, sometimes you need to use generic type, which has all the parameters available.
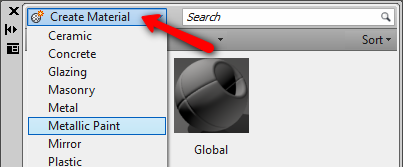
Find which type you want to create. AutoCAD will open editor palette.
Rendering Material Template
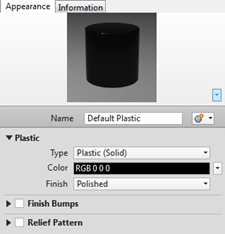
Choosing the right type can make the creating process simpler. Let us review these two different types below. AutoCAD will only show you parameters that are relevant to that type. This can make us easier and focus to only what’s important. For example, for glass we mostly only care about reflection, refraction, and roughness. We do not need to see other parameters, so AutoCAD hide it. Plastic has different behavior. See that AutoCAD will show you different parameters.
 |
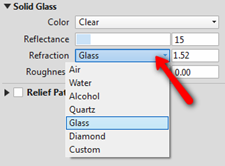 |
| Template for plastic | Template for Solid Glass |
We are going to add more accessories to our interior design. We will add a painting. Download the exercise file here. Your challenge now is to create your own material for the frame and the painting image. Let’s create wood. After you created it, AutoCAD should open the editor. If it doesn’t, double click the new material.
Material Editor
In this editor, you will see 3 separate parts.
(1) is where you can change the preview/swatch shape and the preview quality. For reflective types, you can see better reflection effect in sphere objects. For pattern materials, probably canvas is more convenient.
(2) is where you can create a new material. You can also rename it here.
(3) is where you can change the texture. You can use predefined texture or use bitmap image.
There are more options available. Most of the parameters can be changed using slider or selecting from a list.
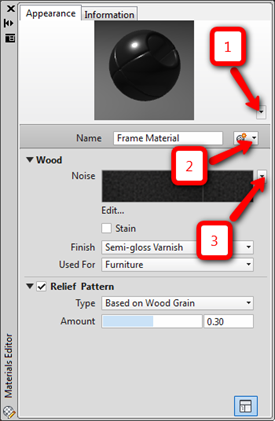
Feel free to play around with this editor. I don’t do many changes. Only change the texture to noise, change the noise color, and change the finish to semi-gloss varnish. After you have done, apply it to the frame. Refer to previous tutorial how to do it.
Texture Editor
Now let us do an exercise to create a new one. Use generic type. Generic material has all the parameters available in AutoCAD. We are going to define the painting. You can use your own photograph, or use any images.
Click image to define the texture.
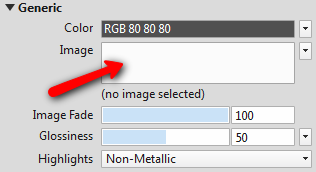
Browse for your image. And click open. You should see texture editor opened.
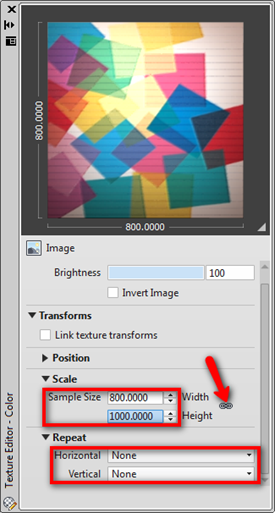
In texture editor, expand the transform category, then expand scale. Define the image scale. In the provided drawing, it is 800×1000 mm size.
Expand repeat category. Change the horizontal and vertical to none. We don’t want this painting to appear tiled, but as a single image.
Apply it to the pic layer.
Test the materials settings by rendering your model.
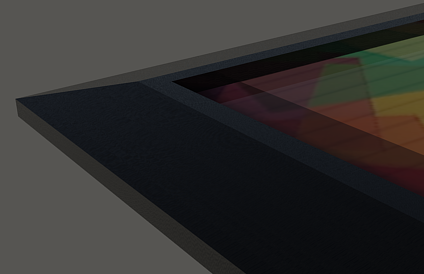
Well, not bad…
Saving To Library
After we created our own materials, we would want to save it to our own library. You don’t want to recreate them every time you want to render your AutoCAD model, don’t you?
In materials library, expand my materials category. It’s at the bottom of Autodesk library. Click to open it. You will see no materials on the right panel, unless you have done this before.
You can directly drag and drop your materials here. Or if you want to create your own category first, right click above my materials, and click create category.
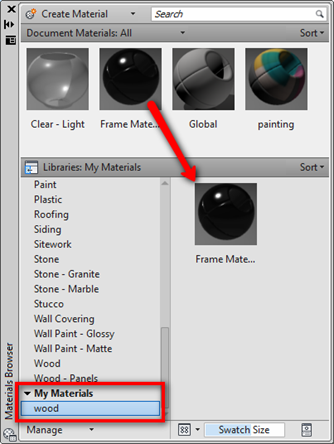
Now you have the materials in your own library. You can use it in your later design.


just one question….
how backup my materials , so use them in others pc???
regards.
MCO.
If you place your materials in tool palettes, you can export the palette then import in other computer. Or you can create a new material library. Basically material library can be shared on network or copy it and open in other computer.