
We have discussed how to add a new command to AutoCAD. We added it to the toolbar. Now let’s discuss how to add it to the context menu. We want this command to appear when we select a particular type of object. This is what a contextual menu all about, right?
This time we will create a command to automatically convert line(s) to a polyline. This is not something new. I’ve seen a lot of people have discussed it in forums or blogs. One of them is in Autodesk Evangelist, Lynn Allen blog. But we are going to do it slightly differently: put it to our context menu.
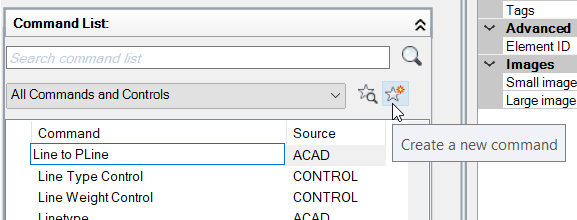
Open your CUI browser. You might want to read the previous post about creating a new command before you continue.
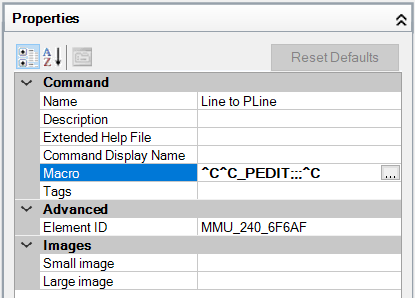
Create a new command in the command list category. Rename this new command. Let’s call it Line to Pline. Or you can use another name that suits you.
Now in properties area, macro field, type this value:
^C^C_pedit;;;^C
A little explanation:
- ^C is similar to pressing [esc], pressing [esc] twice will cancel a running command (if any).
- PEDIT is activating the polyline edit tool.
- ;;; means you press [enter] three times. ; will execute [enter]
In Lynn’s blog she use ^C^CPEDIT;y;; It would work fine too. What’s the difference? Let’s compare to what we do.
- ^C^C is just the same as what we do.
- she uses PEDIT instead of _PEDIT. Mostly using either one of them works fine. Adding underscore is an AutoCAD convention so this macro can be used by AutoCAD in any other language. If you use English, then there’s no difference with or without underscore.
- She uses Y after the first ; If you activate PEDIT and select a line or arc, then AutoCAD will ask you: Object selected is not a polyline Do you want to turn it into one? <Y>
By default, the answer is yes. So pressing [enter] without typing Y will return the value of Yes. She decided to make sure AutoCAD will accept yes as the answer, so add Y then [enter] to do this.
Not different at all, aren’t they?
Now we have done with creating command. Now we have to define a new shortcut menu. Look at the customize section. Find the shortcut menus group. Right-click on it, and click the new shortcut menu. Rename it to Line Object Menu.

What are we doing? We define a condition, when this menu should appear. We want this menu appear when we select line. But it won’t appear when we select other type of objects. We have created the menu, but haven’t define the condition. Now we add this condition on properties section, aliases field.
Click ‘…’ button on this field. Use it, don’t type directly on the text field. Type on each line as follow:
- OBJECT_LINE –> this will enable your menu appear when you select a single line
- OBJECTS_LINE –> this will enable your menu appear when you select multiple lines
Adding both of them will enable your menu to appear on both conditions.

Click OK. You will see your aliases as below. You might have different ID than mine (mine POP520), but that’s not a problem.

Now, drag and drop our new command to this shortcut menu.

Click OK to close your CUI browser. Now try to draw some lines. Select it, then right click. See if it shows up in your context menu.

Kinda fun, isn’t it?


Edwin … Killer site. You are my goto for Autodesk SW customization solutions!
I have been playing around with this feature and it works great! I have blocks that I use all the time that I am putting in on the Default Menu so they are a click away and I don't have to move the mouse much at all. The problem I am having is when it is inserting these blocks it puts them in on the current layer and not the layer the blocks were made from. When I have the block on the tool pallet and click on it there to use, it comes in on the right layer. When I use the same block from this listing feature it does not. And I guess it is the attributes that come in on the wrong layer and not the line drawing parts of the block. Any ideas?
Rmock,
I think you using AutoLISP can be a better solution to this situation. We have a simple tutorial on how you can set active layer then place object. After you finish, it will restore active layer.
Then you can run the LISP using your right click customization. If you are interested, you can read this tutorial: https://www.cad-notes.com/2011/05/creating-layer-and-s…
Or you can describe what exactly you want to do, includes block name and layer name, I think I can make that code for you.