• Home
  • Training Books
  • Subscribe to Our Email Newsletter
  • About
    • Contributors
    • Feedback
    • Contact
    • Privacy policy
    • Cookie Policy
  • Bahasa Indonesia

CADnotes

CAD Tutorials and Best Practices for professionals and students

  • Featured
  • AutoCAD
    • AutoLISP
  • Revit
    • Revit Architecture Basic
    • Revit MEP Basic Tutorial
  • Inventor
  • MicroStation
    • MicroStation Basic Tutorial
You are here: Home / AutoCAD / How to: add custom pattern to AutoCAD

How to: add custom pattern to AutoCAD

April 18, 2012 by Edwin Prakoso 21 Comments

In this Article...

  • Combine with acad.pat
  • Add support file search folder

So you have downloaded or created your own AutoCAD pattern. Now you want to use it. But how?

There are two ways to do this: you can combine your custom pattern with acad.pat or add a support file search path. I will recommend the last one. You may lose your custom pattern if you somehow need to reinstall AutoCAD or your Windows account corrupts. Or you may just make your acad.pat corrupt.

Combine with acad.pat

You can find acad.pat in support folder. It should be something like C:\Users\YOURWINDOWSACCOUNT\AppData\Roaming\Autodesk\AutoCAD XXXX – English\RXX.0\enu\Support. Find acad.pat and open it with text editors like notepad or notepad ++. Do not use Microsoft Word. I suggest you make a backup of this file before you start to work.

Open another instance of Notepad and open your custom hatch. Select all, then copy it using [Ctrl] + C. I use chainlink pattern from DotSoft website.

Paste it at the bottom most of your acad.pat file.

There is a comment that if you add user-defined hatch below that section, then when you upgrade your AutoCAD this file will be migrated correctly.
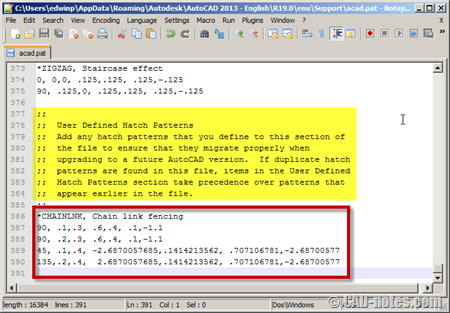
custom hatch in acad pat

However, I still avoid this method.

Now save this file. You should immediately see your custom hatch in pattern list.
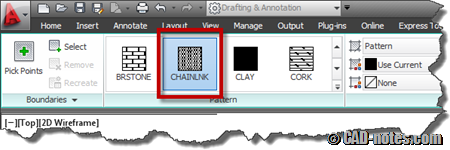
custom hatch in pattern list

Add support file search folder

If you place all your custom hatch in your custom folder, you can add support file search path. Open AutoCAD options (type OP then enter).

In files tab, below support file search path, add your folder.
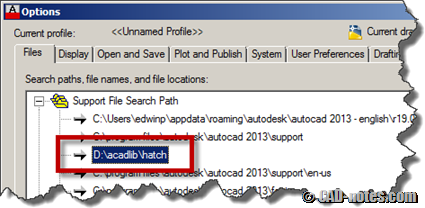
support file search

Click OK to accept this changes, then when you activate hatch command, you should see it in your pattern list. If you can’t find it, you may need to change pattern type to user-defined.

user defined pattern

If you use hatch dialog box, you can change pattern type to custom or user-defined.
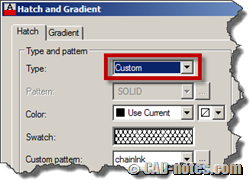
custom hatch in hatch dialog box

I always use the last method and avoid the first one. So I never really have a problem or may be benefits of the first method. If you use the first one, why do you choose to use it? Will you recommend it instead of the last method?

About Edwin Prakoso

I work as a Sr. Consultant in PT Cipta Satria Informatika. I've been using AutoCAD since R14 and Revit since Revit Building 9. I occasionally write for AUGIWorld magazine and I am also active in Autodesk discussion forum. I'm a member of Autodesk Expert Elite, an appreciation for individuals who give contributions to the Autodesk community.
Connect with me on twitter or LinkedIn.

Filed Under: AutoCAD Tagged With: AutoCAD, custom, Hatch, pattern

1 1 vote
Article Rating
Subscribe
Login
Notify of
guest

guest

This site uses Akismet to reduce spam. Learn how your comment data is processed.

21 Comments
Inline Feedbacks
View all comments
Chirag Maheshbhai Oza
4 years ago

NICE WEBSITE. NICE CONTENT KEEP IT UP.
But I am confused about this.
How to use Autocad Hatch?

0
Reply
Chirag Maheshbhai Oza
4 years ago

NICE WEBSITE. NICE CONTENT KEEP IT UP.
But I am confused about this.
How to use <a href=”https://autocadprojects.com/autocad-hatch/”>Autocad Hatch</a> ?

0
Reply
Ernesto Nas
Ernesto Nas
10 years ago

the “Add Support file” really saved me a lot time! thank you for your great help!

0
Reply
VINIL DEV
VINIL DEV
10 years ago

This is really useful one …i used the second one as you describe it feel very simple and easy to work.

thanks dear bror

0
Reply
« Previous 1 2
wpdiscuz   wpDiscuz

Featured

How to: Selectively Select Objects in Revit

Revit model usually is not as complicated as an AutoCAD drawing. You can select objects easier before you modify it. However, in a complex model, you need a method to select multiple objects faster. You want to select them based on specific properties. For example, you want to select all walls with a specific type. Or you want to select all walls with a specific function.
We cover different methods in this article that you can use.

Recent Articles

  • Autodesk Construction Cloud Activity Log
  • Exporting AutoCAD Plant 3D Model to Navisworks
  • Autodesk Data Connector for Power BI is Now Available

Advertisement

New on CADnotes

  • Autodesk Construction Cloud Activity Log
  • Exporting AutoCAD Plant 3D Model to Navisworks
  • Autodesk Data Connector for Power BI is Now Available
  • Autodesk Forma Design Contest
  • Revit 2025: Toposolid Enhancements

Meet the Authors

avatar for
avatar for
avatar for
avatar for
avatar for
avatar for

Get Connected

CADnotes on FacebookCADnotes on InstagramCADnotes on TwitterCADnotes on YouTube

© 2009 – 2025 CADnotes · Feedback · Privacy Policy · Become an affiliate

wpDiscuz