• Home
  • Training Books
  • Subscribe to Our Email Newsletter
  • About
    • Contributors
    • Feedback
    • Contact
    • Privacy policy
    • Cookie Policy

CADnotes

CAD Tutorials and Best Practices for professionals and students

  • Featured
  • AutoCAD
    • AutoLISP
  • Revit
    • Revit Architecture Basic
    • Revit MEP Basic Tutorial
  • Inventor
  • MicroStation
    • MicroStation Basic Tutorial
You are here: Home / Revit / Dynamo / Using the Dynamo Player

Using the Dynamo Player

February 26, 2019 by Edwin Prakoso Leave a Comment

In this Article...

  • Defining Node as Input
  • Renaming the Node
  • Using Dynamo Player

In the last tutorial, we learned how to create a Dynamo script to place an element by defining a coordinate. However, running a script from Dynamo can be confusing for someone who doesn’t understand Dynamo. You can share and run the script from a friendly interface: Dynamo Player.

Here is another reason why you want to use Dynamo Player: when you run the script from Dynamo, the elements created are linked to the script. When you rerun it, it doesn’t create additional elements. It deletes the old elements then recreates new elements. If that is not what you want, then you need to use Dynamo Player.

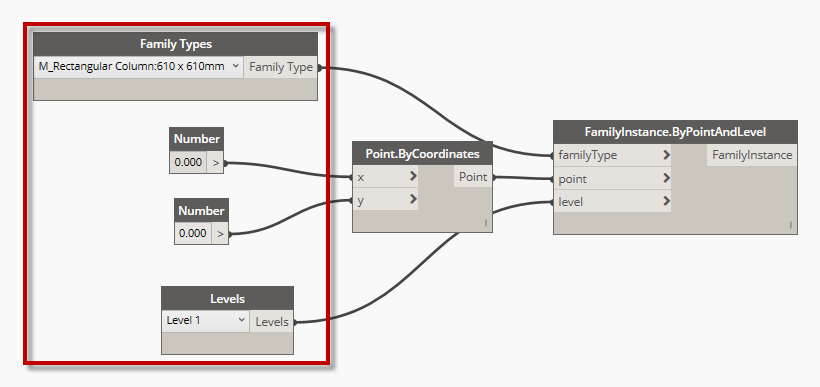
Open the script we created in Dynamo. You should see the script similar to below.

Defining Node as Input

We want the nodes in the red rectangle as our input. We want the users can provide the family type, x & y, and the level. We need to define the nodes as input.

Right click on Levels node then activate Is Input from the contextual menu.

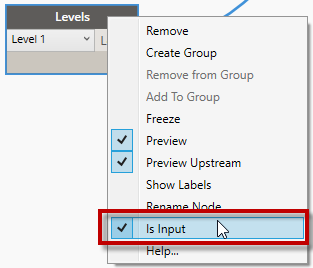
Repeat the process for family types and both numbers node.

Renaming the Node

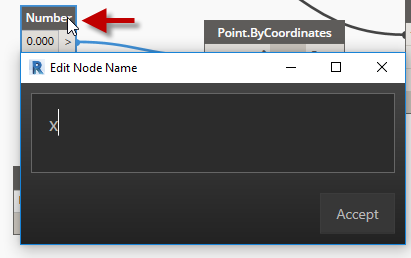
We have two numbers node in the script. We can easily notice which one is the x value, and which one is the y value in Dynamo. However, you’ll never know that in Dynamo Player. We need to rename them.

Double click the node label. Dynamo opens Edit Node Name dialog. Rename the numbers node to x and y.

You may rename the other nodes if you think it’s necessary. Save the script and close Dynamo. Remember which folder you save the file.

Using Dynamo Player

You can find the Dynamo Player tool next to the Dynamo.

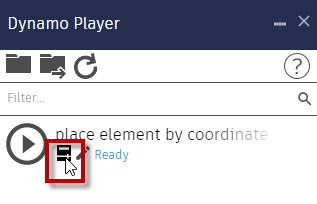
Click the icon. Revit opens the Dynamo Player. You can see a list of sample script and a play button next to each of them. We want to use our own script. Click Browse to Folder…

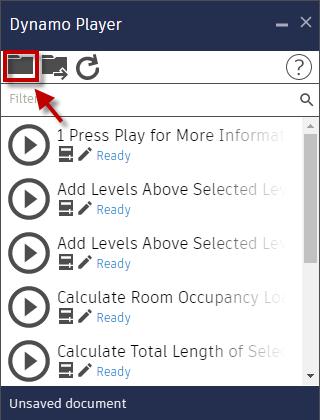
Select the folder where you save the Dynamo script. In this tutorial I only have one script in that folder. If you have more scripts in your folder, you will see them here.

Click Edit Inputs to modify the input value. You can see all available input fields as below. Remember, we provided them before!

Change the value and click play. It may take quite a long time at first. After the script is finished, change the value and click play again.

Now you understand the basic of creating a Dynamo script/program and run it on Dynamo Player. We will learn mode about using Dynamo for changing parameters in the next tutorial.

About Edwin Prakoso

I work as a Sr. Consultant in PT Cipta Satria Informatika. I've been using AutoCAD since R14 and Revit since Revit Building 9. I occasionally write for AUGIWorld magazine and I am also active in Autodesk discussion forum. I'm a member of Autodesk Expert Elite, an appreciation for individuals who give contributions to the Autodesk community.
Connect with me on twitter or LinkedIn.

Filed Under: Dynamo Tagged With: dynamo player

0 0 votes
Article Rating
Subscribe
Login
Notify of
guest

guest

This site uses Akismet to reduce spam. Learn how your comment data is processed.

0 Comments
Inline Feedbacks
View all comments

Featured

Revit extensions: Must have tools for Revit productivity

Do you use Revit extensions? There are so many tools available to extend your Revit capabilities, to increase your productivity. If you haven’t used it, then you should try it now!

Recent Articles

  • Autodesk Construction Cloud Activity Log
  • Exporting AutoCAD Plant 3D Model to Navisworks
  • Autodesk Data Connector for Power BI is Now Available

Advertisement

New on CADnotes

  • Autodesk Construction Cloud Activity Log
  • Exporting AutoCAD Plant 3D Model to Navisworks
  • Autodesk Data Connector for Power BI is Now Available
  • Autodesk Forma Design Contest
  • Revit 2025: Toposolid Enhancements

Meet the Authors

avatar for
avatar for
avatar for
avatar for
avatar for
avatar for

Get Connected

CADnotes on FacebookCADnotes on InstagramCADnotes on TwitterCADnotes on YouTube

© 2009 – 2025 CADnotes · Feedback · Privacy Policy · Become an affiliate

wpDiscuz