• Home
  • Training Books
  • Subscribe to Our Email Newsletter
  • About
    • Contributors
    • Feedback
    • Contact
    • Privacy policy
    • Cookie Policy

CADnotes

CAD Tutorials and Best Practices for professionals and students

  • Featured
  • AutoCAD
    • AutoLISP
  • Revit
    • Revit Architecture Basic
    • Revit MEP Basic Tutorial
  • Inventor
  • MicroStation
    • MicroStation Basic Tutorial
You are here: Home / MicroStation / MicroStation 3D tutorial: Create solid by revolution

MicroStation 3D tutorial: Create solid by revolution

July 13, 2011 by Edwin Prakoso 1 Comment

In this Article...

  • Creating the closed profile
  • Revolving the profile
    • Revolution options
    • Creating revolution
  • Additional detail
  • Further readings

In the last MicroStation 3D tutorial, we covered the basic of solid modeling. We use extrusion and subtract solid. This time, we will cover more tool: create solid by revolution.

In this tutorial, we will create this table.
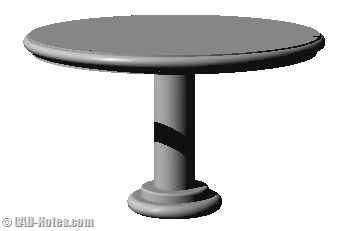
complete table

Creating the closed profile

To create this table, the same rule apply: we need to draw a closed profile first. You can draw this 2D profile in front view.

The dimension unit is in mm. You don’t need to draw the exact size in this tutorial.
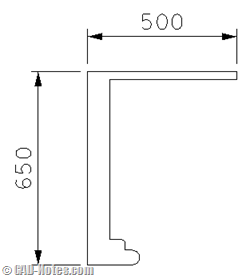
table 2d profile

If creating the profile in one step is difficult, you can draw separate lines and arc. Then convert them to single closed profile using create complex shape tool.

create complex shape

Revolving the profile

After we created the profile, now we will revolve it to make a solid.

create solid by revolution

Find the tool in create solids.

Revolution options

After you activate it, check your tool options.
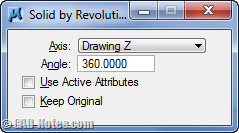
revolution options

You can define the axis by defining points, using view axis (so it depends which view you are working), or using drawing axis. In this tutorial, I use drawing Z.

If you didn’t draw the profile on front view, then you might need to use other axis.

Change the angle to 360 degrees. We want to revolve it to full circle.

If you want to keep the original profile, check keep original. Sometimes we need it when we want to create more objects based on that profile. You can leave it uncheck for now.

Creating revolution

Now we already set the options. Pick your profile from view.

MicroStation already know that you want to revolve it along Z axis. But you need to pick a point where you want to revolve it.

Use image below as reference.
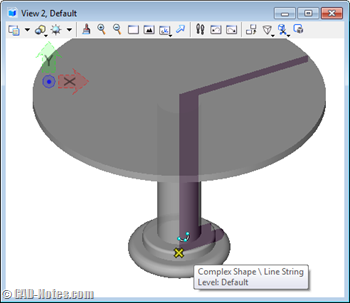
revolution on view

Additional detail

You can continue this table by adding additional details. In this example, I created a profile like this at the edge of the table.
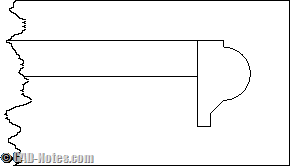
additional profile

After I revolve it, I get this detail on my table.
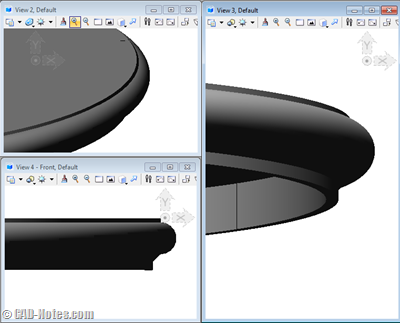
additional detail

Now can you add your own details? Try to combine it with extrusion too.

Further readings

If you have trouble following this tutorial, you might want to check the complete MicroStation tutorial here.

About Edwin Prakoso

I work as a Sr. Consultant in PT Cipta Satria Informatika. I've been using AutoCAD since R14 and Revit since Revit Building 9. I occasionally write for AUGIWorld magazine and I am also active in Autodesk discussion forum. I'm a member of Autodesk Expert Elite, an appreciation for individuals who give contributions to the Autodesk community.
Connect with me on twitter or LinkedIn.

Filed Under: MicroStation Tagged With: revolution, revolve

0 0 votes
Article Rating
Subscribe
Login
Notify of
guest

guest

This site uses Akismet to reduce spam. Learn how your comment data is processed.

1 Comment
Inline Feedbacks
View all comments
Kokoy
Kokoy
12 years ago

These tutorials are the best! It's the easiest to understand and the most fun to read of all the tutorials in the net. But I wish there are more 3D Tutorials. :/

1
Reply
wpdiscuz   wpDiscuz

Featured

3 Things Orient to View in Revit can do for you

Revit orent to view tool might be overlooked. But it can be very helpful to help you work with large and complex models. Here are 3 benefits that you can get right now.

Recent Articles

  • Autodesk Construction Cloud Activity Log
  • Exporting AutoCAD Plant 3D Model to Navisworks
  • Autodesk Data Connector for Power BI is Now Available

Advertisement

New on CADnotes

  • Autodesk Construction Cloud Activity Log
  • Exporting AutoCAD Plant 3D Model to Navisworks
  • Autodesk Data Connector for Power BI is Now Available
  • Autodesk Forma Design Contest
  • Revit 2025: Toposolid Enhancements

Meet the Authors

avatar for
avatar for
avatar for
avatar for
avatar for
avatar for

Get Connected

CADnotes on FacebookCADnotes on InstagramCADnotes on TwitterCADnotes on YouTube

© 2009 – 2025 CADnotes · Feedback · Privacy Policy · Become an affiliate

wpDiscuz