One thing that you will always have during design: to have design alternatives or design options. Every project owner and every designer will want to see some alternatives. How the building will looks like in plan, section, and 3D model. So how we do that in Revit? Do we have to save our design to another file and modify the changes? No we don’t! Revit has a feature exactly for this purpose: Design Options. You can find design option on Revit ribbon, manage tab, design options panel.

Preparing Your Model
Let us create a very simple floor plan first. A simple floor plan like this will do. I use something like this. The size of the plan is not critical. You may also use your own model if you like.

Now imagine we can’t decide how the entrance would look like. We are going to create two alternatives for the entrance. You may want to add more for practicing later.
Activating and Preparing Design Option
Before you use the design options, you will see all the buttons grayed and disabled. Except for design option button. Click the design option button, and you will see a dialog box opened.
On the right hand side of the dialog, you will see 3 groups of buttons.
The first one is to choose which option you want to edit. You need to define option set first.
The second group manage option set. Option set is used to manage which area you want to have the options. You can manage the options for entrance area, options for reception area, option for pantry area… in separate option set.
Third group is the options. In one option set you can have multiple options. For example for the interior option set, you have option 1, option 2, and option 3. For the entrance, you have option 1 and option 2.

You can create new option set, rename it, accept it as primary, or delete the option set.
Click new button in option set group. You will see ‘option set 1’ and ‘option 1 (primary)’ as a child in the option tree. Select ‘option set 1’ from the tree, then click rename button in option set group. Rename it to ‘building entrance’.
And then select option 1 (primary), click rename button in option group. Rename it to ‘stacked entrance’. Add new option and rename it to ‘arched entrance’.

Now we have one option set, and in that option set we have two options. Select the primary option, then click edit selected in edit group. Close the dialog.
Now you will see the plan grayed out and you can’t select the elements in the drawing. This is because the active set now is the ‘stacked entrance’ option.
Optional: Moving Building Elements to Option Sets
One thing that you may have in mind now, what if you want the existing elements are in one of my design option? You need to move it to your option. Imagine that the options are transparent paper you will overlay on your main model. If you want option 1, then you place transparent paper 1. You can then add more elements on that paper. But you can’t change the main model.
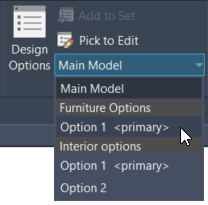
To move your existing elements to an option, you need to switch to main model first. You can do this by selecting from drop down list in design option panel. Select main model from the list.
While you are in main model, you can select the existing building elements. Select the elements you want to move. Revit will open contextual tab, you need to activate the manage tab again.
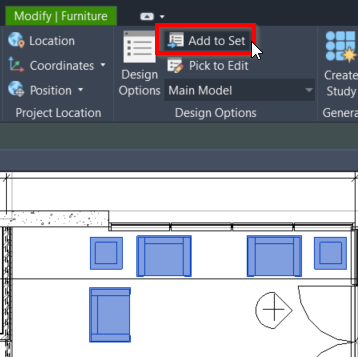
Choose to which option sets you want the element exist. Now you can continue working on each option set.
Creating Options
Select the options that you want to work on.
Add more walls and add door like this. You may add more building elements as necessary.

Now we have finished the first design option. Let us work on the second option. You can change the active option by using drop down menu in design option panel.

Now you will see the entrance door disappear, just like you’ve never worked there before!
Create another design for the entrance.

Now you have two design options for the entrance. Apologies for the design, I believe you can create more attractive design than me :) Don’t forget to review the design in other views. Try to see the 3d view, sections, and schedules.
You can add more option sets for different areas for your design. And have several options for that particular area.
Finalizing Your Design
After you have done with the presentation and choose an option that you will use, open design option dialog. Choose the option, and click make primary. Primary option will always appear even if you are not using design option anymore.
Then click finish editing in edit group to end using design option.


Superb, what a blog it is! This blog gives useful facts to
us, keep it up.
I also have a question with schedules. I would like to create different schedules for the different options. When I tried to create a door schedule it would only count the doors that where in the primary options. Thank you for your help!
Hi Rose,
You can change in visibility/graphic overrides which option you want in that particular schedule.
If you want to show both options, then you need to create two schedules, one for option 1 and the other for option 2.
Hope this helps!
How do put your walls back into Main Model?
Edwin, very interesting explanation on Design Options!
one question, how do you deal with concrete beam schedule, levels and beam marks
Thanks
Hi Raul,
Were you referring to schedule with design option? Or scheduling in general? Generally speaking, you can create column schedule using schedule tool, and filter it by levels.
thanks
it was simple n useful