In this Article...
One of the great benefits of using AutoCAD to create your technical drawings is the ability to adapt AutoCAD to suit your company’s processes. If you can establish a technical drawing process that you perform frequently – you can automate it with AutoCAD. If you’ve ever had to do the same thing with AutoCAD twice – think about how you could automate it so you never have to do it again.
One of the easiest ways to automate a process within AutoCAD is to write a script. In this post, I will demonstrate how to write and develop a script for AutoCAD. In this example we will write a script that will automate a typical plot routine.
What is a script?
In computer programming terms, a script is a programme that will run with no interaction from the user. To AutoCAD, a script file is an ASCII text file that contains a set of command line instructions for AutoCAD to follow – just like an actor reading from a script. AutoCAD script files always have a file extension of ‘.scr’.
Defining a process
Before we can automate a process, first we have to define it. In this example we will write a script file that will create an A1 PDF plot of a drawing. We will work through the instructions that we would usually need to give AutoCAD to make a plot, and make a note of them so that we can write it up into a script.
Recording the steps
AutoCAD script files cannot interact with dialogue boxes, so we need to work out what we would type at the command line to produce our plot. To this end we will use the command line version of the plot command ‘-PLOT’ (the hyphen suppresses the plot dialogue) and we will manually step through the options to produce our plot.
Tip: If you don’t know the answer to the question AutoCAD is asking you, type ‘?’ at the command line and hit return to see a list of available options. Copy these options out into a text file for later reference. You may have to step through the routine a few times to get all the answers you need.
When we have produced a plot manually, we can open up the text window (hit F2 on your keyboard) to review the steps.

Creating the script file
The next step is to open a new blank notepad file (Please don’t be tempted to use Word or another word processing programme for this!). Copy the commands from the AutoCAD text window, and paste them into your notepad file.
Editing out the Junk
The next step is to edit out what you don’t need.
You don’t need AutoCAD’s command line prompts. You do need your replies. In the image below I have highlighted what can be stripped out. An empty line is equivalent to you pressing ‘Return’ on your keyboard, so leave those empty lines in!
Watch out for character wrapping inherited from the AutoCAD text window. Make sure all the text for each step is on the same line.

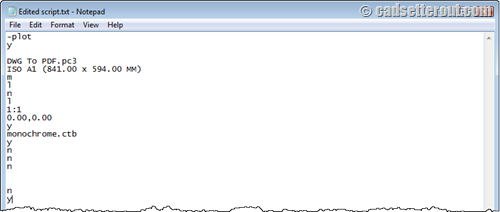
You should end up with something that looks like this:

Don’t forget that you will need an empty line at the end of your script. This is equivalent to pressing ‘Return’ to complete the command.
Testing the script
The next step is to test the script. First, close down the text file and change the file extension to ‘.scr’
Tip: make sure that Windows is showing file extensions before you do this!
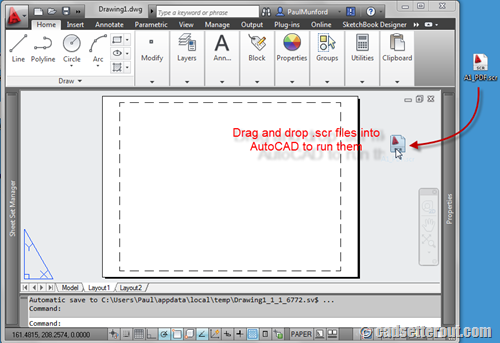
Next, simply drag and drop your Script file into AutoCAD to run it.

Debugging
It may take you a couple of goes to get your script to run. Use the text window to see how far your script ran before it stalled. Make the corrections in the .scr file and keep trying until you are happy!
Adding Comments (putting some junk back in)
Now you have a running script file it is a good idea to add a few comments to remind you what you did. You never know, it might be you who has to re-write the script in six months time…
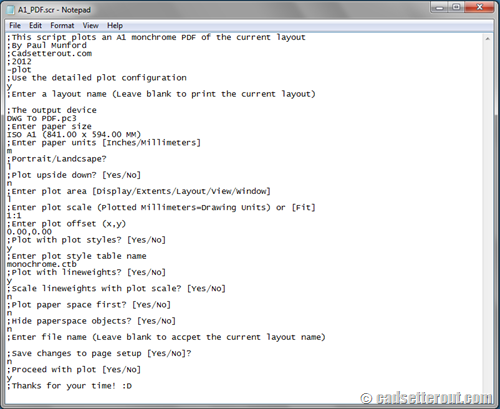
AutoCAD will ignore any line in your script file that is preceded by a semi-colon. My version of the script ended up looking like this:

How could you use AutoCAD Scripting to automate your workflow?
AutoCAD scripts can be used to automate many tasks. You could use a script to add your corporate standard layers or styles to a drawing. You could write a script to update your title block. And of course you could adapt the script we’ve just finished writing to automate many of your plotting tasks.
AutoCAD scripts also work for AutoCAD LT, and you can run scripts on a whole batch of drawings using a windows .bat file or by using the free Scriptpro program from Autodesk labs.
Next time we will look at the differences between scripts and Macros.
Until then – stay lucky.


Good Post.
Cant wait to try this.
You’rᥱ so interesting! I do not suppose I’ve truly read through
something like that before. So great tο discovеr another person with some
unique thoughtѕ on this sսbject. Seriously.. thank you for starting thіs up.
This websіte is one thing that is needed on the web,
someone ѡith a ƅit of oгiginaⅼity!
EZscript-Pro will do just as you descibe. Runs your script and LISP routines on drawings.
Hi,
its been for years am searching for a lisp or a script how to make a simulation, example for a folding sliding timber door in plan.
please help
Dear Paul,
First of all thank you very much for your tutorial.
When I just retyped your script – it works perfect, but when I try to write my own, it doesn’t work
After hours spending on retyping and modification I just give up and ask you for help.
I want to write a script using command PURGE, which could purge the drawing also from all nested items, So I wrote it like this:
;This script purges all elements which can be purged, including nested items
_PURGE
;View items you can purge [Yes/No]
Y
;View items you cannot purge [Yes/No]
N
;Confirm each item to be purged [Yes/No]
N
;Purge nested items [Yes/No]:
Y
Purge All
Close
But when I start to run it, I get this (copy from F2)
Command:
Command: ‘_script
Command: _PURGE
Enter type of unused objects to purge:
Command: Y
Unknown command “Y”. Press F1 for help.
Also another script for the command -PU doesn’t work.
My script looks like this:
_-PURGE
;Enter type of unused objects to purge [Blocks/DEtailviewstyles/Dimstyles/Groups/LAyers/LTypes/MAterials/MUltileaderstyles/Plotstyles/SHapes/textSTyles/Mlinestyles/SEctionviewstyles/Tablestyles/Visualstyles/Regapps/Zero-length geometry/Empty text objects/All]:
A
;Enter name(s) to purge :
;Verify each name to be purged? [Yes/No]:
N
And here is the error:
Command: ‘_script
Command: _-PURGE
Enter type of unused objects to purge [Blocks/DEtailviewstyles/Dimstyles/Groups/LAyers/LTypes/MAterials/MUltileaderstyles/Plotstyles/SHapes/textSTyles/Mlinestyles/SEctionviewstyles/Tablestyles/Visualstyles/Regapps/Zero-length geometry/Empty text objects/All]:
Command: A
Unknown command “A”. Press F1 for help.
:
Could you please tell me where do I make the mistakes?
Greetings,
Justyna
Hi Justyna,
Remember that a carriage return counts as pressing ‘RETURN’ on your keyboard.
_PURGE <<RETURN
<<RETURN AGAIN
;View items you can purge [Yes/No]
Y
;View items you cannot purge [Yes/No]
N
;Confirm each item to be purged [Yes/No]
N
;Purge nested items [Yes/No]:
Y
Purge All
Close
In your case, the first return runs the '_PURGE' command, the second RETURN is replying to the _PURGE commands prompt.
The _PURGE command is now complete, So AutoCAd is ready for the next command, which your script passes as 'Y' – which confused poor old AutoCAD :)
Command: ‘_script
Command: _PURGE <<RETURN
Enter type of unused objects to purge: <<RETURN AGAIN
Command: Y
Unknown command “Y”. Press F1 for help.
Does that make sense?
If it helps, it might be a good idea to get the script running without comments first, and then add the comments at the end.
Paul
Hi this is very helpful! I just created a script followed the steps above and the pdf was automatically saved on the desktop. Is there anything to add in the script so that I can save the pdf to another place?
Hi Miaoxin,
You can define the file and folder path along with the PDF name.
e,g “C:\Test.PDF” (Include the quotation marks).
Paul
Hello Mr. Mundford,
I am a Sales Engineer for Also Energy in the US. We are a PV data monitoring company, and we are working to automate our process for producing monitoring diagrams from a library of component blocks. We would like to be able to enter information about a site and generate a script that knows where the hardware is located by equipment pad, hardware enclosure, and what it is connected to with addressing included.
We are hoping to find someone to work for us as a consultant or do contract work to develop this process. Is this something you are able to do? If not, could you refer me to someone who can?
Thank you,
Samira Smith | Sales Engineer
Also Energy Inc
5425 Airport Blvd, Ste 100
Boulder, CO 80301
Office: 866-303-5668 Ext. 1016
http://www.AlsoEnergy.com
http://www.DECKMonitoring.com
Home of 2 Leading Software Products: PowerTrack and DECK Monitoring
……………………………………………………………………………………………..………..………………….
AlsoEnergy will again exhibit at Intersolar North America, July 12-14 in San Francisco.
See us at booth 8511!
Hi Samira,
I recommend that you start by contacting your local Autodesk re-seller:
http://www.autodesk.co.uk/resellers/locate-a-reseller
Paul
Hello,
what about the command “publish”?
When all layouts are defined properably the publish command is very useful to plot all the layouts. You don’t need any script.
Cheers Jürgen
Hi Jurgen,
You make a good point. This is an example of how to break down a sequence of commands that you know well to turn it into a script. Everyone is familiar with plotting yes?
I actually used to use a script like this with a tool button macro to produce one of test plots. I was very happy to be able to get my drawing plotting with the click of a single button!
I still used PUBLISH for batch plotting though!
Thanks for the comment,
Paul
Thank you, I’m work in the same way. Automate tasks and execute custom AutoCAD commands, functions or scripts over multiple folders loaded in runtime such as ARX, ObjectARX, LSP, VLX, DVB and FAS without open AutoCAD using Autocad core console.
hey dude this was helpful, I-m strugeling since I want to cancel a command using a SCR file I have this…
DONUT
0
1000
195611.8,-15000
line
195611.8,-15000
195611.8,-50000
text 195611.8,-55000 90 REFERENCE_1
I want to add a *cancel* at the end ( like pressinf ESC key) remember this si SCR since I have an LT 2011 version at work. I tryed ^C and ^C^C and a blank space but nothing works
Thank you
Hi Luis,
^C^C will work in a macro, but not a script.
You could try putting in a blank carriage return, which is the equivalent of pressing ‘Enter’ at the AutoCAD command prompt.
Paul