In this Article...
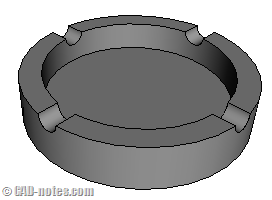
We covered how to use primitive 3d solids in MicroStation in previous tutorial. In this MicroStation tutorial we are going a bit further to create object. We are going to use create 3d solid and modify it.

Basically, these are the steps to create solid 3d object:
- Create a closed profile.
- Create a solid using that profile.
- For more complex 3d objects, we do Boolean operation to combine two or more objects. We can join two solids, or remove a portion from it using other solid, etc.
In recent versions of MicroStation, many new tools are implemented. But those steps are still the most common way to model an object. Even in other CAD applications.
Creating a closed profile
In MicroStation, we can create a closed profile using many tools. Polygons and circle are the easiest way to create a closed profile.

You can also use place SmartLine. Or create complex shape to convert open profile to closed profile. If you are already familiar with 2D design in MicroStation, you should be able to use them. You may want to look at our MicroStation tutorial series to do some exercise to create it.
Creating a 3d solid from profile
There are several tools in MicroStation that you can use to create a solid object. The common tools are by extrusion, by revolution, and by extrusion along.

Creating solid from a profile is not really a challenge in creating 3d models. Creating the profile is. We will get there.
Modify Solids
In most cases, we can’t create a complex object in one shot. We create a solid, then modify it. There are many modification tools you can use here. We will try to use them later.

Exercise: Creating an ashtray
Now let’s try to do a simple exercise. We will create an ashtray.
Create a 3d DGN. If you’re not sure how to do it, read in our first MicroStation 3d tutorial here. Let’s change the master units to cm so we can work easily. Yes, I’m using metric :)
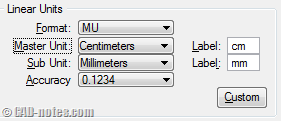
See how you can set your working units in MicroStation DGN here.
Creating first object as base
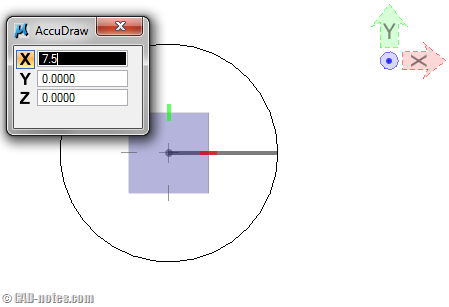
Now we are going to create the first solid as base object. On top view, create a circle with diameter 15 cm.
![]()
- Activate place circle tool.
- In top view, click anywhere to place the center point.
- Move your pointer right, indexed to X positive. Type 7.5 to define the radius, then click data point.
Now let’s create a solid from that circle. We use by extrusion tool.
![]()
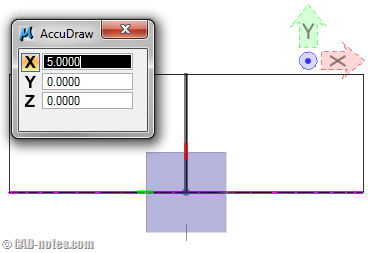
- Activate solid by extrusion.
- Pick the circle using data point.
- Go to front view, move your pointer up the type 5. Click data point.
Creating second solid
We want to remove some portion in the cylinder center to make the ashtray. Let’s create another circle on top of the cylinder. Go to top view, snap top center of top cylinder. Before you click data point, see the other views. Make sure the top cylinder is highlighted. You can also snap the center from front view, but snapping from top view is easier.
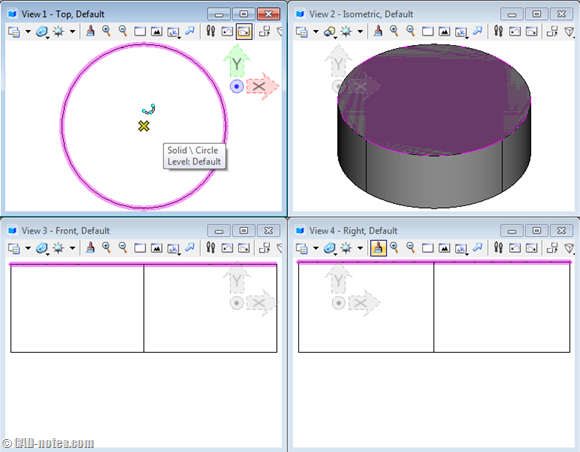
Click data point. That will define the circle’s center. To create the circle, go to top view. Move your pointer away from center point. Type 5 then click data point. It will create a 5 cm radius circle.
Now extrude it down 3 cm.
Subtracting the base solid
Now we have two objects. We are going to remove some portion of the first object using the second object.
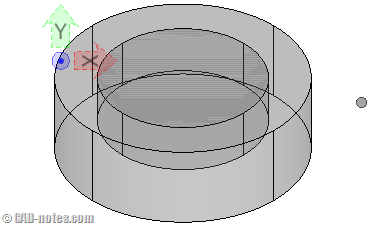
We use subtract tool here.
![]()
- Activate subtract solids.
- Data point the large cylinder as the solid to subtract from.
- Data point the small cylinder as the solid to subtract.
Click again data point to accept the selection. Remember, in MicroStation we use data point to accept.
Now you will see the solid is removed from base object.
This is how we create 3d object. Like drawing in 2d, there are many possibilities how you can complete the model. But the workflow is the same. You repetitively using create solid tools, then modify it to create more complex objects.
Now let’s continue our model. We will remove some portion again to add a place where you can put the cigarette (What do you call it?).
Create another circle in front view. Snap at the quadrant of the top circle. Refer to image below how you can get it. Make sure in isometric view that you are selecting the correct point.
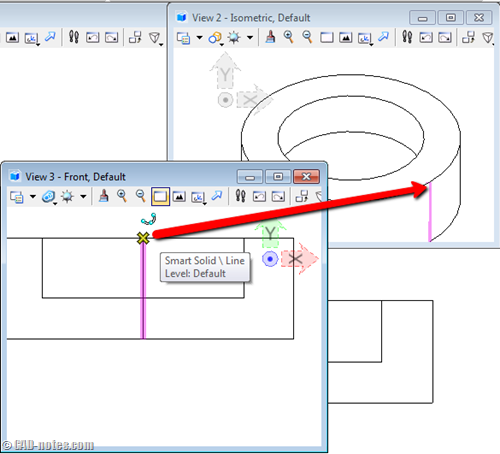
Create a circle with radius 0.75.
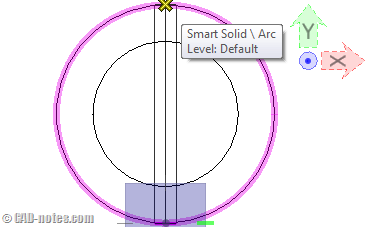
Now extrude the circle. To define the extrusion height, snap to the other end of the cylinder.
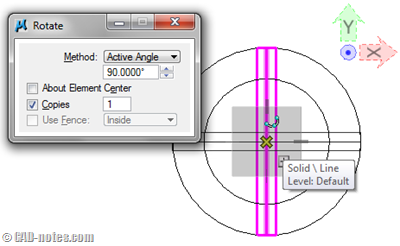
Create a rotated copy of 3d object
We can use manipulate tools to modify 3d objects too. It is the same tool to manipulate 2d objects. Let’s try to use rotate tool.
![]()
In tool setting, change the active angle to 90 deg and activate copies. Click the last cylinder at the mid point.
Now we have the solids we need.
Let’s subtract it again.
Activate subtract tool. Pick the first object we created before. Now pick one of the small cylinder. To select more cylinder, hold [ctrl] then pick the other one.
Click data point to accept it. You did it!
Not difficult to create a 3d model, isn’t it? We will go further in the next tutorial. Stay tunned!
Exercise video
Have a hard time to follow the tutorial? See how to do it in this video.


These tutorials have been really helpful for me at my job. Thank you so much!
wow..great..Thanks for this..i hope there's more 3d tutorial…more power sir.!