• Home
  • Training Books
  • Subscribe to Our Email Newsletter
  • About
    • Contributors
    • Feedback
    • Contact
    • Privacy policy
    • Cookie Policy
  • Bahasa IndonesiaBahasa Indonesia

CADnotes

CAD Tutorials and Best Practices for professionals and students

  • Featured
  • AutoCAD
    • AutoLISP
  • Revit
    • Revit Architecture Basic
    • Revit MEP Basic Tutorial
  • Inventor
  • MicroStation
    • MicroStation Basic Tutorial
  • CADnotes on YouTube
You are here: Home / AutoCAD / How to: Update AutoCAD Block in Multiple Files using Script

How to: Update AutoCAD Block in Multiple Files using Script

May 2, 2017 by Edwin Prakoso 17 Comments

In this Article...

  • Preparing the block
  • Creating the Script
    • The script explained
    • If you use AutoCAD LT
  • Test the script
  • Running the Script with ScriptPro
    • Running the Script Even Faster
  • You can see how it works here
  • What else can you do with ScriptPro?

Updating block is a common issue that AutoCAD users have. Sometimes we need to update a block definition, and sometimes we need to do on multiple files at once. The frequent question I see is how to update title block in multiple files with a new definition. Using a block as the title block is a common practice because we can reserve the text field with attributes. The downside of using a block is when we need to update it. We need to update it on each file.

In this article, we will cover how you can use an AutoCAD script and run it with ScriptPro. We covered ScriptPro before; it might be better if you read it first.

Preparing the block

Before we start, we need to create the block in a separate file. You need to explode the block, then save it as an external file with WBLOCK command.

Save it with the same name as the block. If you want to update block named “title”, then save it as title.dwg.

Save the file in a folder. In this article, we use D:\Data as the example. It’s important to use a specific folder for this purpose and not mixing it with other files. Because we will add this folder in Working Support File Search Path.

Open AutoCAD options. In Files tab, under Working Support File Search Path add the block folder.

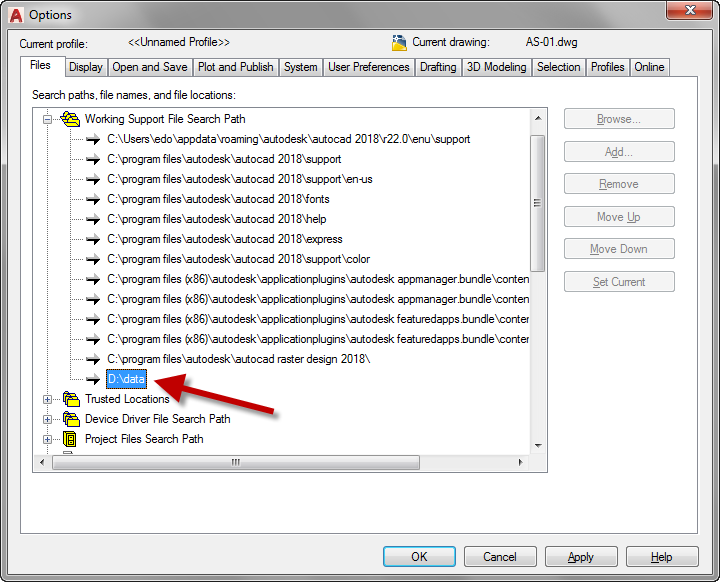
You can place your blocks in this folder. When you need to update a particular block, AutoCAD will search in this folder.

Creating the Script

Now let’s create the script. Open text editor application such as Notepad.

Updating a block definition is simple. We insert a block with the same name, and AutoCAD will update the definition after we confirm it.

The script will be like this:

-INSERT
title=
(COMMAND \E "RESUME")
QSAVE

Type the command in the notepad and save the file as “blockupdate.scr”.

Include the double quote to force Windows saving it in the .scr file extension.

The script explained

  • -INSERT is the command to insert a block definition. The – character is to suppress the dialog box. Because we want to run a sequence of command, we need to run it without a dialog box.
  • title= is the block name. Title is the actual block name. You need to add = to allow AutoCAD update the block from an external file. Replace the block name with yours and don’t forget to add =
  • (COMMAND \E “RESUME”) is the AutoLISP command to replace Esc key. AutoCAD still asks to define the insert point, scale, and rotation angle. We do not insert another block instance to the drawing, so we can just cancel it. However, after INSERT command we still need AutoCAD to do another command. So we add RESUME after the Esc.
  • QSAVE is to save the drawing file. Remember that ScriptPro doesn’t save the file, we need to define it in the script. Don’t forget to add an empty line below QSAVE.

If you use AutoCAD LT

AutoCAD LT can’t execute AutoLISP command. Therefore you can’t use (COMMAND \E) to simulate the Esc key. So you can just add the block and erase it immediately after you place it.

You can use this script as an alternative.

-INSERT
title=
0
1
1
0
Erase
Last

QSAVE

The script will place the block at 0,0,0 with scale 1, rotation 0. Then erase the last object created.

A new line in the script is the same as pressing Enter key once. That’s why we add an empty line after Last. We need to press Enter twice.

Test the script

After you created the script, it is important to try it first. Make sure it works before you run it on dozens of drawings.  Check the command line after you execute the script and see if there’s something wrong.

I tried this script on AutoCAD 2018 and AutoCAD LT 2018. You might see different behavior in a different version.

Running the Script with ScriptPro

After you are sure the script is running as expected, now you can run it on multiple drawings. It’s always a good idea to create a backup before we start. Copy the drawing file before you run the script.

We already cover how to run a script on multiple drawings, so you need to open this article to continue: Run a script on multiple DWG with ScriptPro.

Running the Script Even Faster

Garry Nelson gave me an interesting information about AutoCAD Core Console, the accoreconsole.exe.

Using ScriptPro to do a batch process on multiple drawings is very helpful. But as we run it automatically, we don’t need to see the UI. And we don’t even need to see the file when the process run. You can use AutoCAD Core Console to run it much faster; it’s faster than I thought. It runs the process without an interface, without opening the file. It simply runs with the command line.

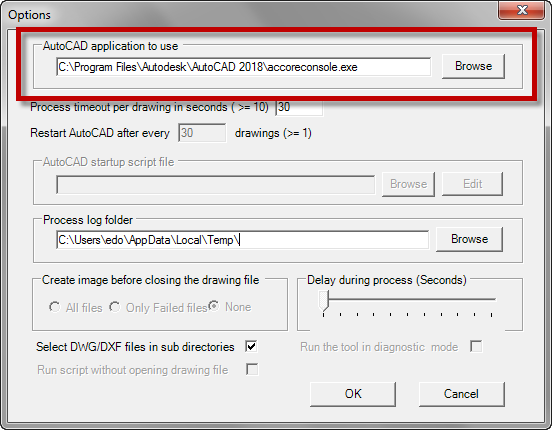
To use AutoCAD Core Console, you need to change the ScriptPro options. In the AutoCAD application to use, set the application to accoreconsole.exe (see the screenshot below). The file is in the same folder as AutoCAD. Usually in C:\Program Files\Autodesk\AutoCAD 201x\

If you want to read more about AutoCAD Core Console, visit Through the Interface blog: The AutoCAD 2013 Core Console.

Thank you, Garry, for the cool tip!

You can see how it works here

What else can you do with ScriptPro?

ScriptPro is very useful tool, and if you can use it right, it can look like black magic. With AutoCAD Core Console, it literally can save very significant time.

Now if you are already usingScriptPro, for what purposes did you use it? If you haven’t used it, do you have a plan how you are going to use it?

About Edwin Prakoso

I work as a Solution Consultant in Datech Solutions, Tech Data Indonesia. I've been using AutoCAD since R14 and Revit since Revit Building 9. I occasionally write for AUGIWorld magazine and I am also active in Autodesk discussion forum. I'm a member of Autodesk Expert Elite, an appreciation for individuals who give contributions to the Autodesk community.
Connect with me on twitter or LinkedIn. If you want to have my new articles sent to your email inbox, you can subscribe to the newsletter.

Filed Under: AutoCAD, Featured Tagged With: ScriptPro

5 1 vote
Article Rating
Subscribe
Login
Notify of
guest

guest

This site uses Akismet to reduce spam. Learn how your comment data is processed.

17 Comments
Inline Feedbacks
View all comments
Tung
Tung
3 years ago

Hi Edwin, I can not found Lisp “the AutoLISP command to replace Esc key” . You can share it?

0
Reply
Tung
Tung
Reply to  Tung
3 years ago

I understood your method, thanks for your sharing.

0
Reply
NTGS
NTGS
4 years ago

Hi Edwin,

Thanks for sharing this information, I managed to get the script to work.

But when the block I’m updating has spaces in its filename I can’t get the script to work. How do you represent whitespace in the script?

Best Regards

0
Reply
John Barrus
John Barrus
Reply to  NTGS
3 years ago

Like this:
”xxx xxx=xxx xxx.dwg”

Exactly like that. Double quote before and after. I did a lot of searching and many attempts to get it to work for me. Just for clarity, that’s 3 xes a space and 3 xes.

0
Reply
Vjt
Vjt
4 years ago

Unable to start autocad

0
Reply
Laison Joseph Albarado
4 years ago

What if there say 50 drawings that are need to updated but not all have the same revision.

0
Reply
Marlon Guerrero
Marlon Guerrero
4 years ago

Hi, ScripPro not work whit autocad 2017, make the process whithout process,

0
Reply
Edwin Prakoso
Edwin Prakoso
Author
Reply to  Marlon Guerrero
4 years ago

But does the script work if you run it without ScriptPro?

0
Reply
Huy
Huy
5 years ago

Hi, i have an issue with this script.
My block name is “X-KHUNG TEN” (it has space in its name) and the script didn’t work.

0
Reply
Edwin Prakoso
Edwin Prakoso
Author
Reply to  Huy
5 years ago

The script should work for all block names. Have you tried to redefine the block without the script? If it works, try the script without ScriptPro. It will be easier to find the problem if you try it step by step.

0
Reply
charlie longcroft
charlie longcroft
6 years ago

Hi,

Great Article. Having some issues with my script. Trying to replace a block with the script. Command line asks – to redefine block, I click yes then, I receive an Invalid message.

Any ideas would be greatly received.

Thanks
Charlie

0
Reply
Edwin Prakoso
Edwin Prakoso
Author
Reply to  charlie longcroft
6 years ago

Hi Charlie,
Have you tried to run it without ScriptPro? What error message did you get? Can you copy and paste the error in the command line here?

0
Reply
Gervase
Gervase
6 years ago

Some very useful information here for pros and novices of CAD

0
Reply
Jay Whitehead
Jay Whitehead
6 years ago

Greetings.

The tutorial looks great. Would you happen to have same one but for a Mac user?

Thanks!

0
Reply
Edwin Prakoso
Edwin Prakoso
Author
Reply to  Jay Whitehead
6 years ago

Hi Jay,
Unfortunately, ScriptPro is not available for AutoCAD for Mac. So no, you can’t use it on Mac OS.

0
Reply
Henry Leon
Henry Leon
6 years ago

Great tool tip. My script does not seem to run properly can you help me? Below is what happens when I run it.

Thank you.
Command: _SCRIPT
Enter script file name : “C:\Users\Henry\LEON & ASSOCIATES\Technology\SPRINKCAD\LISP\blockupdate.scr”

Command: -INSERT
Enter block name or [?]: SPK-CALC-JOB=
Substituting [simplex.shx] for [archstyl.shx].
Substituting [simplex.shx] for [HELVC.shx].
Block “SPK-CALC-JOB” redefined

Units: Unitless Conversion: 0′-1″
Specify insertion point or [Basepoint/Scale/Rotate]: (COMMAND \E “RESUME”)
nil

Command: QSAVE

0
Reply
Edwin Prakoso
Edwin Prakoso
Author
Reply to  Henry Leon
6 years ago

Hi Henry,

It looks like the script works. I can see that the block is redefined.
Have you tested it in AutoCAD (without ScriptPro)? Does it work as expected? Have you checked the DWG file?

You may want to check if you add an empty line below QSAVE. Every new line represents enter in AutoCAD. If you don’t have an empty line after QSAVE, the last line will not be executed.
You can also add a space after QSAVE to execute the space key (which does the same as the Enter key).

0
Reply
wpdiscuz   wpDiscuz
Join Our Free Email Newsletter
  Thank you for Signing Up
Please correct the marked field(s) below.
1,true,6,Contact Email,2 1,false,1,First Name,2 1,false,1,Last Name,2

Featured

6 Things AutoCAD Command Line Can Do for You (Infographics)

AutoCAD Command Line is the most important feature in AutoCAD. Veteran users can use two hands (one on the keyboard and the other using mouse) and draw very quickly. It is faster than relying on the GUI only.

The new users probably using GUI more than older users like me. They prefer the Ribbon and use the Command Line less. 

In this post, you can see 6 things AutoCAD Command Line can do to make your life easier. You don’t have to use them all, but at least you know it can be done. If you think it’s good, use it. But if you don’t like it, leave it.

Recent Articles

  • Revit 2024.1 Update is Released
  • What’s New in Revit 2024: Bending Detail
  • What’s New in Revit 2024: The Dark Theme

Advertisement

New on CADnotes

  • Revit 2024.1 Update is Released
  • What’s New in Revit 2024: Bending Detail
  • What’s New in Revit 2024: The Dark Theme
  • Autodesk Build: Using Assets for Progress Tracking
  • My Home on the ACC Unified Platform

Meet the Authors

avatar for
avatar for
avatar for
avatar for
avatar for
avatar for

Get Connected

CADnotes on FacebookCADnotes on InstagramCADnotes on TwitterCADnotes on YouTube

© 2009 – 2023 CADnotes · Feedback · Privacy Policy · Become an affiliate

wpDiscuz