In this Article...
In my last post for CAD Notes, I showed you how to take a task that you perform frequently, and automate it by turning it into an AutoCAD script.
In this post we will look at another automation tool – the command Macro. We will look at the difference between a Script and a Macro and discuss the possibilities of both.
To review:
- An AutoCAD Script Is an ASCII text file, with the file extension .SCR, that contains a number of instructions for AutoCAD to perform at the command line.
- An AutoCAD command Macro is also a list of instructions for AutoCAD to follow, but a Macro is run from the AutoCAD UI (A tool bar button, menu pull down or short cut key combination). A Macro usually lives within your CUI or on a Tool palette.
I hope to demonstrate that the process of writing a Macro is the same as that of writing a Script. All you really need to automate AutoCAD is a good understanding of the sequence of commands that you need to complete to get the job done.
AutoCAD Scripts
The Good – AutoCAD scripts can contain long lists of instructions for AutoCAD to follow. AutoCAD scripts can be stored in a central location on your server. Should you want to update a Script file, you only need to change it in one place for everyone to get the changes. AutoCAD scripts can contain comments, to remind you what the script does.
If you are using the full version of AutoCAD, you can use the LISP programming language within your script. This is not available to AutoCAD LT users.
The Bad – Loading Script files can be a fiddle, and your users will need to know where to find the Script files. Some internal training will be required to run your Scripts.
AutoCAD Macros
The Good – AutoCAD command Macros can be distributed via the CUI or tool palettes, making it much more intuitive for your users to use. AutoCAD Command Macro’s can contain LISP code, and they can also contain DIESEL code (which is good for AutoCAD LT users). Macros can contain pauses for user input, but be careful – there is no error handling method in a Macro.
The Bad – Writing long, complicated command Macro’s can be very difficult to debug.
Tip: You can of course, get the best of both worlds by using a command Macro to call a Script…
Automate your plotting – reloaded
In the last post, we learned how to examine what we had previously written at the command line to write a script. We end up with this script to create an A1 PDF plot in our default plotting location:
-plot

y
DWG To PDF.pc3
ISO A1 (841.00 x 594.00 MM)
m
l
n
l
1:1
0.00,0.00
y
monochrome.ctb
y
n
n
n
n
y
To write the same routine as a macro, we would put it all on one line, like this:
^C^C-plot;y;;DWG To PDF.pc3;ISO A1 (841.00 x 594.00 MM);m;l;n;l;1:1;0.00,0.00;y;monochrome.ctb;y;n;n;n;;n;y;
Note that, instead of a carriage return macros use the semi-colon to indicate where you would usually press return on your keyboard. Spaces are also interpreted as hitting the return key (just like when you are operating AutoCAD manually). However, using spaces can make your code difficult to read and debug so I suggest that you replace the spaces with semi-colons.
The ^C^C at the beginning of the command is equivalent to pressing ‘Esc’ on the keyboard twice. This should cancel any other commands that are running before your Macro runs. You can read more about the Syntax for AutoCAD Macros here.
Running and Debugging your Macro.
You can run your Macro from the AutoCAD CUI (See Edwin’s post on creating new AutoCAD commands) however I am going to show you how to run your command from a tool palette.
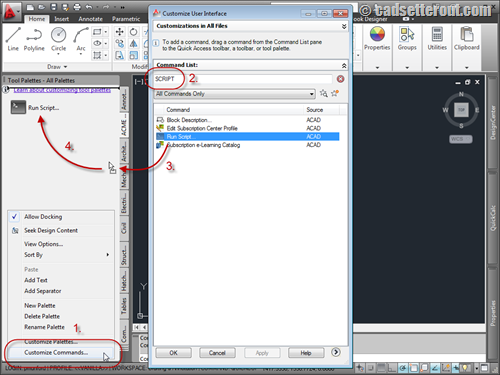
First use the keyboard combination shortcut CTRL+3 to open your tool palettes. Right click over any blank area on your palette and chose ‘New Palette’ to create a new blank palette which we will use for testing our macro.
Tip: These instructions are for AutoCAD 2012. Previous releases may be a little different. If you are new to working with Tool palettes, read Edwin’s post ‘creating your own AutoCAD palette’ for more information on creating and working with tool palettes.
(click image to enlarge)
- Right click over any blank area on your new palette and choose ‘Customize commands’. This will bring up the ‘Customize user interface’ dialogue.
- Type ‘script’ into the search box to bring up the run script command.
- Drag and drop the run script command from the customize user interface dialogue onto your palette.
You don’t have to use the run script command for testing Macro’s, but there isn’t a ‘Run Macro’ command, so it will have to do!
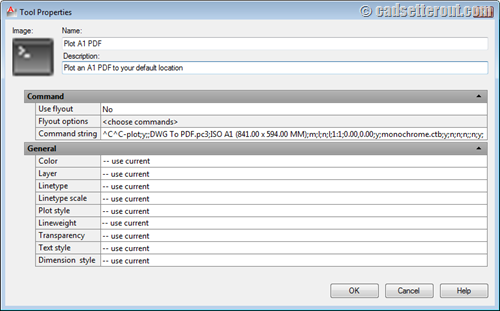
To add your command Macro to the new toolbar button, right click on the ‘Run script’ tool palette button, and chose ‘Properties’. You can now paste your Macro in under ‘Command string’.
(click image to enlarge)
Click on the OK button to close the dialogue and save your Macro.
Finally, click on your new button… and see what happens!
You now have all the fun of debugging your Macro. I hope that it works for you first time. If it doesn’t – Hit ‘F2’ to bring up the AutoCAD text window to see what happened and what you might need to adjust to get your Macro working.
Macro examples
Here are some examples of command Macros that you could use, see if you can work out the commands and options used.
^C^C_fillet;r;0;
Start the fillet command with a radius of zero – Handy for joining reluctant polylines.
^C^C_pedit;m;\\;j;;;
Join multiple lines or arcs into a polyline in one go (this Macro assumes that the variable ‘PEDITACCEPT’ is set to 1)
^C^C_break;\@;
Break a line at the point you click on.
^c^_copy;\;\\_rotate;l;;@;
Copy and then rotate your selection
^c^_zoom;e;_zoom;0.95x;
Zoom a bit more than extents
^C^C-purge;r;*;n;
Purges all registered applications from memory.
^C^C_erase;all;;
Erase everything! – be careful with this one :D
What will you write a Macro for?
Writing Macro’s for AutoCAD can be simple and fun. You can create simple quick Macro’s that will save you time and effort every time you have to create a drawing. You could create a Macro to plot your drawings at the click of a button, update your title block or create geometry on your company standard layers. Or you could create Macro’s to pull AutoCAD commands together that you use frequently.
What will you create today?
-Paul-


can i take a quantity of pipe and duct from hvac 2d drawings using this macro command…… say detaily and contact me 9940802883
Hi Paul,
I am working as numberic codes layer example
Layer F10 and it should change to Tarmac Road and final Layer will be F10_Tarmac Road
Layer T10 and it should change to Tarmac Road and final Layer will be T10_Tarmac Road
Paul
1. Is there any way to wrap text in a script file by adding a character at the end of the line?
2. Can multiple script files be nested in one script file? Can the following be in one file and called from AutoCAD?
; RED BOX
SCRIPT
M:/Lisp-S/RS/RS_X-1-Shored.scr
SCRIPT
M:/Lisp-S/RS/RS_X-2-Reshored_Top.scr
SCRIPT
M:/Lisp-S/RS/RS_X-3-Reshored_Bot.scr
SCRIPT
M:/Lisp-S/RS/RS_X-4-Below.scr
SCRIPT
M:/Lisp-S/RS/RS_X-Grid.scr
Hi Bryan,
No – you can’t wrap text in a script file, But you could use one script to call another.
Hi Paul,
Thank you for this post that clearly explains the differences between scripts and macros.
In the AutoCAD Macros summary you stated:
“AutoCAD Command Macros can contain LISP code, and they can also contain DIESEL code (which is good for AutoCAD LT users).”
Does this mean that AutoCAD LT can run LISP & DIESEL code as long as it is embedded in a macro?
Hi Mark,
Thanks for allowing me to clarify that. The answer is no – AutoCAD LT won’t run lisp code, just DIESAL!
Paul
Thanks, Paul.
I was afraid that was what it meant!
I had a macro that would convert Sq Ft to Acrea
getvar(area)/43650.
Now however I can not get it to work on a new computer,
My compliments for the instruction on Macros. I have about 20 LISP commands that I am going to shorten to Macros. Thanks to what you provided, I anticipate several more. I foresee certain plots going faster. Thank you again for the instruction.
You are welcome Scott :)
My printer at work is called: \\ijmmfdpr01\ijmfollewme1
The macro is doing something weard with the two slashes.
It doesnt work. But if I write it down manually it does work.
What to do?
Hi Daniel,
AutoCAD reads slashes the other way around. Try //ijmmfdpr01/ijmfollewme1
Failing that – try wrapping it in quotes, so that AutoCAD deosn’t try and parse the whole string – like this “\\ijmmfdpr01\ijmfollewme1”
Paul
We have legacy drawings where the blocks for structural items (angle iron, c-channel, I-beam) have lines or poly-lines on 3 or 4 different layers, and different layers at different line weights. Additionally some layers are turned off and NEVER shown, but I am not allowed to delete them.
I want to open up ‘block editor’ then by pushing 1 button, select all entities and set line-weight to ‘by layer’. Then save the block and close the block editor.
Can anyone give me the Macro sequence to do this?
p.s. I used the “action recorder” to record the steps, but don’t see how I can use that as a macro with related button.
Thanks
Hi Ed,
Can you make use of the Express tool ‘SETBYLAYER’ ?
I do everything on layer "0" then change entities as necessary. I have created macros that allow me to change entities to a pre-determined layer, but these are not at all robust as I can only either change two items or use "window" since "" in script is "user input" and my macros have two "" in them. Make sense?
Here's what I'd like to do to update these macros I wrote nearly 20 years ago. . .
I can switch them to the CLAYER command and select a specific layer. Then run the LAYCUR command to switch entities at will to the prescribed layer. Bang, it's that easy. However, I'd also like the same macro to switch me back to the current layer being 0. Any thoughts?
I don't think macro can do that. You can create a simple LISP program for that. But not with macro.
Hi,
I was wondering if there is possible to create a macro that imports a object – I mean when you want to create a line you just hit 'L' + 'Enter', my question is if you could create a similar macro or shortcut, like hitting 'TH' + 'Enter' and a object, that i previously have created in another drawing, comes into the scene.
Like instead of using the 'I' + 'Enter' [INSERT], just goes straight to that object?
Thanks!
Hi Aaron,
This sounds possible. If you can do it at the command line, you can make it into a Macro.
Insert Block
Zoom to object
Select ‘Last’
Paul