In this Article...
In my last post for CAD Notes, I showed you how to take a task that you perform frequently, and automate it by turning it into an AutoCAD script.
In this post we will look at another automation tool – the command Macro. We will look at the difference between a Script and a Macro and discuss the possibilities of both.
To review:
- An AutoCAD Script Is an ASCII text file, with the file extension .SCR, that contains a number of instructions for AutoCAD to perform at the command line.
- An AutoCAD command Macro is also a list of instructions for AutoCAD to follow, but a Macro is run from the AutoCAD UI (A tool bar button, menu pull down or short cut key combination). A Macro usually lives within your CUI or on a Tool palette.
I hope to demonstrate that the process of writing a Macro is the same as that of writing a Script. All you really need to automate AutoCAD is a good understanding of the sequence of commands that you need to complete to get the job done.
AutoCAD Scripts
The Good – AutoCAD scripts can contain long lists of instructions for AutoCAD to follow. AutoCAD scripts can be stored in a central location on your server. Should you want to update a Script file, you only need to change it in one place for everyone to get the changes. AutoCAD scripts can contain comments, to remind you what the script does.
If you are using the full version of AutoCAD, you can use the LISP programming language within your script. This is not available to AutoCAD LT users.
The Bad – Loading Script files can be a fiddle, and your users will need to know where to find the Script files. Some internal training will be required to run your Scripts.
AutoCAD Macros
The Good – AutoCAD command Macros can be distributed via the CUI or tool palettes, making it much more intuitive for your users to use. AutoCAD Command Macro’s can contain LISP code, and they can also contain DIESEL code (which is good for AutoCAD LT users). Macros can contain pauses for user input, but be careful – there is no error handling method in a Macro.
The Bad – Writing long, complicated command Macro’s can be very difficult to debug.
Tip: You can of course, get the best of both worlds by using a command Macro to call a Script…
Automate your plotting – reloaded
In the last post, we learned how to examine what we had previously written at the command line to write a script. We end up with this script to create an A1 PDF plot in our default plotting location:
-plot

y
DWG To PDF.pc3
ISO A1 (841.00 x 594.00 MM)
m
l
n
l
1:1
0.00,0.00
y
monochrome.ctb
y
n
n
n
n
y
To write the same routine as a macro, we would put it all on one line, like this:
^C^C-plot;y;;DWG To PDF.pc3;ISO A1 (841.00 x 594.00 MM);m;l;n;l;1:1;0.00,0.00;y;monochrome.ctb;y;n;n;n;;n;y;
Note that, instead of a carriage return macros use the semi-colon to indicate where you would usually press return on your keyboard. Spaces are also interpreted as hitting the return key (just like when you are operating AutoCAD manually). However, using spaces can make your code difficult to read and debug so I suggest that you replace the spaces with semi-colons.
The ^C^C at the beginning of the command is equivalent to pressing ‘Esc’ on the keyboard twice. This should cancel any other commands that are running before your Macro runs. You can read more about the Syntax for AutoCAD Macros here.
Running and Debugging your Macro.
You can run your Macro from the AutoCAD CUI (See Edwin’s post on creating new AutoCAD commands) however I am going to show you how to run your command from a tool palette.
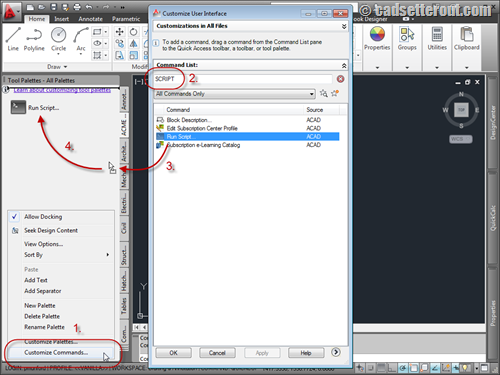
First use the keyboard combination shortcut CTRL+3 to open your tool palettes. Right click over any blank area on your palette and chose ‘New Palette’ to create a new blank palette which we will use for testing our macro.
Tip: These instructions are for AutoCAD 2012. Previous releases may be a little different. If you are new to working with Tool palettes, read Edwin’s post ‘creating your own AutoCAD palette’ for more information on creating and working with tool palettes.
(click image to enlarge)
- Right click over any blank area on your new palette and choose ‘Customize commands’. This will bring up the ‘Customize user interface’ dialogue.
- Type ‘script’ into the search box to bring up the run script command.
- Drag and drop the run script command from the customize user interface dialogue onto your palette.
You don’t have to use the run script command for testing Macro’s, but there isn’t a ‘Run Macro’ command, so it will have to do!
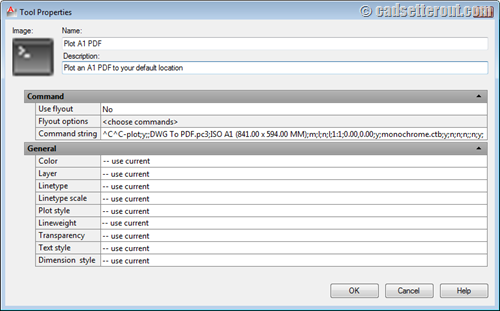
To add your command Macro to the new toolbar button, right click on the ‘Run script’ tool palette button, and chose ‘Properties’. You can now paste your Macro in under ‘Command string’.
(click image to enlarge)
Click on the OK button to close the dialogue and save your Macro.
Finally, click on your new button… and see what happens!
You now have all the fun of debugging your Macro. I hope that it works for you first time. If it doesn’t – Hit ‘F2’ to bring up the AutoCAD text window to see what happened and what you might need to adjust to get your Macro working.
Macro examples
Here are some examples of command Macros that you could use, see if you can work out the commands and options used.
^C^C_fillet;r;0;
Start the fillet command with a radius of zero – Handy for joining reluctant polylines.
^C^C_pedit;m;\\;j;;;
Join multiple lines or arcs into a polyline in one go (this Macro assumes that the variable ‘PEDITACCEPT’ is set to 1)
^C^C_break;\@;
Break a line at the point you click on.
^c^_copy;\;\\_rotate;l;;@;
Copy and then rotate your selection
^c^_zoom;e;_zoom;0.95x;
Zoom a bit more than extents
^C^C-purge;r;*;n;
Purges all registered applications from memory.
^C^C_erase;all;;
Erase everything! – be careful with this one :D
What will you write a Macro for?
Writing Macro’s for AutoCAD can be simple and fun. You can create simple quick Macro’s that will save you time and effort every time you have to create a drawing. You could create a Macro to plot your drawings at the click of a button, update your title block or create geometry on your company standard layers. Or you could create Macro’s to pull AutoCAD commands together that you use frequently.
What will you create today?
-Paul-


Hi Sandeep,
Getting the context right is a little tricky. Check out this thread for some advice!
http://www.cadtutor.net/forum/archive/index.php/t…
Hi,
First I want to say thanks for the tips.
How to open a drawing from my computer by the help of a macro. I mean a standard drawing should open when I click on a toolbar button. How can I ?
* I put the drawing in support folder and apply the macro as "^C^C_open;XXX.dwg", but no way :(
Edwin, It is a common practice in the MEP filed to change the xref background to a dull solid color, usually color 8, so that your work is more visible than the architects stuff.
Thank you for the explanation, Tony. Now it makes sense for me :)
With my autocad 2004, there's a macro button I can load data from dbase to autocad. This is how I do it, first click on 'Load Project' under 'Macro', pick the drawings that I want which is a AutoCAD VBA Source file, then click on 'Load Macro" and type the requirement that match to the data that I want then click on 'Find', once the system find something match to my requirement, then click 'Draw' and all data will be in the pre-set position of the drawings so I don't have to type in every single time. Now I change a new computer with a 2013autocad, but I don't know how can I get this macro button setup. If you can help that would be much appreciate. Many thanks
Hi Carmen,
VBA is not installed by default in AutoCAD 2013.
Here’s a link that might help.
http://blog.jtbworld.com/2012/04/vba-download-for-autocad-2013.html
Paul
Hello I'm a newbie to this macro, just thinking if you have a macro for autocad lt 2014 that can change all layers to colour 8. This will be very beneficial for all MEP cad people that used to setup xref drawings. Thanks in advance.
I'm not sure why you want to change all layers color to 8. But you can use this macro:
^C^C_-LA;C;8;*;;
You can use this to change dimension style:
-DIMSTYLE;R;STANDARD;
You can change standard to any style you want. However, I recommend you to use tool palettes for this purpose.
Nice, Thanks Paul;
I will definetely try my own.
really good….sir can u write something about how to program a auto cad command by c++… i will be very much grateful to you…
That's great stuff Rmock :D
I don't know how old this artical is but after finding out how to use the CUI and make my own macros I have totally remade my right click default menu. We use some standard geometery at work which when I got here was off to one side of the temple, if you needed it, you go over copy and bring back to where your working. That didn't work well for me, to much zooming around the drawing. I made them into blocks and put them on my Tool Palette, which worked well I didn't have to zoom around any more but still had to move my mouse over to screen two select and move back. Now I created new commands with macros and put them into my default right click menu. I don't even move my mouse, just right click select the block I need and place it. So much of a time saver. Now I am always looking for other macros that I can use.
Hi Rmock,
That sounds fantastic. Well done :)
Paul