In previous Revit tutorial, you’ve been introduced about placing exterior wall. Now, we will place the remaining wall. If you are new to Revit, you may want to check our Revit tutorial from the beginning.
There’s no difference between placing an exterior or an interior wall. Only the wall’s properties might be different. And it’s easier to place the interior wall after your building shell is defined.
Now let’s continue our design. Activate your wall tool. Use the same wall type as before. And change the wall height to unconnected. And change the height value to 3000.
![]()
Finish your 1st Floor level walls as below. Don’t mind about the exact position yet. We will correct this later.

Now we will fine-tune our wall position. Click modify tool from the Revit ribbon bar. Pick interior wall left most, 2nd from the bottom of your model.
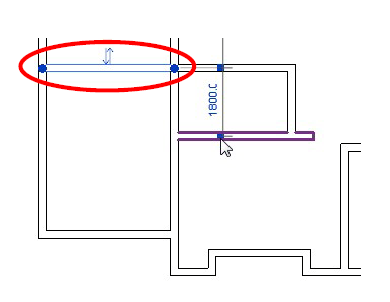
You will see a temporary dimension appears. If you see the temporary dimension doesn’t refer to the bottom-most wall, move the grip by clicking and dragging it.
Click on the dimension value, change it to 5000.
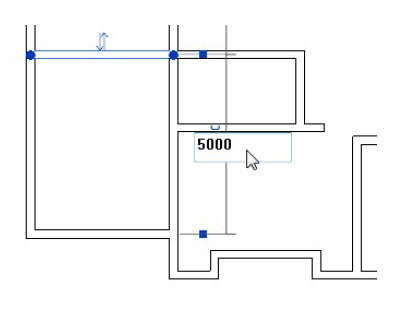
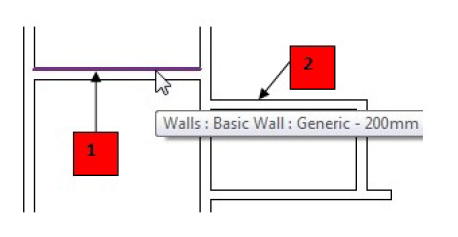
Now see the wall on it’s right. These two walls should be aligned. Activate the align tool. It’s on Revit ribbon bar, modify tab, edit section.

Pick the wall face you’ve moved as a reference (1), then click the wall on it’s right (2). Not that difficult, right? :)
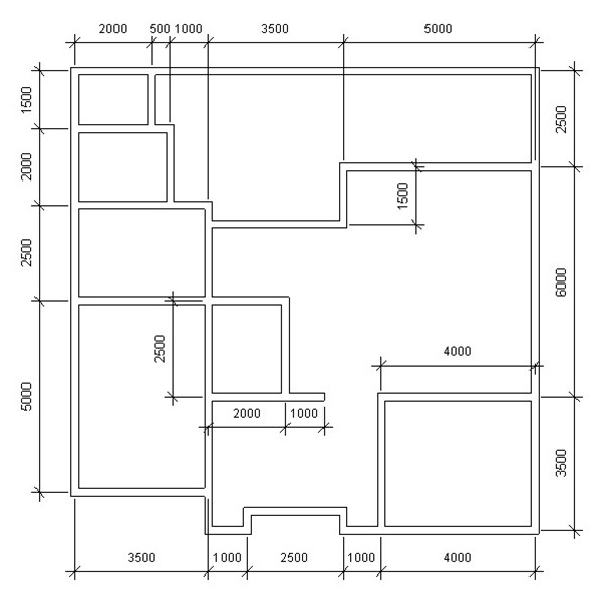
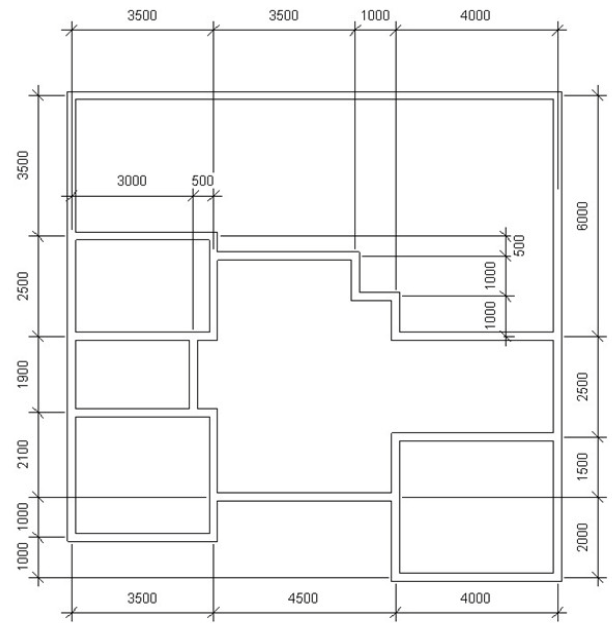
Now, arrange all the walls to match this image. Don’t worry about the dimension. I only put it for your reference. You don’t have to place them right now.
Now let’s move to the 2nd floor. You should see several walls have been placed. This floor shares some walls on the 1st floor. The others, shown in halftone (gray). It means there is no wall in that location yet. It shows the 1st-floor wall for your references.

Finish this 2nd-floor plan. Place exterior walls with height up to roof level, and interior walls with height unconnected, 3000 mm. Use this image below for your reference.
How are you doing so far?
*You can purchase this tutorial compilation in an e-book. Find out the books in our E-Store .


Good day Mr. Prakoso,
Fisrt of all, I want to congratulate you for this awsome and well understanding tutorial for revit. I just started your tutorial but from this stage forward (finishing your walls & forward) a huge domains logo appears instead of the images which makes it hard to continue, is there a way this can get fixed? I really want to continue with this tutorial.
Thank you in advance for your time. Regards!
This is very helpful for me to practice my revit lessons