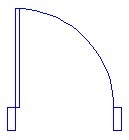
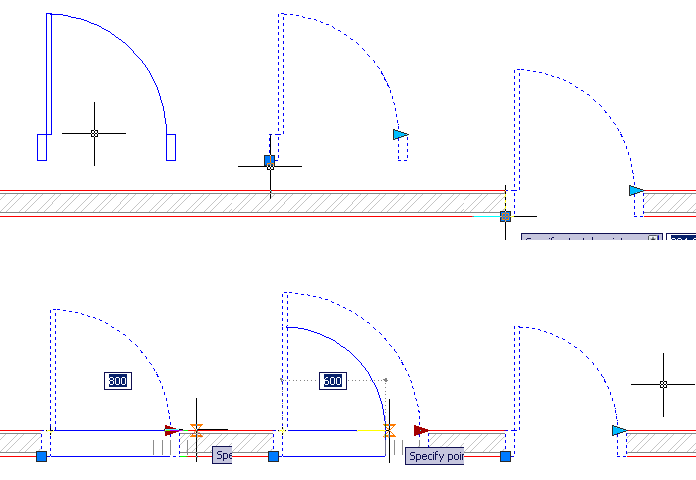
 This is the last object we are going to create using AutoCAD dynamic block. We are going to create a door. Basically it’s not that different with what we did with dynamic block before. But this time, we are going to learn about action properties in dynamic block. We are going to use wipeout as well.
Now, open your previous dynamic block tutorial file. We are going to create all of our dynamic blocks in a single AutoCAD file. This file will be our block library. We will create several dynamic blocks here. Don’t loose it until we finish our tutorial.
Creating the Geometry
In your AutoCAD file, create a new layer: A-Door, with color: blue, and lineweight: 0.09 mm. Set this layer as current layer.
Draw a 50×150 rectangle as the frame. Copy it to it’s right with 700mm distance. Draw a rectangle 30×650 as door panel. Then draw an arc for swing symbol to complete it.
The last thing we are going to add is a wipeout. Activate it, and draw a rectangle wipeout that covers the whole door width.
You will see the door frames are covered by the wipeout. Select the wipeout, right click, then from context menu select draw order>send to back.
Why do we use wipeout? We are going to host our door to a wall. We don’t want to trim or modify our wall after door placement. And modifying the wall length will be reported incorrectly. So we add wipeout to cover our wall later. We will try this at the end :)
Now as usual, create a block from this object. We will create it as dynamic block. Give it name ‘Single Door’. You can define insertion point wherever you think appropriate. Open your block in block editor.
Adding Parameters and Action
We are still using linear parameter. Add a linear parameter as below.
Delete the left arrow. Or you can change ‘number of grips value’ to 1 in properties palette.
There are 3 action we need to add, based to this parameter:
1. Add a stretch action to stretch our door width. Similar to what we do with adding action to dynamic block wall. This time we only need to create a small rectangle to include the right door frame and the wipeout.
2. Add scale action to resize the arc door swing symbol. This action is very simple to add. Just select the parameter, then select the arc. [ENTER] to finish.
3. Add another stretch action for resizing the door panel. Only select the door panel when this action ask you to select object.
Parameter and Action Properties
Placing those action is easy I believe. But we are not finish yet. We are going to limit the size. We don’t want AutoCAD users to change the door size without a guidance. We will change some parameter properties just like we did when we create column. Select the parameter. Change the Dist type to ‘List’ and click the … button to input distance value list.
Don’t forget to change this parameter name to something like ‘width’ or ‘door width’.
*You may want to use Increment. But since the last time we used it, I think it will be better to use list now.
Add more values to define your door width.
The last one, is changing an action properties. Not only parameter has properties! Remember the stretch action for the door panel? Where do you think the door panel will be stretch? Horizontally!
We need to change a property to override this behavior. Select this action, open your palette property. Under overrides category, change the angle offset to 90 degrees.
This will override the stretch action, it will stretch the door panel vertically even the parameter is stretch horizontally.
Ok, we are done! Save block, and close block editor.
If you have difficulties with the tutorial, you can watch this video. But sorry, this video don’t use WIPEOUT. But shouldn’t be a problem, because we are emphasizing on parameters and actions.
One more thing. We still can see our wipeout frame. Let’s turn it off. Activate wipeout, then type F [ENTER] to activate frame option. Type OFF [ENTER] to turn it off.
Command: WIPEOUT
Specify first point or [Frames/Polyline] <Polyline>: F
Enter mode [ON/OFF] <ON>: OFF
Regenerating model.
Try to stretch your door and don’t forget to try placing your door at walls!
*Notes:
- If you can’t see the wipeout covering your wall, select your wall and change the drawing order: send it to back.
- You might want to add flip actions so you don’t need to mirror it.


[…] Additional Materials: Consider wire mesh for ventilation, rubber mats for flooring, and hinges for the stall door. […]
What autocad dou you use?I want to create a door block but i cant catch up your steps ! i dot see the menu’wipeout’ in my autocad 2007? Can you please do a tutorial video to show these steps when using autocad 2007
WIPEOUT is available since AutoCAD 2004. Have you tried to type the command in the command line?
I can not get the door to stretch up watrds it stretches across to the right.
It looks like you haven’t set the angle offset.

Have you checked this property?
hi,my dynamic door works well, but the wipeout did not work .
Here is the file:https://www.dropbox.com/s/juo7ixhvqx46412/dynamic%20door.dwg?dl=0
Hope you can help me
Anyway to make this work with a 45° angle and flip points can't get it to work
I tested also with 90° and the flips dont work the door shrinks
Hello Edwin
How can I convert a drawing which has no block definition with blocks like i have column layer and i want column sizes(parameter) varying for different columns in the drawing
Hello Edwin!
This is my first attempt on blocks in general, and i kinda got it working. But i would prefer to have the door with the width parameter to the outer end of the door frame, which will be more logic regarding actual door sizes. This gives me a problem with scaling the arc, and what i'm looking for is something like a "invisible parameter" that isn't resizable in itself, but scales to the main width. Then the arch could be relative to this "invisible parameter".
Thank you for this tutorial, it really helped me, and i even figured out how to successfully add a wall thickness parameter :)