Let’s get started. You already get familiar with Revit Architecture interface, views, and navigating views in Revit. Now, we will learn how to create a simple 2 story house with Revit as you saw before. We will create it from scratch. We will create it in metric unit.
Create a new project. Use Revit menu file>new>project. Don’t use new project from startup page. We are going to create a new project in metric. Using startup page will use your default template without further question. I will ensure that all of us using the same template.
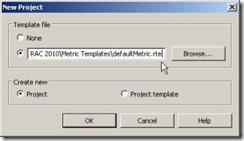
Using the Revit menu will show you this dialog.

Click browse and choose template DefaultMetric.rte.
For imperial users: You might not find it on your computer if your installation is set to imperial measurement. However, you can find metric files in your installation media.
Revit template as a default, has two levels. We will add one more level, then rename the level. Open north view.

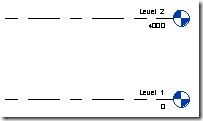
You will see two levels, level 1 and level 2. Revit default template only provide these two. We will add another one.

Activate level from ribbon. It’s on home tab, datum section.
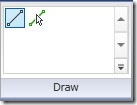
There are two modes of drawing in Revit. You can draw lines (by default) or you can pick lines. Change the drawing mode to pick lines.

Change the offset value in the option bar to 4000. Make sure that make plan view is checked.

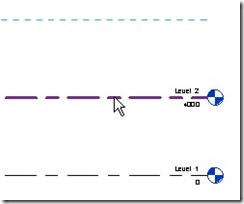
Move your pointer on level 2 reference line.

Make sure you see dashed blue line, then click your mouse. Level 3 will be added.
Now we will rename the levels. Click modify on ribbon bar. Zoom until you see level 1 label clearly. Click the label, wait until you see the label become editable, then rename it to 1st Floor. Hit [enter] after you finish renaming.
You will see a warning box “Would you like to rename corresponding views?” Click yes. You will see in project browser, all view named ‘level 1’ changed to 1st Floor. Includes floor plan and ceiling plan.


Hi,
In my case I create one level like you but this level was create like an Structural Plan. When I use copy the level is just floor plan that I have to add to my Project Browser. Do you know something about this? I’m using Revit Architecture.
Thanks
I can’t create a new level because the datum buttons are not highlighted, even in the north view, how can I get this highlighted? (I am working in Autodesk building design suite premium 2013)
I can't seem to find templates!
I accidently delete the North Elevation on Project Browser, how to get back
Jack,
You can add elevation view and place it at North. It will recreate the view.
sorry, its fredoch01@yahoo.com.
nice tutorials Edwin but, i fink u should try breaking it down a little. for instance, after creating roof, all the procedures for creating fascia was really confusing. i'ld appreciate if u'ld please post a "simpler step by step" version to my email, fredoch012yahoo.com. thank you sir.
DO YOU HAVE THE CONTINUATION FOR THIS LESSON, WHERE CAN I GO TO FIND OUT MORE ON THIS SUBJECT. TRYING TO USE REVIT TO MAKE SOME 2 STORY HOUSE, BUT I'M STUCK ON THE SECOND LEVEL. DON'T KNOW IF TO CONTINUE THE WALL FROM THE FIRST FLOOR OR TO START THE SECOND FLOOR WALLS IN THE SECOND FLOOR LEVEL? ANY GUIDANCE WILL BE WELCOME, EDDIE
Eduardo,
The complete tutorial can be found here:  ;https://www.cad-notes.com/contents/revit-articles/
You can also purchase tutorial books available in our Store.
Right from the start you have lost me!
Step one was OK – Setting up metric template.
When I click OK, I get the view for placeing exterior walls (Four Circles, views)
"level in the menu is grayed out – can't select?????
Can't get to putting walls in id datums are not there?
How do I add a datum level then??????????
Jim
Jim,
To add levels, you have to work on elevation view. In this tutorial, we use North elevation view.