In this Article...
 Autodesk has introduced palette in AutoCAD since a long time ago. If I’m not mistaken, since AutoCAD 2005. It is a very easy way to manage (and create) your reusable content. We will place every dynamic blocks we’ve created there in this step.
Later, we will use palette to access the reusable contents when we draw.
Understanding tool palettes
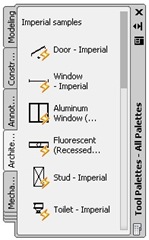
Snipped from help file:
Tool palettes are used to manage blocks, hatches, and other custom tools.
If you see the palettes that are included with AutoCAD installation, you will see a collection of AutoCAD blocks, hatches, and other tools. This is a great way to you who want to customize your own workspace without a lot of work. You can access your blocks quickly, without having to use insert tool, find where your blocks are. It’s just a click away.
You can also manage lines with different line type, line scale, etc dimension with different dimension styles, hatches with different scales, etc. That’s what I love about tool palettes: simple but powerful.
Take a look at this example, I use 2 icons (image below) to manage same pattern, but different scale. We don’t have to activate hatch, find the pattern type, or make adjustment to hatch scale. Simply 2 clicks: activate, and click on boundary.
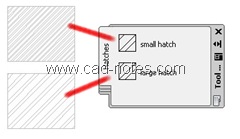
You can also use it for other AutoCAD tools like dimension, lines, etc.
Creating our own palettes
Make sure your tool palette is opened. Right click on tool palette title bar. You will see a list of palettes group on your context menu. Select architecture to activate that group. This will activate architecture group. By default, this sample group only have one palette in it. We will add more here.
Right click again on title bar. Select Customize Palettes from context menu. You will see dialog box like below opened.
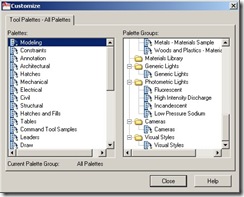
There are two column in this dialog box. The left column, consist all the palettes available. On the right column, we can see how we group our palettes. Architectural group still only have one palette. We will use it as our tool group.
Right click on left column, then select new palette from context menu. Rename it to something like ‘My Architectural Objects’. Find Architectural group on the right column. Your new palette should’ve already been placed here. If it’s not, drag it and drop under Architectural group.
Close this dialog box.
Adding more AutoCAD objects
Before adding objects to our palette, let’s discuss about objects, blocks, and file locations.
For AutoCAD objects like lines, dimension, hatches, you don’t need to keep your file. But if you intend to insert blocks to your palettes, don’t loose your file. Let’s say it this way: That file is your library, and clicking a tool in tool palettes will load that block. So plan where you will put your file. If you want to put it on server, do it before you start placing tools to your palettes. Now we can pretend our previous file that has our wall, column, and door has been save at appropriate place. Open it.
Let’s create a new layer. Name it ‘A-Centerlines’. Use magenta as it color, and lineweight 0. For linetype use ‘center’.

On command line, type LTS then [enter]. Enter value 10 then [enter]. Set A-Centerlines as current layer, then draw a line in your drawing area. Size doesn’t matter.
Now, click and drag the line to our palette. By default, it will be named Line. Right click on that tool, select rename. Give it new name: Centerline.
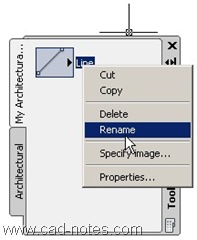
If you want your the tool to look more informative, you can change the ugly line icon with an image (jpg, bmp, etc)
Drag and drop all your blocks here.
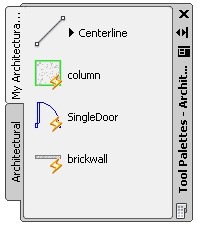
These tools will be named after blocks. There you go. Easy right?
Testing the tools
If you have more tools and blocks, you can arrange your them further. You can create more palettes if you need to. After you’ve done, try to create a new file.
- Check on your layer manager, make sure you only have layer 0 (by default).
- Draw using Centerline tool we’ve just created. It will be created using A-Centerlines layer, with it’s properties! You don’t even need to create a layer! Check your layer properties now. Tool palette can be very useful for maintaining your CAD standard.
- Place all other blocks to your drawing.
Very easy right? Next, we will discuss about AutoCAD template and cad standard. And finally using them all in our design.
I would like to know your opinion about this tutorial series. If there’s anything you would like to add, i wrote something wrong, yours doesn’t work as expected… anything… feel free to write in comments form.


Is there any way to set the image size on a tool palette to be default Large? I know I can right click "View Options" and set the Image Size, but it always defaults back to medium size.
Hi Killian,
In my AutoCAD, if I change the image size it will keep the size. When your thumbnail revert back to medium size? After restart AutoCAD or reboot your computer?