• Home
  • Training Books
  • Subscribe to Our Email Newsletter
  • About
    • Contributors
    • Feedback
    • Contact
    • Privacy policy
    • Cookie Policy

CADnotes

CAD Tutorials and Best Practices for professionals and students

  • Featured
  • AutoCAD
    • AutoLISP
  • Revit
    • Revit Architecture Basic
    • Revit MEP Basic Tutorial
  • Inventor
  • MicroStation
    • MicroStation Basic Tutorial
  • CADnotes on YouTube
You are here: Home / Revit / Revit Architecture tutorial: Creating Railings

Revit Architecture tutorial: Creating Railings

August 18, 2009 by Edwin Prakoso Leave a Comment

We have created a staircase in our Revit model. But it’s not finished yet. There is an open area we have to close by adding railings. On the balcony at the front and back of the building, and on the void next to our staircase. We will finish this in this session.
As this is a tutorial series, if you want to follow this tutorial, it might be better if you follow this tutorial from the beginning.

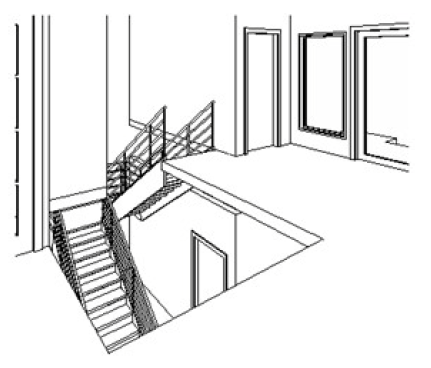
Open your 2nd-floor plan, and place a camera so you can see your stair. You should see your void is wide open. Let’s place railings here so nobody will fall from the 2nd story.

Open your 2nd-floor plan again. As we can see, our staircase already has railings. We will edit the existing railing and add segments to the path. Activate your modified tool. Select the railing as shown below. Press [tab] several times if you have difficulties in selecting it. When it’s highlighted, click it to select.

railing

Now from your ribbon, activate edit path.

edit path

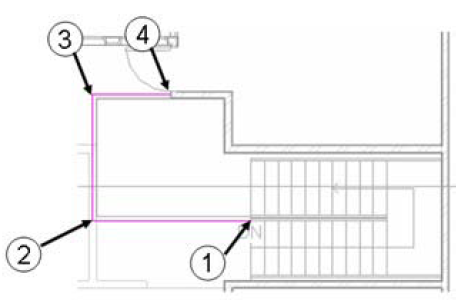
Finish this path like below. Two thing to consider:

  1. Make sure your path is a continuous line. Revit won’t allow if this line has gaps.
  2. The stair railing has a different segment with the void railing. Don’t lengthen the path. Add a new segment. (You might want to try it to see the difference)

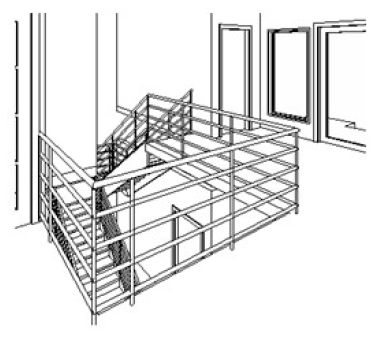
After you finish, click Finish from your ribbon bar.

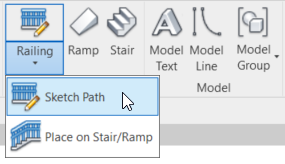
We’ve just edited an existing path. Now we will create a new one on the balcony, let’s start from the front. Activate the railing tool from the Architecture tab, Circulation panel.

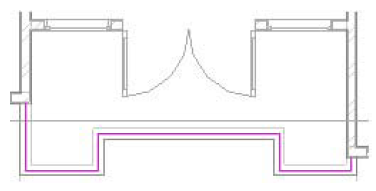
Make sure the chain checkbox is active, and change the offset value to 75.

option bar

Snap to your walls and draw the path as below:

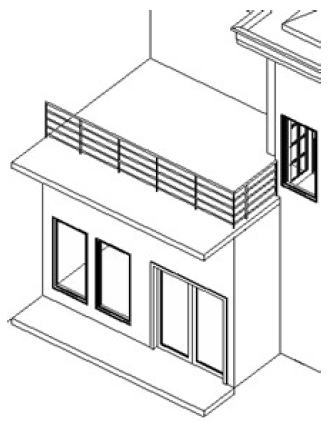
Change the type by accessing properties. Change it to “900mm Pipe”. Click finish.


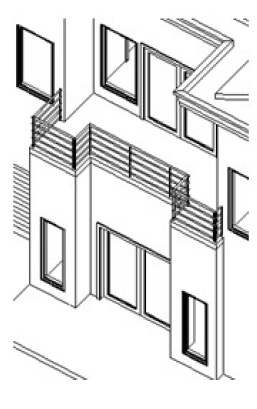
Create railing for the backside balcony, then you are finished in this tutorial.

*You can purchase this Revit Architecture tutorial compilation in an e-book. Find out the books in our E-Store .

About Edwin Prakoso

I work as a Solution Consultant in Datech Solutions, Tech Data Indonesia. I've been using AutoCAD since R14 and Revit since Revit Building 9. I occasionally write for AUGIWorld magazine and I am also active in Autodesk discussion forum. I'm a member of Autodesk Expert Elite, an appreciation for individuals who give contributions to the Autodesk community.
Connect with me on twitter or LinkedIn. If you want to have my new articles sent to your email inbox, you can subscribe to the newsletter.

Filed Under: Revit Tagged With: Revit Architecture Basic

0 0 votes
Article Rating
Subscribe
Login
Notify of
guest

guest

This site uses Akismet to reduce spam. Learn how your comment data is processed.

0 Comments
Inline Feedbacks
View all comments
Join Our Free Email Newsletter
  Thank you for Signing Up
Please correct the marked field(s) below.
1,true,6,Contact Email,2 1,false,1,First Name,2 1,false,1,Last Name,2

Featured

5 Reasons Why You Should Use AutoCAD Block (Infographics)

Here are the reasons why you should use AutoCAD blocks. If you haven’t used it, this perhaps can encourage you.

Recent Articles

  • Revit 2024.1 Update is Released
  • What’s New in Revit 2024: Bending Detail
  • What’s New in Revit 2024: The Dark Theme

Advertisement

New on CADnotes

  • Revit 2024.1 Update is Released
  • What’s New in Revit 2024: Bending Detail
  • What’s New in Revit 2024: The Dark Theme
  • Autodesk Build: Using Assets for Progress Tracking
  • My Home on the ACC Unified Platform

Meet the Authors

avatar for
avatar for
avatar for
avatar for
avatar for
avatar for

Get Connected

CADnotes on FacebookCADnotes on InstagramCADnotes on TwitterCADnotes on YouTube

© 2009 – 2023 CADnotes · Feedback · Privacy Policy · Become an affiliate

wpDiscuz