 In my previous AutoCAD tutorial, I’ve introduced you annotation scaling for dimension. We have added two scales to all of our dimensions automatically. In this post, we will discuss how we use annotation scaling for hatches. We will also discuss how we can control it further.
Two questions popped up when I first time learn about annotation scaling:
- Can we selectively show objects in a certain scales, but not in others?
- Showing annotation in different scales is great. But sometimes it can obstruct my drawings on relatively large scale. But I need it there in detailed drawings.
To answer these questions, let’s open our drawing again. Select any wall, right click, and select block editor from context menu.
Here’s what we are going to do: We want our brick pattern will be not too large in 1:50. And we don’t want this pattern shown in 1:200 scale. Let’s assume we only use those 3 scales.
First, we need to tell AutoCAD this is how we want it look like in 1:100. Change your annotation scale to 1:100.
![]()
Now we need to add annotative behavior to this pattern. Select it, right click, select hatch edit. In the options area, activate annotative.

Click OK to close this dialog. Now try to move your pointer above this pattern, you will see annotative symbol right next your cursor.

Now we need to tell AutoCAD to also show this pattern in 1:50. Select the pattern. Look at your properties palette. If it’s not opened yet, right click and select properties.
In pattern section, click on text field next to annotative scale. You will see … button next to it. Click it.
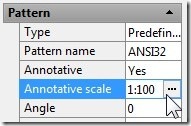
This will open object scale dialog. You will see 1:100 listed here. Click add. Select 1:50 and click OK. Now this pattern will show only in 1:50 and 1:100! This is how you can add scales manually to your annotations. Save this block and close block editor.
Turn off annotation visibility. It’s the button next to your annotation scale list. Try several scales. You should see your pattern only in 1:50 and 1:100. Try to compare how it looks in your layout, different viewport scale.
Now let’s back to our dimension. Add some more dimension using 3mm style like this.
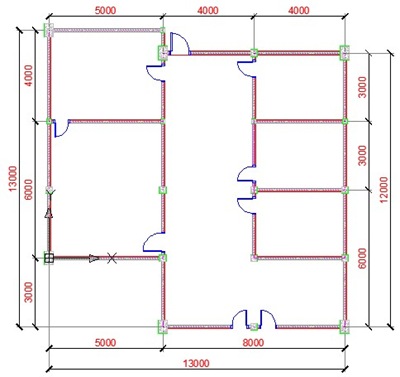
Now, here’s a challenge. Can you show all dimensions in 1:50, but only some in 1:100?
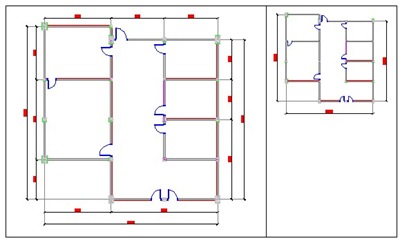
After you finish, here’s the last one on this post.
Activate 1:100 viewport. Let’s pretend that our dimension too far from our drawing. But we feel it’s OK for 1:50. Select a dimension. You will see your dimension showing two sizes: On 1:50 and 1:100.
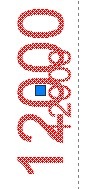
Drag your dimension closer to your drawing. Pay attention to your other viewport while doing this. It’s only adjusted in your active viewport, but not in the other scale! Amazing isn’t it?

Basically that’s all you need to know about annotation scaling. Do you find it interesting? Will you use this feature?
If you won’t, what are your considerations?


This type problems faced in model space i worked but different scale used that time i used 1:100 anther section 1:50 this dimensions showing 1:100. How to fix the problem please.
Please give me your guidance how to hatch
Please give your tips on Hatch
Sir, am I using AutoCad 2017 and have a problem with hatching a object whenever I hatch it And want remove it then all lines associated with that removes wha is my mistake plz help
Hi all
thanks Mr.edwin
it is very difficult in AutoCAD 2015 i am trying it but it is not working , my problem is that we using annotative scale in dimensioning and you have a drawing that you need to make big and small dimension and you have to use same annotative dimension but only you need to change the scale for some dimension and not for all and keep another characteristic
like you have big rectangle 100X100 and inside small circle diameter 2 and you make your annotative dimension style and start make dimensions for rectangle and once you make for the circle the dimension will be big becasue the annotative scale is very big so how to change the annotative dimension scale for circle dimension and cute dimension dynamically without changing the that one for rectangle
Hi Ammar,
You need to use different dimension styles for that. One for the rectangle and the other one for the circle.
THERE ARE MANY GRAMMATICAL MISTAKES… YOU SHOULD PROOF READ YOUR POST. YOU SUCK.
Hi Edwin,
Tried this, followed step by step. When I go to properties, Pattern, Annotative scale. The Annotation Object Scale dialog box only shows on the Object Scale List…1:1.
Did I missed something? Please advise.
Thank you so much.
Here is
Controlling Annotation Scale Further
September 29, 2009 by Edwin Prakoso —5 Comments
In my previous AutoCAD tutorial, I’ve introduced you annotation scaling for dimension. We have added two scales to all of our dimensions automatically. In this post, we will discuss how we use annotation scaling for hatches. We will also discuss how we can control it further.
Two questions popped up when I first time learn about annotation scaling:
1.Can we selectively show objects in a certain scales, but not in others?
2.Showing annotation in different scales is great. But sometimes it can obstruct my drawings on relatively large scale. But I need it there in detailed drawings.
To answer these questions, let’s open our drawing again. Select any wall, right click, and select block editor from context menu.
Here’s what we are going to do: We want our brick pattern will be not too large in 1:50. And we don’t want this pattern shown in 1:200 scale. Let’s assume we only use those 3 scales.
First, we need to tell AutoCAD this is how we want it look like in 1:100. Change your annotation scale to 1:100.
anno scale
Now we need to add annotative behavior to this pattern. Select it, right click, select hatch edit. In the options area, activate annotative.
hatch options
Click OK to close this dialog. Now try to move your pointer above this pattern, you will see annotative symbol right next your cursor.
anno symbol
Now we need to tell AutoCAD to also show this pattern in 1:50. Select the pattern. Look at your properties palette. If it’s not opened yet, right click and select properties.
In pattern section, click on text field next to annotative scale. You will see … button next to it. Click it.
hatch properties
This will open object scale dialog. You will see 1:100 listed here. Click add. Select 1:50 and click OK. Now this pattern will show only in 1:50 and 1:100! This is how you can add scales manually to your annotations. Save this block and close block editor.
Turn off annotation visibility. It’s the button next to your annotation scale list. Try several scales. You should see your pattern only in 1:50 and 1:100. Try to compare how it looks in your layout, different viewport scale
Hi, Edwin
Great articles about automatic dimension scaling! but what about text objects? how to make them appear in the same scale in different view ports? Thank you
Hi Satantra,
The concept is exactly the same with dimension. You can use annotation scaling as well.
Hi Edwin
Could you tell me how to create annotavie block that has got line type phantom so the scale of lines is correct in different scales.
Line type is annotative. If you create a block with phantom line type, when you place it using different scale, LTS will adjust to current scale. In an annotative block or not.
You need to create viewports to see how it works. Probably you can see it in this tip: https://www.cad-notes.com/2010/06/controlling-linetype…
See step no. 2
Please send me some lessons on using Auto cad MEP 2015, as many as you can. Thanks.