In this Article...
This time we are going to work with AutoCAD block. We had a good time when creating label for coordinate. Now we are going to create a similar AutoLISP program. We will create a program to label elevation. But this time we will also use block. Using block has several advantages. We can have more geometries without having to draw them and also can place the text to block attributes.
Before We Start: Preparing the Block File
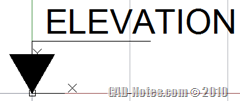
Before we start, you need to download this AutoCAD file. This is the block we are going to use as elevation label.
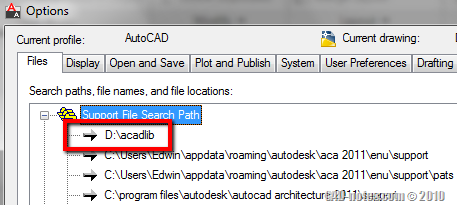
Save the file to your library folder. I save it to D:\acadlib. You may have different location if you want to.
Now we need to set the location as AutoCAD support file search path. Open AutoCAD option. Add the folder location here.

Command We will Use
Easy enough to guess: we are going to use INSERT to insert our block. If you try to type INSERT then [enter] in AutoCAD, it will open insert dialog box. That will not work with our AutoLISP program. AutoLISP will only work if we give input in command line or without dialog box.
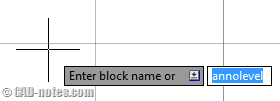
To prevent AutoCAD to load the dialog box, we need to add – (dash) in front of the command. try to type –INSERT then [enter]. See what I’m talking about?

We are going to use that.
Insert block will insert a block with the name we defined in our AutoLISP program. If it can’t find it, then it will search and load DWG name with the same name as the block. Then insert the DWG as block. That is why we define the file location in default search path. AutoCAD will load the file from that location.
The rest is easy. Like in previous tutorial, we can get the elevation value from the coordinate list and insert it to the block attribute.
So our basic program can be like this:
(defun c:cnannolevel (/ labelposition y)

(setq labelposition (getpoint "

Pick Label Position: "))

(setq y (cadr labelposition))

(setq y (rtos y))

(command "_-insert" "annolevel" labelposition 1 1 0 y)

)
More Consideration
If you already tried it, you can see it works nicely. But you may want to consider to allow AutoCAD users to change the block scale. We will do it later in this AutoLISP tutorial.
The next thing is change the label value when it’s at 0 elevation. In my country, many people like to use + 0.00 when it’s at zero elevation. We will add an if conditional to change the value.
Add Ability to Change Scale
If you examine the block, you will soon know that it was created in full scale 1:1. When you need to place it to a drawing with 1:100 scale, then you need to scale it after placing it. We don’t want that, don’t we?
So now we will add one more variable. This time we will let the variable become global variable. So AutoCAD will still recognize the variable after the application ends. And we can use it for other LISP application.
Because we don’t want the program to ask user for scale every time they use it, then we will use conditional IF.
The structure of conditional IF is
(IF (statement) (things to do if true) (else, things to do if false))
I added conditional IF twice:
(if (= cnglobalscale nil)

(setq cnglobalscale (getreal "

Set Global Scale for CN Annotation <1/1>: "))

)

(if (= cnglobalscale nil)

(setq cnglobalscale 1)

)
The code in plain English
- The first conditional will check if the globalscale is not set (the value is NIL). If it’s true it will ask the user for input.
- The second conditional will check if the user don’t give any input and simply press [enter]. Because the user don’t provide value, then the scale still NIL.We assume that they want to use default scale 1:1. That’s why we provide 1/1 in the bracket. We tell user that if they don’t give any value, it will use full scale. This is common in AutoCAD tools to offer user to use default value.
Now the program become like this:
(defun c:cnannolevel (/ labelposition y)

(if (= cnglobalscale nil)

(setq cnglobalscale (getreal "

Set Global Scale for CN Annotation <1/1>: "))

)

(if (= cnglobalscale nil)

(setq cnglobalscale 1)

)

(setq labelposition (getpoint "

Pick Label Position: "))

(setq y (cadr labelposition))

(setq y (rtos y))

(command "_-insert" "annolevel" labelposition cnglobalscale cnglobalscale 0 y)

)
(defun c:cnannoscale ()

(setq cnglobalscale (getreal "

Set Global Scale for CN Annotation: "))

)
I added one more function at the bottom so users can change the scale anytime. Remember, we only ask for scale one time, when the global scale is NIL. So we need to provide them a way to change the scale manually later.
Change Text in Zero Elevation
As I mentioned before, we here would like to have + 0.00 than just 0 at zero level. This is simple. Just like before, we use conditional IF.
Instead of using
(setq y (rtos y))
We use
(if (= y 0) (setq y "%%p 0.00") (setq y (rtos y)))
The code will check if Y value is zero, and replace it with + 0.00. If it’s not, it will use the original value.
Final Code
After we added those features, then this is the complete code:
; CAD-Notes.com annotation utilities

; by: Edwin Prakoso
(defun c:cnannolevel (/ labelposition y)

(if (= cnglobalscale nil) ; this will check if user already has defined the drawing scale

(setq cnglobalscale (getreal "

Set Global Scale for CN Annotation <1/1>: "))

)

(if (= cnglobalscale nil) ; this will check if the user choose default value

(setq cnglobalscale 1)

)
(setq labelposition (getpoint "

Pick Label Position: "))

(setq y (cadr labelposition))

(if (= y 0) (setq y "%%p 0.00") (setq y (rtos y))) ; this will change text when in zero elevation

(command "_-insert" "annolevel" labelposition cnglobalscale cnglobalscale 0 y)

(princ)

)
(defun c:cnannoscale () ; this another function defined to enable user to change scale later

(setq cnglobalscale (getreal "

Set Global Scale for CN Annotation: "))

)
This program works nice. But the problem is the label can’t be updated automatically. Not like using fields. We will cover how to update the value later when we cover entity selection.


THANKS VERY MUCH EDWIN FOR YOUR NICE TUTORIAL.NOW I HAVE A QUESTION WHY DO WE USE SLASH (/ ) WHEN DEFINING A FUNCTION..
how to get mother board sl no using vlisp
how to get name of current running lisp programme by lisp
Nice one Edwin. Very clearly laid out. Well explained.