We published an AutoCAD tip how you can make a view title block. In that block, you can select a scale from the list. In this tip, we will take advantage of the text field.
The benefit of using text field is the text will be updated automatically. A dynamic block also can only have one visibility parameter. By using a text field, it allows you to use the parameter for another purpose. Let’s start creating the block.
Prepare the block
Let’s start by making attributes and the objects to make the view title block. Create a new file and go to Layout tab. We will create this block and link it with a viewport.
![]()
There is already a viewport in this layout. Resize it by moving the grip.
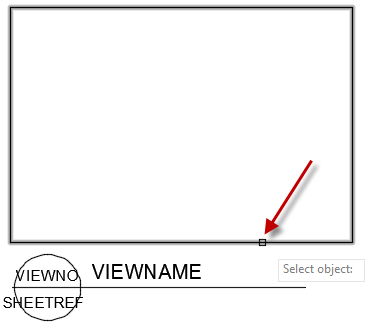
In this example, I created a bubble and a line. I added drawing number, sheet reference number, and the view name.
The scale text will be added in this tutorial.

If you are not familiar with creating attributes, you can watch how to make attributes in the video at the end of this article.
Now add another attribute, type ATTDEF. Fill the Tag and Prompt field. Then click the Insert Field button.
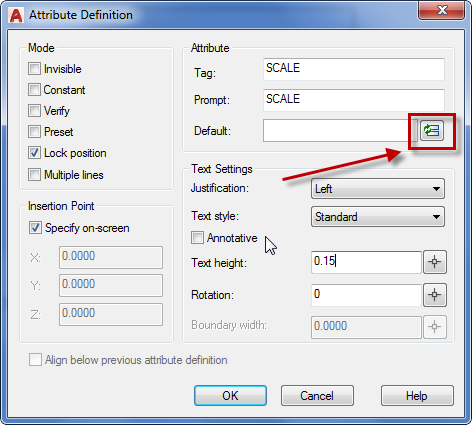
In the field dialog box, select Objects in Field category. Then click select object button.
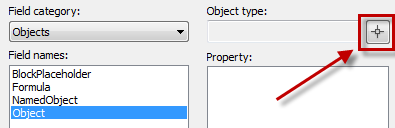
Select the viewport as the object.
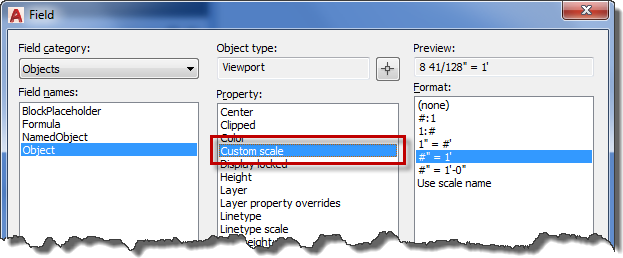
Now you can see the properties is listed. Select Custom scale in the property list. Then select the format that you want to use. In this example, I use #’ = 1′.
Click OK to close the Field dialog. Click OK again to complete the attribute definition. Place the attribute.

Now make a block from those objects and attributes.
You can test it by changing the viewport scale. Don’t forget to type REGEN to see the changes. The text field is only updated if you regen, save or plot the drawing.
Save this drawing. Remember, this is a block library. So save it in a safe place.
Placing the Block in Tool Palette
In the next step, we will add this block to Tool Palette. One thing that you need to remember is the text field is linked to the viewport. So you need to add the viewport as well.
Before we place the block, make another block. This time add the view title and the viewport. So this is a nested block.
Now drag the block to your tool palette.
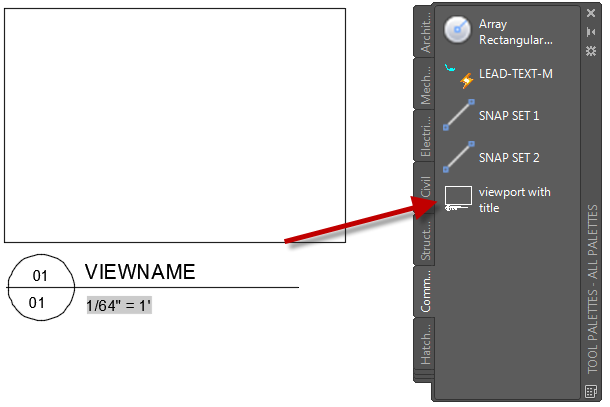
Now you can click the tool palette to place the viewport. But you need to explode the block before you can use it.
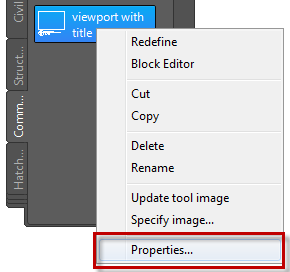
Modifying the tool properties
To explode the block automatically, let’s modify the tool properties. Right click on the tool in the tool palette, then choose Properties… from the context menu.
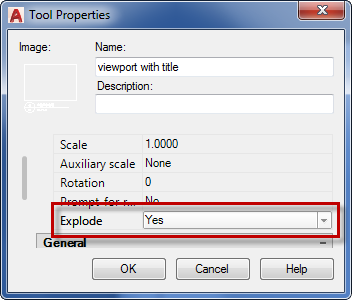
In the tool properties dialog, find Explode below insert category. Change it to Yes.
Now you can close the file. Try to use it in a drawing file; you will see the scale text will change automatically! Isn’t that nice?
Check this video how to make it and how it works. If you can’t see the video below, see it on YouTube here.
To Sum Up
Sheet Set Manager can help you with more automation. You can get the view title, drawing number, sheet number automatically too. We cover the detailed tutorial in our Sheet Set Manager e-book. However, if you don’t use Sheet Set, simple text field can help.
The text field is great for texts that we want to change automatically by acquiring objects’ properties. Have you utilized it? Can you share some examples?


Hi Edwin,
Can you send me the tool palette?
You need to create the Tool Palette by yourself. But you can download the file I use for the tutorial here.