When we work with AutoCAD, we often need to change the set of running object snaps. For a particular drawing, we might need only endpoint snap and midpoint snap. But when we work with another drawing, we might need the center, tangent and quadrant snap. Sure, we can just turn them all. But they will be more annoying than being helpful. Only activate object snaps that you use frequently.
Now if we often change the set of running object snaps, how can we do it quickly?
The OSMODE system variable
The set of object snaps is saved in the OSMODE system variable. The setting is stored as a bitcode.
Look at the table below.
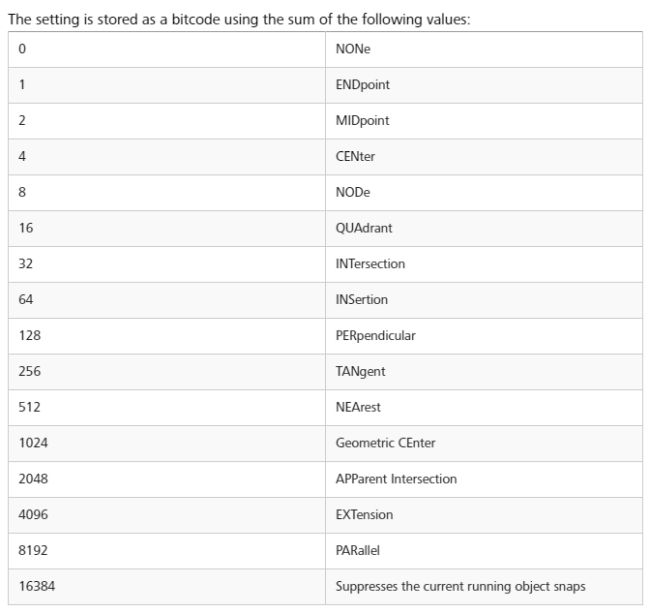
If you want to turn on endpoint and midpoint snap, the value should be 1+2 = 3.
If you want to activate center, quadrant, and tangent, the value should be 4+16+256 = 276.
Does it mean you need to remember those values and good in math? Certainly not!
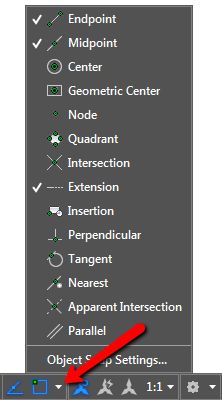
You can change the object snap settings to any set that you want from status bar or OSNAP dialog box.
After you get what you need, type OSMODE on the command line and press enter. Remember the value that shows there.
Now if you have 2 different sets of object snaps, it’s easy to remember. For example, I can just type OSMODE enter, type 4099 enter for my first set. Then if I need to change it to a different set, I can change it to 5137.
That is much faster than opening a dialog box, then check and uncheck several items.
Creating custom tools
If you have more than two number to remember, you may need to create custom commands. You can create a command for each value. There are many possibilities where to place the command.
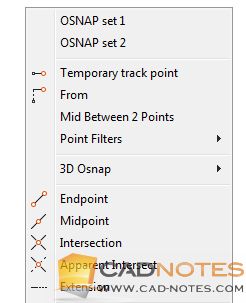
You can put it on the tool palettes, on a toolbar, ribbon or even contextual menu. My favorite is to put it contextual menu. When I press SHIFT+right click, I can see my command there. With other object snap settings.
If you are interested in creating custom commands to change OSMODE, the macro is ^C^C_OSMODE;4099. You can modify the value to your preference.
Depends on where you want to place the command, below is some reference how you can create custom command:
- How to use a macro in Tool Palettes.
- Customizing AutoCAD with CUI: tutorial series.
- Create a custom command with Action Recorder.
For Action Recorder, you need to record your action, not using a macro. After you activate the Action Recorder, type OSMODE enter, the preferred value then enter again.
To Sum up
Object Snap is not the only system variable using bitcode. Bitcode system variables can be changed very quickly if you know the value. Much faster than clicking the check button on a dialog box. You only need to remember the system variable and the values. Maybe you can use a Post-it to help you remember.
And you always can create a few commands if you don’t want to remember them!
You also can use this tip for SELECTSIMILAR and LOCKUI.


Detailed and thorough article. It is very helpful for beginners in this AutoCAD field. We do use AutoCAD for creating 2D floor plans. AutoCAD software is our first choice. Again, thank you for this post.
Great Edwin, I have very enjoyed this blog very informative and easy to understand. Thanks for sharing such a great information with us!
It helps in deciding the points of the objects.
For instance when moving a SLINE parallel by pressing the blue arrow, OSNAP turns automatically on. So to disable, one must press F3 after. It should be possible to select “never turn OSNAP on automatically”, to avoid pressing F3 every time. If you have any hints on disabling that OSNAP turns on automatically, please help.
Great tips! Edwin you are simple the best in this business. Grateful to have linked with you.
Thank you for the kind words, Salfa.
I’m glad that you like it!
Greetings from Holly Jerusalem
Thanks for the tips,I did not know this method
Great tutorial as I hadn’t thought to add items to a contextual menu.
For object snaps I added the individual Snap keys (Snap, Endpoint…) to the CUI, Keyboard Shortcuts, Shortcut Keys and assigned them to Function keys F5-F7, F9-F12 as I don’t use the stock shortcut keys assigned to them.
F4 is assigned to new item “Perspective” with the command setvar;Perspective;0 since I find parallel projection to be a hindrance in how I work and haven’t found a way to keep it from setting back to 1.
Another version of your macro:
‘setvar;osmode;$M=$(if,$(=,4099,$(getvar,osmode)),0,4099)
to toggle it off/on with the name EndMidExt and description:
Set End, Mid, and Ext Object Snaps.
After adding it to a menu change the name at the top under Display to:
$(if,$(=,4099,$(getvar,osmode)),!.)EndMidExt
Now the macro works transparently and displays if it’s current.
When using Parallel and Extension I toggle SHIFT to acquire off with a macro:
‘setvar;polarmode;$M=$(if,$(and,8,$(getvar,polarmode)),$(-,$(getvar,polarmode),8),$(+,$(getvar,polarmode),8))
which toggles SHIFT to acquire Off/On
Excellent macro Tom!
Thanks you for sharing this.
Thanks Edwin for your good work. I am requesting if possible you can email the pdf format tutorials on Learning AutoCAD. I have already installed AutoCAD 2013. Kind Regards.