In this Article...
We have learned how we can control object appearance in Revit using Object Styles. As we learned, settings in Object Styles will apply to all views. In our design, we often need to change the appearance in a specific view but not the others.
For example, we want to show the furniture in interior design but not in structural design. Or maybe you want to show more colorful drawings for presentation drawings but not in architecture drawings.
Let’s see how you can change the object appearance in specific views.
Visibility/Graphic Overrides
Visibility/Graphic Overrides has the exact same settings as Object Styles. The only difference in this setting is: it only apply in one view. You can override model and annotation categories by switching to another tab.
If you change the overrides in 1st Floor Plan view, it won’t affect 2nd Floor Plan View and other views.
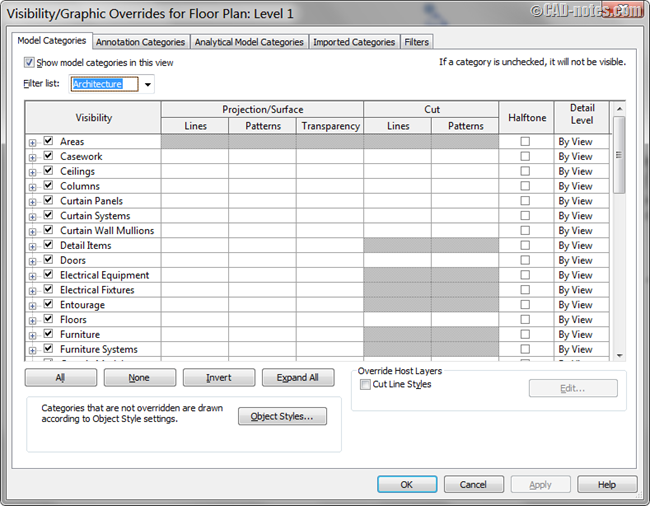
You can access Visibility Graphic from Revit ribbon> View tab> Visibility Graphics.

You can also open Visibility/Graphics Overrides by pressing VG as shortcut
Filters
Still in Visibility/Graphics Override, you can also use document filters. Document filters allow you to control objects in multiple categories at once.
You can filter objects by their properties and then change their appearances. (Read: 3 Benefits of Using Revit view filter). It means that you can also change appearance of objects in the same category, but have different properties.
You can access document filters from Visibility/Graphics Override dialog> Filters tab.

To create a new filter, click edit/new button at the bottom.

Click new to create a new filter.
![]()
Next you can define the object categories that you want to include in this filter.
In the 2nd column, you can choose what category you want to include. In this example only walls in selected.
In the 3rd column, you can define rules if you want to filter objects by their properties. You can use multiple rules here. In this example, only exterior function is used here.
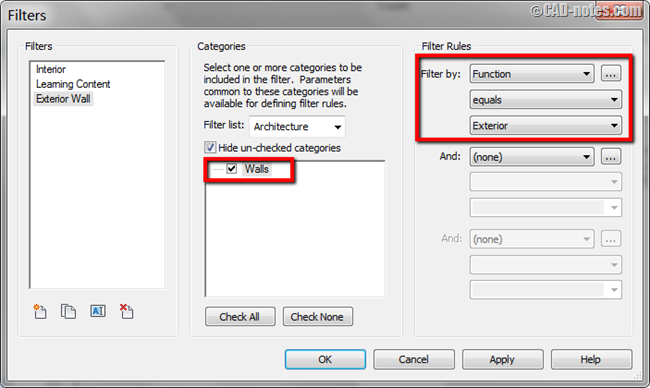
After you define the filters, click OK to go back to Visibility/Graphics Override.
You have defined the filters. Now you can use them here.
Click Add to add filters that you want to use.
![]()
After you add the filters, you can override their appearance similar to what you can do with Model Categories in Visibility/Graphic Overrides.

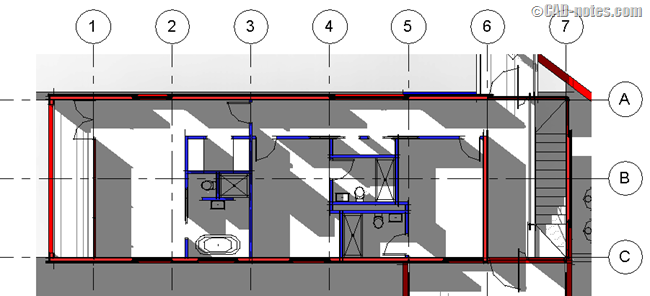
This is an example how you can set different colors for walls. The red walls are exterior walls, and the blue walls are interior walls.
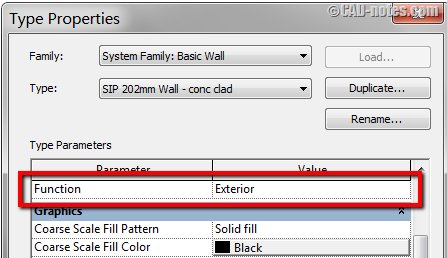
Where is this exterior/interior function defined? It is saved in the type/instance properties. For wall function, it is saved in Type Properties.
You may need to explore the properties further to have better control when using filters.
View Templates
To get visualization that you want, you may need to change many settings in a view. If you want to apply the same settings to other views, you don’t have to do all the settings again. You can save it to a view template.
You can create view template by saving from a view or you can change the settings manually.
If you already have a view that you want, you can save the settings.
Open the view that you want to save the settings, click Create Template from Current View. You can access it from View tab> View Templates.
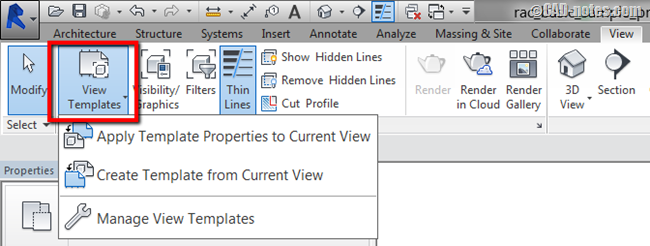
To apply the template, open view that you want to override then click Apply Template Properties to Current View.
If you are more adventurous, you can explore the settings in Manage View Templates.
All view templates are listed here. You can change any view settings from this dialog. If you change the settings here, all views that use the template will be updated with the new settings.
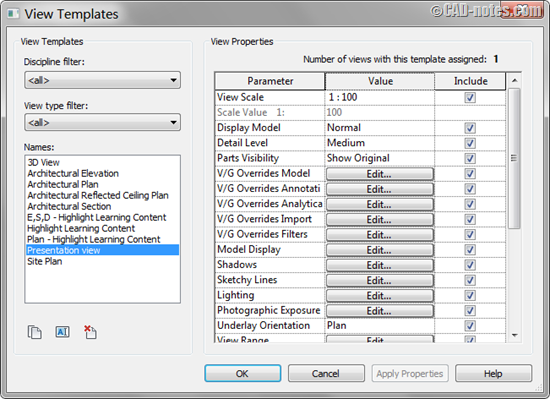
If you use View Template, you can’t override View Categories in that particular view. The settings will be greyed out and can’t be changed.
Override Category/Elements View
You can also change elements view by overriding individual object or selected objects. Select objects that you want to change, right click and choose Override Graphics in View> By Element.
An example of using this override is when you want to make far objects look thinner.
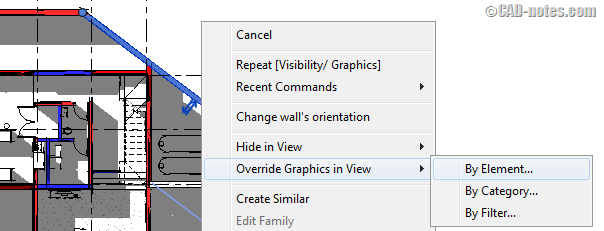
The other options, By Category and By Filter is the same as using Visibility/Graphics Override. If you change the view properties here, the settings will be applied there also.
Conclusion
I found that many people fear that they can’t change view appearance in Revit easily. Revit actually has many options to do that quickly and easily.
If you want to change appearance for objects in all views, use Object Styles.
If you want to change appearance for objects in specific view, use Visibility/Graphics Override.
And if you want to control the appearance further, use filters.
You can save all the settings so you can reuse them in other views, using view templates.
You can override single or multiple objects without following any rules too, by overriding the settings by element.
It’s quite easy, isn’t it?


