We covered how to draw precisely using AccuDraw. Now we continue how to draw precisely using AccuSnap to get a reference point.
When we place drawing elements, we need to reference to an existing point. We need to place a point exactly at the end of a line, midpoint of a line, center point of a circle, et cetera. In MicroStation, we use AccuSnap to do this. You have used AccuSnap for snapping your data point to a line end before, now let’s get to know it better.
AccuSnap only active when MicroStation is asking you for a data point. It means when you need to place a drawing elements or define a data point during modify or manipulate your drawing elements. When MicroStation doesn’t ask you for data point, AccuSnap is not active.
By default, the AccuSnap mode is set to find key points. Key points are different for each object type. For example, key points for lines are the end points and mid point. Key points for circle are at its octants (every 45 deg) and its center point.
Open a new drawing, create several objects in it. Rectangle, lines, circle, arc, et cetera. Don’t worry about their size. We just use it to understand the AccuSnap behavior. We will do a drawing exercise on the next tutorial.
Try to activate a drawing tools. Let’s use Place SmartLine. Move your pointer close to those objects and see when and where the AccuSnap appear.
Overriding Snap Mode
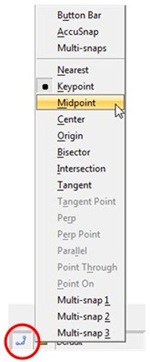
During the design, we need to use more snap tools than just the key points. Don’t worry, MicroStation has enough tools you can use. You can override the default mode by clicking the AccuSnap button on status bar.

Or if you feel more comfortable with toolbar, you can show the button bar. Click the AccuSnap button and select button bar.

How come the toolbar only showing a few mode, not as many as in menu? Right click on the toolbar, and activate other mode you may need. Or, simply click show all. There you go; you have the entire snap mode you can use!
Active and setting default Snap
How do we know which mode is active? Active snap is shown as a pushed icon. When you see the center point icon is pushed, then the active snap is center point. But there is more.
![]()
See the key point snap icon? It’s also pushed, and it’s shown in gray. The grayed button means it’s the default snap mode.
Activate Place SmartLine. Try to override the mode to center point. Click on a circle to snap to its center. After defining a data point, the key point will be back as the active snap mode. This is very useful if you only need to change the snap mode for a point, and still want the key point as default snap mode.
On the snap menu, the default mode will have a blank circle on the left of it. While the active snap mode have a filled circle.

If you need to change the default mode, you can do one of these:
- Double click on a button in snap toolbar
- Click the snap button on status bar, hold [shift] and click on a snap mode you want.
If you have finished playing around with the default snap mode, make sure to switch it back to key point.
Tentative Snap
Do you remember which button is the tentative snap? Yes, press the left and right mouse click together. I know some of you may not feel comfortable with it. I will show you how you can choose another mouse click combination for at the end of this post. Let’s just use the default for now.
If you move your pointer close enough to a key point, you will see this point.

It’s almost like the snap point, but it’s not yellow. It’s a dashed cross. If you move your pointer closer to that point, then it will change to snap point.
Let’s move your pointer until you see the tentative point. Click the tentative icon. MicroStation will show you which point you are attempt to snap. The tentative point becomes a large white cross, and MicroStation highlight the object. If you see it is snapping to correct point, click data point to accept it.
This is important if you have a lot of objects in your drawing. You can review whether you are snapping to correct object or not. If it’s not, click reset (right click) to cancel it, and try it again.

Changing the Tentative Snap Assignment
If you still feel uncomfortable with clicking two buttons at once, you can change the button assignment.
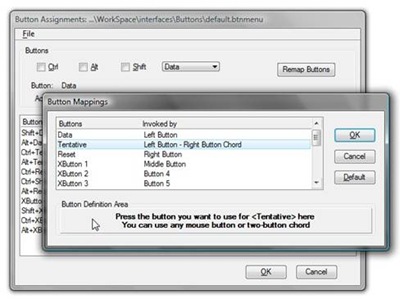
Access MicroStation menu: Workspace>Button Assignments… MicroStation will open a dialog box. Click Remap Buttons.
In button mappings dialog box, select the tentative. As you can see, currently it’s invoked by left button – right button chord. Move your pointer to definition area. Click your mouse to assign a new button.

Many MicroStation users use mid button as tentative point. It’s a long story :) You will lose the pan functionality if you use it. But you still can use pan scroll by pressing [shift] + data point. It’s not exactly the same with pan view. If you don’t like the pan scroll, you can change the assignment from pan scroll to pan view. It’s your choice!

Next, we will do an exercise for AccuSnap and AccuDraw.


Hi Edwin,
I am beginner of Microstation. Thank you for this blog. My question I am trying to change my tentative snap to middle button but I can't find the remap button. Thank you
Mariebel, did you mean you can't find that button in the dialog shown in this tutorial? Have you tried to use other user profile?
Dear SAURABH,
You can activate snapping by click toggle accusnap icon in Snap Mode ToolBar
Or you can keyin "accusnap on" to activate snapping
Regards
chen chen
Dear Edwin,
How do we activate (deactivate) object snapping.
The same thing we do in AutoCad by pressing F11.
Regards
Saurabh saran