After creating your 3D model in Revit, of course, you want to show off your model. Why not? It’s easy. You may already have several cameras in your project right now!
In this post, we will discuss placing and fine-tuning our camera. And we will also discuss how to create a 3D section by controlling the section box.
Placing Camera
You can place a camera by activating it from your ribbon, View tab, Create panel. Click the small arrow near the 3D view, and click the camera button on the drop-down menu.

Then you can define the camera by two clicks: the camera position and target position.
After you define the camera, Revit will automatically open a new view. This view will show you what your camera sees. Mostly we need to modify the view. Make sure modify is active, click the view boundary. You will see the blue grips on the rectangle sides. You can resize the boundary by dragging the grip.
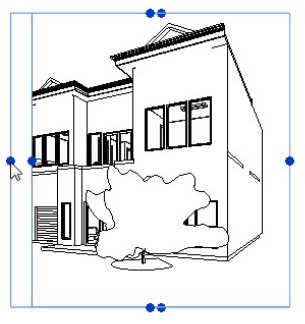
You can fine-tune moving your camera around by holding [shift] + mid button.
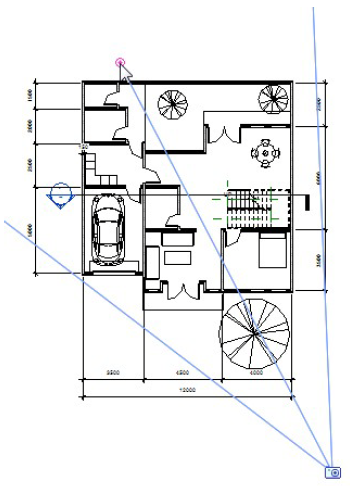
Bird Eye Elevation View
That’s how we can place the camera. Pretty easy, I guess. But sometimes we want to get the ‘wow effect’ by placing the camera at a high or low angle. Try to place another camera, but before you define the position, look at the options bar. We can define the camera height. By default, the offset is 1750mm (for metric) above the active level.

So if we want to see from a high angle, we can set the from level to the highest floor level. And high value in offset field.
Moving Camera Position and Target
We can move the camera position by using [shift] + mid button. But that’s not easy. An easier way is dragging the camera position and target. We can open 3 views (plan, elevation, and the 3D perspective) and work on those views. Click tile in Views tab, Windows panel.

Now find your 3D perspective view in your project browser. Right-click, and select show camera from the context menu. Now you can see your camera in plan and elevation view.

You can move your camera and target by clicking and dragging it. Vertically on your elevation view, and horizontally on your plan view.


Now, can you create a low angle camera?
Tips: You may need to turn off crop view if your camera is outside the clipping boundary
Creating 3D Section
Now create a new 3D view. It can be a perspective or a standard 3D view. Right-click anywhere inside the view, and click view properties.
Find the section box option under the ‘extents’ section. Activate it.
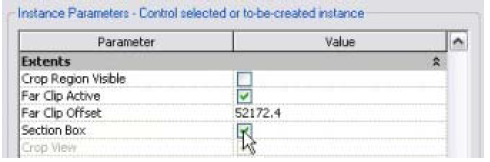
You will see the section box. Resize it until cut your model. Click and drag the arrow.
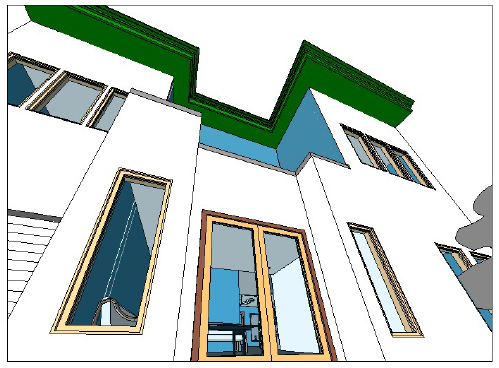
Here is mine.

And this stair 3D section.

Can we render the 3D section? Why not!

If you decide to play around with perspective view, it might be quite difficult to control. You better try with parallel projection first!


Hey Edwin,
When creating renders with section box, i see that the sun does not use the building parts that are not visible in the section ? Can you please confirm this ? If so how can i provide an accurate section render to show how the sun actually effects that part of the building ?
Mustafa,
You are right. Revit rendering will ignore objects outside of the section box. I don’t think Revit has the ability to include those objects.
Thank you for notitying me.
Congratulations. But I saw it first in another blog in http://revit-pt.blogspot.com/2009/11/perspectivas…
Rimacoca,Thank you for notifying me. There is a big chance that some of my posts are similar with posts in another blog. The most important thing is it still can be useful to our readers, isn't it? :)
Yes it's true. Congratulations to both. http://www.cad-notes.com and http://www.revit-pt.blogspot.com :)
Yes it's true. Congratulations to both. http://www.cad-notes.com and http://www.revit-pt.blogspot.com :)
Rimacoca,Thank you for notifying me. There is a big chance that some of my posts are similar with posts in another blog. The most important thing is it still can be useful to our readers, isn't it? :)
Congratulations. But I saw it first in another blog in http://revit-pt.blogspot.com/2009/11/perspectivas…