Issue
You usually use Contour Roll tool when you want to build part made from sheet metal that through roll process. In some cases when sketch contains curve geometry, this tool can’t be used.
In this article, we will cover how you can manually create a flat pattern using derive tool.

Why do we have to create it manually?
We can easily create a flat pattern if the part is created with sheet metal tools. But Inventor doesn’t have the ability to solve parts with roll process that also have dishing process. If your part has both processes, then you need to calculate the dimensions to create that flat pattern.
Here’s the workaround to create flat pattern of sheet metal parts that can’t build from Contour Roll tool:
Creating the model
Create the sketch
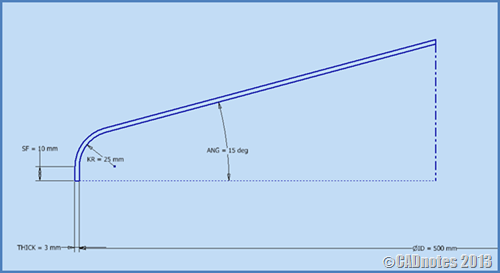
Let’s start with creating basic sketch of Top Conical, use Sheet Metal(mm).ipt in order to work in same unit. Create sketch in YZ plane. Define the parameters like picture shown, you can highlight the dimension, right click and choose dimension properties by clicking.
Revolve the sketch
Next step is to model the sketch using Revolve tool located in 3D Model Tab Create Panel. Ensure you use Full in Extent box.

Now we have the model ready to be flattened. Inventor flat pattern tool will not work for this part.
So we need to use our logic to do a work around and solve the problem with available tools. No software is perfect. With that limitation, we need to customize it to solve our problem.
For this case, we will input the formula to build the flat pattern sketch. Let me show you the trick.
Creating the flat pattern
Create the sketch
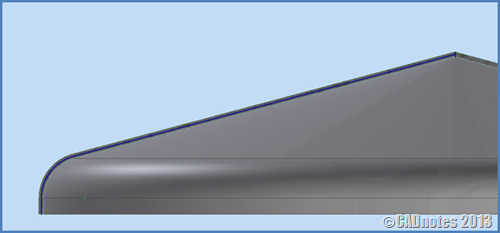
Create the sketch on YZ plane, slice the graphic using F7 button from your keyboard. Use Project Cut Edges tool to project all slicing sketch. Make all geometry be construction. And create the sketch as neutral axis in the middle of existing sketch using Offset tool (deactivate your loop select to ease your job). See the figure below
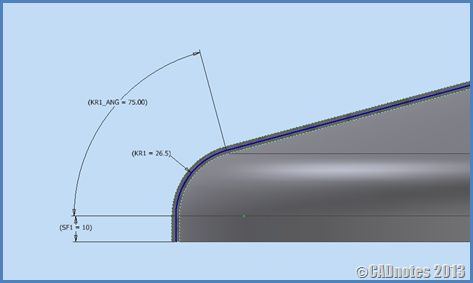
Add reference dimension like below.
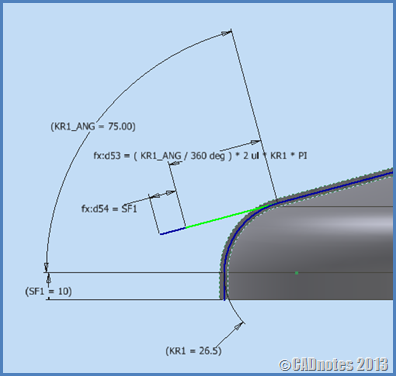
Add two segment of line to define the outside dimension of sheet metal that have to be prepared as raw material. To make your flat pattern update as far as there is a change of Top Conical dimension, let’s make the equation for the line as shown figure below.
Next step is to create the circle as the flat pattern of this Top Conical part. Add one more reference dimension. Same with before, this reference dimension is used to create apex angle equation of this flat pattern. To create this flat pattern sketch, we need to define the apex angle.
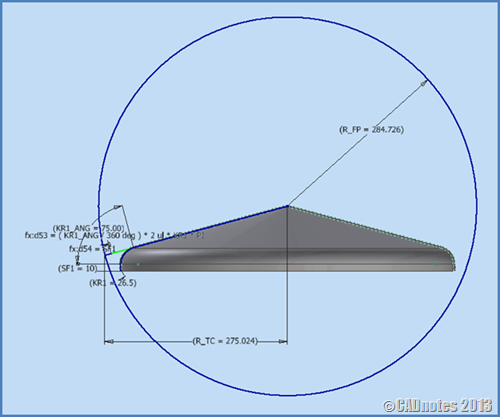
Let’s create apex angle by adding line from the center of circle. Add horizontal constraint in the end of line that touches the arc of circle. Add the equation as you can see in the picture. Let’s calculate the equation using calculator:
275.024*360/284.726 = 347.733 deg
The result is the apex angle of our flat pattern. Next remove arc between lines that we don’t need using Trim tool.
Let’s finish the sketch and rename the Sketch1 that located in browser into Flat Pattern.
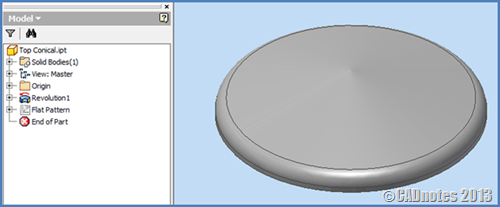
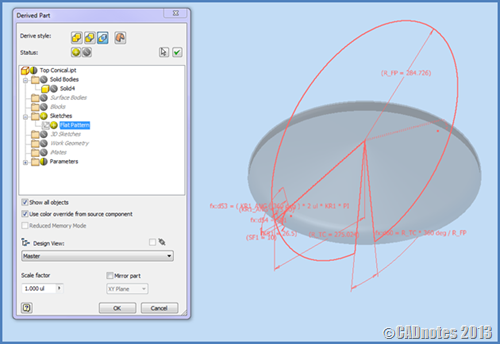
Save the file into your directory, and let’s create the flat pattern model using Derive tool located in 3D Model tab, Create Panel. Create New file, use Standard(mm).ipt and now click Derive tool and direct the file to part that has just saved. Turn off Solid Bodies and turn on Sketches then click OK button.
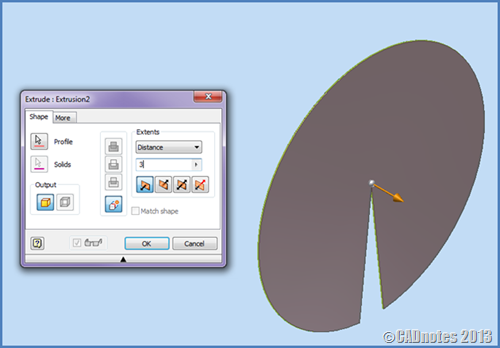
And the last is to extrude the sketch. Try to change the dimension of Top Conical, and see that any changes in your flat pattern file will also update the model.
With this trick, you can solve your problem that Inventor doesn’t accommodate, such as to create flat pattern of Screw Conveyor, Cover Pipe, Dished, etc.
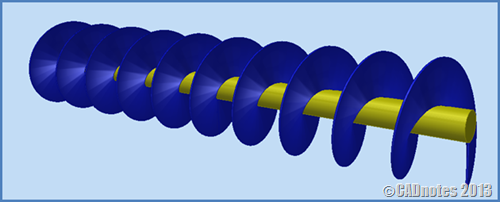
Thank You for Reading
DD
Further reading
Paul Munford published tips to avoid errors when you create a flat pattern. If you work with sheet metal regularly, this will be useful for you: Autodesk Inventor Sheet Metal, Flat pattern success – Every time!


Forgive me if I am wrong but I think smccarthy may be commenting on an F&D head, and what is drawn here is a Toriconical head. I would rather have the detials on an F&D personally. Thanks!
Nice piece of work, however, it is incomplete. The flat pattern will not create the shape in the Top Conical model, it will create a cone when folded, as a result of the pie-shaped wedge. Since I cannot post anything here, I will try to outline the steps to define this:
1. Take the profile created in your first step and change all of the geometry except for the outside profile, to construction lines, and create a contour flange instead of a revolution. Set the Width Extents to Midplane with a distance of 60mm.
2. Create a new sketch on the XZ Plane. Project the furthest edge of the flange as a construction line, along with the Center Point
3. Draw a V shaped sketch with the apex coincident with the center point. Constrain the 2 endpoints of the lines forming the V with the endpoints of the projected flange edge. Make sure this in an open profile
4. Extrude this sketch as a surface with the Extents set to All
5. Activate the Sculpt tool. click the Remove icon, and select the surface created in step 4. This will create a wedge shaped profile.
6. Create the flat pattern
The wedge shape cut out of your Flat Pattern sketch should look similar to the profile in step 6.
As has been said, however, not very useful in the real world…
this methode is used in my work as a vessel drafter, and the dimension is totally correct.
as mentioned before is Creating Flat Pattern Using Inventor Derive Tool.
I want to accomodate 2 process so we can create the flat pattern.
Please create the article similar to compare your result,
I am not saying your calculations are incorrect. I am saying the that the result is a cone, not the Top Conical model. I’d be happy to send you my files for you to look at, since I cannot post them here, as you can with AUGI or Autodesk Discussions (I’m not very good at creating these types of articles.. sorry…). Try printing your flat pattern, cut out the wedge, and then tape the edges back together, and see what you get.
Your workflow is great, but as J.Steurs says “..A vessel head is always rolled out of a full flat disk and not where a piece of the pie is missing…”
You can start with the flat pattern to create the vessel head, but there will still need to be an additional amount of post-processing required to create the model you show.
Yes, the result is cone, the process workflow to create this component is roll the flat pattern be cone and then you should do dishing process to get knucle radius.
What is the matter?
All the calculations are correct, but as often not useful in the real world. A vessel head is always rolled out of a full flat disk and not where a piece of the pie is missing.
this methode is used in my work as a vessel drafter, and the dimension is totally correct.
as mentioned before is Creating Flat Pattern Using Inventor Derive Tool.
I want to accomodate 2 process so we can create the flat pattern
Love this post – but I am not sure how you apply the same theory to the Screw Conveyor? Could you expand on this – or email me directly? Thanks!
Yes, it can apply to screw conveyor. I have tried to my customize air vent ( one kind of nozzle that attach to atmospheric tank)
Awesome workflow man! Thanks! Could you elaborate a bit on the workflow as applied to a variable pitch auger like you have shown above?
..Opening screw…pake SildWorks lebih gampan.
please speak in English brother,,
maybe it is easier, but some time we face problem that can't be solved by the tools in the software, and we should create new trick.