• Home
  • Training Books
  • Subscribe to Our Email Newsletter
  • About
    • Contributors
    • Feedback
    • Contact
    • Privacy policy
    • Cookie Policy

CADnotes

CAD Tutorials and Best Practices for professionals and students

  • Featured
  • AutoCAD
    • AutoLISP
  • Revit
    • Revit Architecture Basic
    • Revit MEP Basic Tutorial
  • Inventor
  • MicroStation
    • MicroStation Basic Tutorial
You are here: Home / Featured / How to add dimensions in Revit 3D view

How to add dimensions in Revit 3D view

February 12, 2016 by Edwin Prakoso 2 Comments

In this Article...

  • Create a 3D view with section box
  • Working with Work Plane
  • Add more annotations and effects to make your drawing even more compelling!

Sometimes we need to show 3D views of your Revit models. It is a benefit of modeling a building in 3D, right? Doing in Revit is easy.

However, you may need to add dimensions to your 3D view as well. It is possible to add dimensions in parallel projection, but not in perspective view. You will need to work with work plane before you can draw the dimensions correctly.

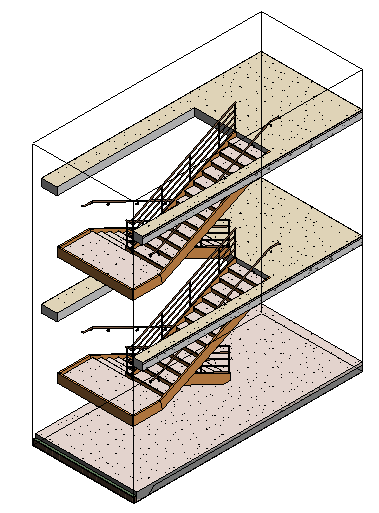
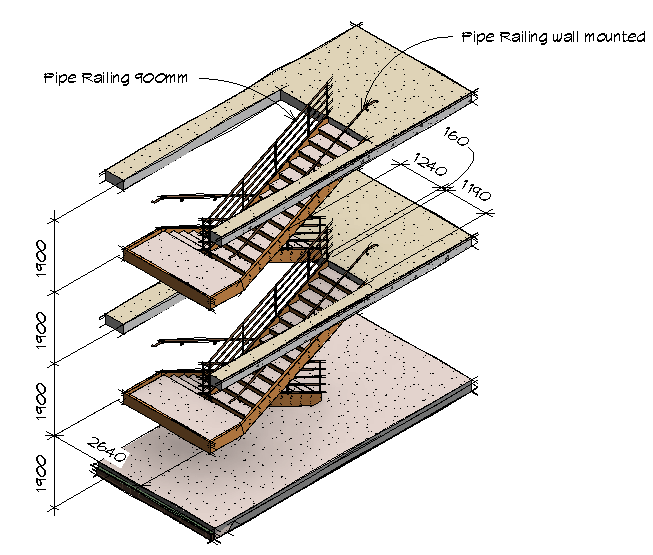
Let’s see how we can create a drawing like this.

Create a 3D view with section box

First, let’s prepare our 3D view. If you want to show only a part of your model, create a 3D view with section box. If you are not familiar with section box, refer to this post in Revit Zone: Section Boxes.

3D section box

If you use Revit 2016, you can easily do this by selecting the components and click section boxes tool in Modify Tab> View Panel.

section box tool

Rename the {3D} view to give this view a better description.

Adjust the grips position if necessary. And hide components that you don’t want to show in this 3D view.

Working with Work Plane

A dimension is a 2D object. When we use dimension tool, it will be placed in the set working plane. You will need to change this when you place the dimension.

You can set new work plane by clicking Set tool in Work Plane panel. This panel is available in Architecture, Structure, and Systems tab.

Set work plane

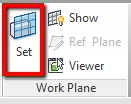
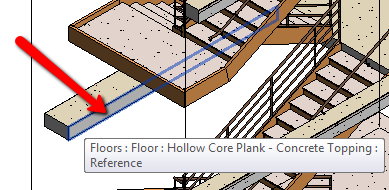
Click the tool. You will see some options to specify the plane. In this example, I will use Pick a Plane. This option allows you to pick any surface in your model as a reference.

Pick a plane

I will make a dimension show the stair and levels height. So I choose a vertical surface behind the stair.

Selected surface

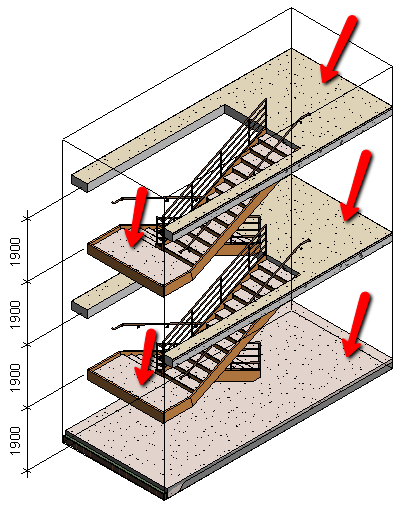
Now I can activate dimension tool and create the dimension. Pick the surfaces that you want to measure and place the dimension.

surfaces_to_pick

If you need to add more dimensions to a different work plane, set a new work plane before you add the dimension.

Add more annotations and effects to make your drawing even more compelling!

You can also add text and add some visual effects to make it look stunning. In this example, I use sketchy line and ambient shadow.

3d_view_dimension

About Edwin Prakoso

I work as a Sr. Consultant in PT Cipta Satria Informatika. I've been using AutoCAD since R14 and Revit since Revit Building 9. I occasionally write for AUGIWorld magazine and I am also active in Autodesk discussion forum. I'm a member of Autodesk Expert Elite, an appreciation for individuals who give contributions to the Autodesk community.
Connect with me on twitter or LinkedIn.

Filed Under: Featured, Revit

5 1 vote
Article Rating
Subscribe
Login
Notify of
guest

guest

This site uses Akismet to reduce spam. Learn how your comment data is processed.

2 Comments
Inline Feedbacks
View all comments
Shoib Mohammed
Shoib Mohammed
7 years ago

Thank you for sharing. Got to know how to give 3D dimensions in Revit and it is helpful

0
Reply
John Smith
John Smith
9 years ago

Edward,

Thank you for your contribution on adding dimensions to 3d Revit views. People like you are giving and helpful.

0
Reply
wpdiscuz   wpDiscuz

Featured

What’s New in Revit 2021 – Part 3: Structure

See what’s new in Revit 2021 in structural discipline. We have some exciting enhancements in this area!

Recent Articles

  • Autodesk Construction Cloud Activity Log
  • Exporting AutoCAD Plant 3D Model to Navisworks
  • Autodesk Data Connector for Power BI is Now Available

Advertisement

New on CADnotes

  • Autodesk Construction Cloud Activity Log
  • Exporting AutoCAD Plant 3D Model to Navisworks
  • Autodesk Data Connector for Power BI is Now Available
  • Autodesk Forma Design Contest
  • Revit 2025: Toposolid Enhancements

Meet the Authors

avatar for
avatar for
avatar for
avatar for
avatar for
avatar for

Get Connected

CADnotes on FacebookCADnotes on InstagramCADnotes on TwitterCADnotes on YouTube

© 2009 – 2025 CADnotes · Feedback · Privacy Policy · Become an affiliate

wpDiscuz