• Home
  • Training Books
  • Subscribe to Our Email Newsletter
  • About
    • Contributors
    • Feedback
    • Contact
    • Privacy policy
    • Cookie Policy
  • Bahasa IndonesiaBahasa Indonesia

CADnotes

CAD Tutorials and Best Practices for professionals and students

  • Featured
  • AutoCAD
    • AutoLISP
  • Revit
    • Revit Architecture Basic
    • Revit MEP Basic Tutorial
  • Inventor
  • MicroStation
    • MicroStation Basic Tutorial
  • CADnotes on YouTube
You are here: Home / Revit / Working with different Revit view range in a floor plan

Working with different Revit view range in a floor plan

November 17, 2014 by Edwin Prakoso 2 Comments

In this Article...

  • About the view range
  • Working with Plan Region

Do you ever need to have a floor plan with different view range? Sometimes you need to show different height in a specific area compared to the rest of the floor plan.

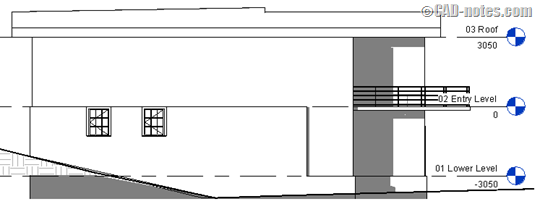
Let’s take a look at this example below. There are two windows in the elevation view.
 

north_elevation

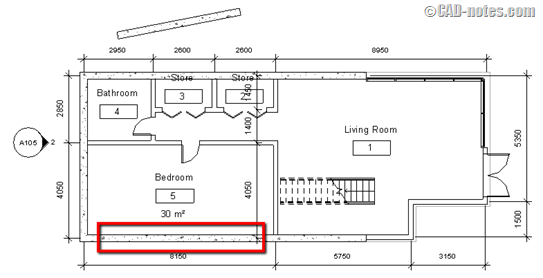
But when you open the floor plan, you can’t see the windows.
floor_plan

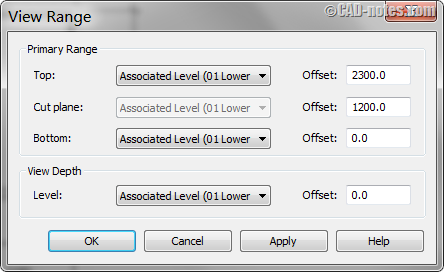
The reason why we can’t see it is that they are placed above the cut plane of the plan’s view range. The floor plan cut the model at elevation 1200 mm, but the windows sill height are at 1700 mm. So I need the cut plane at the elevation more than 1700.
view_range

About the view range

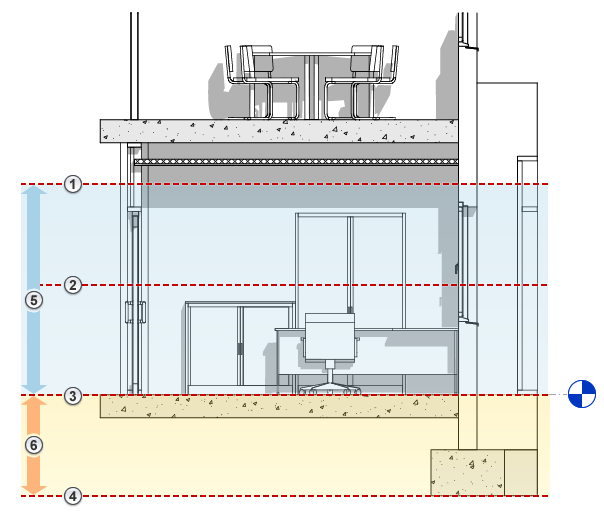
If you are not familiar with view range, this image can help to set the options above. This image was snipped from Revit help about view range. Read it if you need more information.
revit_view_range_explained

  1. Top
  2. Cut plane
  3. Bottom
  4. Offset
  5. Primary Range
  6. View Depth.

Working with Plan Region

Changing the view range is not always applicable. Sometimes when we change the view range, we see other components disappear from our floor plan. So you need to define different view range for that particular area.

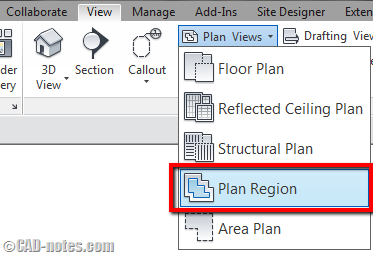
You can do this by using plan region. You can find this tool in View tab> Create panel> Plan Views drop-down> Plan Region.
plan_region_tool

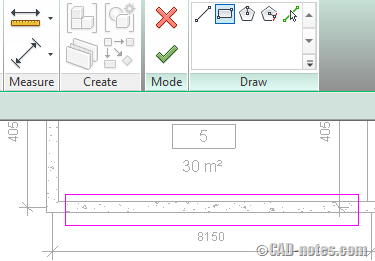
You will need to define the plan region using sketch tool. Draw the sketch as necessary, then click finish. In this example, I only need to create a rectangular boundary.
region_sketch

Now when you click the boundary you created above, you will see View Range in Properties Palette. It’s the only property you can change for this object.

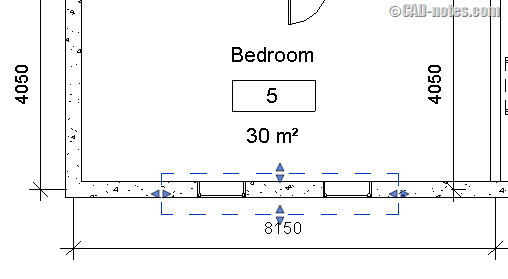
Click it and change it as necessary. After you set the view range correctly, you will see the windows now appear.
new_plan_region

Working with view range can be frustrating when you start using Revit. Many times it doesn’t work as we expected. Plan region can really help, doesn’t need?

About Edwin Prakoso

I work as a Solution Consultant in Datech Solutions, Tech Data Indonesia. I've been using AutoCAD since R14 and Revit since Revit Building 9. I occasionally write for AUGIWorld magazine and I am also active in Autodesk discussion forum. I'm a member of Autodesk Expert Elite, an appreciation for individuals who give contributions to the Autodesk community.
Connect with me on twitter or LinkedIn. If you want to have my new articles sent to your email inbox, you can subscribe to the newsletter.

Filed Under: Revit Tagged With: plan region, view range

0 0 votes
Article Rating
Subscribe
Login
Notify of
guest

guest

This site uses Akismet to reduce spam. Learn how your comment data is processed.

2 Comments
Inline Feedbacks
View all comments
Tatenda Kasirori
Tatenda Kasirori
20 days ago

Thank you very much. This was so helpful

0
Reply
Michel Macias
Michel Macias
7 years ago

Thanks !! This is really helpful..!

1
Reply
wpdiscuz   wpDiscuz
Join Our Free Email Newsletter
  Thank you for Signing Up
Please correct the marked field(s) below.
1,true,6,Contact Email,2 1,false,1,First Name,2 1,false,1,Last Name,2

Featured

6 SHIFT Key Combination You Might Not Know

AutoCAD has several key combinations that will help you to access more options/tools easily. This article has 6 shift key combinations that you can use!

Recent Articles

  • Revit 2024.1 Update is Released
  • What’s New in Revit 2024: Bending Detail
  • What’s New in Revit 2024: The Dark Theme

Advertisement

New on CADnotes

  • Revit 2024.1 Update is Released
  • What’s New in Revit 2024: Bending Detail
  • What’s New in Revit 2024: The Dark Theme
  • Autodesk Build: Using Assets for Progress Tracking
  • My Home on the ACC Unified Platform

Meet the Authors

avatar for
avatar for
avatar for
avatar for
avatar for
avatar for

Get Connected

CADnotes on FacebookCADnotes on InstagramCADnotes on TwitterCADnotes on YouTube

© 2009 – 2023 CADnotes · Feedback · Privacy Policy · Become an affiliate

wpDiscuz