In previous Revit Family tutorial, we created a simple profile for our wall sweep. For 2D profile, in most cases, that’s all we need. But sometimes we need the same profile geometry, but in different sizes.
Revit Family and Family Types
Remember when we can select different door sizes? The Revit project template by default has loaded a door family: single_flush (or M_single_flush if you use metric).
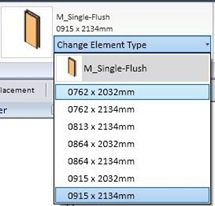
Below the door family name we can see several sizes of that particular door. They are the family types. M_Single-Flush is the door family, and 0762x2032mm is the family type.
We can create another door types (we did it in that tutorial) without opening the family in family editor. It’s possible after we define parameters in the Revit family. Creating parameters in 2D or 3D Revit family basically have the same concept. Let’s do it slowly by defining parameters in 2D family first. We will try to create a 3D Revit component later.
Creating Parameters
Open the profile we created in previous Revit family tutorial.

We created two dimensions to define the profile size and relative position to the insertion point. Let’s change it to parameters.
Activate modify tool then select the 150mm dimension.
From the option bar, click the label dropdown menu. Select <Add parameter…>

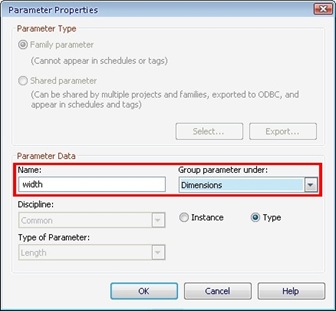
Give the parameter name ‘width’ and group parameter under Dimensions. Click OK.
Select the 75mm dimension, and delete it. Create a new dimension from the profile top, to the horizontal axis, an to the profile bottom.

Click the EQ symbol. This will constrain the distance to always be equal.
Creating Family Types
We have defined the parameters. Now it’s time to create the family types. Click the Types button.

Click the new button in Family Types group.
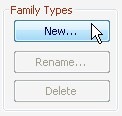
When Revit ask you for the type name, give it ‘150mm’.
Click new again, give it name ‘200mm’. We just create a new type with ‘200mm’ as the type name. But we haven’t actually define the parameter value in this type. Change the width value to 200.

Click apply.
Flexing the Model
Before we start creating other types, we need to test our family. When you are creating a complex 3D family with many parameters, it is a good idea to test it after a few steps. It would be very difficult to find where the problems after we have many parameters defined. So better start slowly, but it would make sure we see the errors (if any) at early stage. We call it flexing the model.
After I changed my profile width, I see the profile become like this.
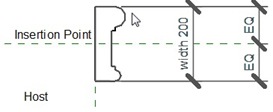
Something is wrong. The arc on the top and bottom of this profile no longer have the same radius. We need to create another parameter to correct this. Click radial dimension on your ribbon. Add a dimension to the arc.
Select the dimension, and change it to a parameter. Give it name ‘arc radius’ and group it under dimension.
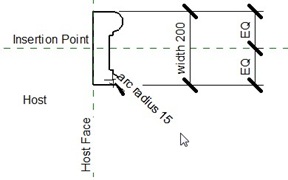
Now add a dimension to the top arc too. Now that we already have a radius parameter, and we want the both arc share the same value, change the dimension label to arc radius. It’s already listed on the label dropdown list. Now both of them have 15mm radius.

Now it looks alright. After we added the radius parameter, users can change the radius too. So we need to test if the profile still look alright after we change the radius. Try to change it. And if it looks OK,then add more types. I created 3 types, 150mm, 200mm, and 250mm. Add more if you wanted to. If you are not sure, test it with more different sizes. Remember, people who use this family can add their own type when they use it in Revit.
We only allow users to change 2 parameters here. If you want users to change the profile thickness, you can try to add it too. Save it and load it to your project.
Try to create a wall sweep (again, refer to previous tutorial). In the type properties, you should see the profile family and types.

Sweep profile is the Revit family, and 150mm is the family type.
What about 3D Revit Family?
Creating 3D family is a bit different. But actually it’s not difficult.
- You can create a simple family without any parameters (like we did before with the profile). This should be easy. Especially if you are familiar with 3D modeling before.
- You can create a complex family with parameters and types. Depends on how many parameters you have, basically it just a repetitive task: add parameters, create the 3D object, flex the model, add more parameters, add more 3D objects, and flex the model again.
Next, we will create a simple 3D Revit component.


I see. You are trying to create a nested family.
You can't control the parameters within a project. You have to change it in your column family, just like you do now.
If you want to change the profile parameters within your project, then you have to create the profile in the column family, not on a separate family file.
Revit does have shared parameters that we can use in multiple families, but profile can't use shared parameters.
HTH :)
I have made a semi circle profile with added radius parmeters, I then load the family in an archtectural column family under process. I used the loaded semicircle parametric profile for a sweep on the column. Sweep is done as per loaded profile, but here i m unable to nest it's parameter to column family. So each time I have to change the parameters of profile family & reload it to cloumn family for fresh sweep. So is there a way, so that I may change parameters of profile used in sweep, from the column property ?
LJU
You can change the parameters within project. Use type properties to change it.
There is an article that you can refer to, but in this example we are controlling a door size. Find the 'Creating New Door Type' section.
Can you explain how to nest thes parameters of a parametric profile family to the sweep, so that profile can be controled after making sweeps ?
LJU