 If I’m not mistaken, AutoCAD use CUI since 2006. Not MNU or MNS as it used to be. CUI (customize user interface) is a XML file. It’s easier to manage. In this post, we will create a new command to set all properties to ByLayer. This is a request from my colleague. He likes to override color and linetype when he draw, and want to be able to reset all of the properties back to ByLayer. By clicking an icon, every properties will be set to ByLayer.
First you may want to take a look to what I want to achieve. Click here to see animation.
Let’s do it. First open CUI by accessing menu tools>customize>interface… or by typing CUI then [enter]. You will see browser like this. If you use ribbon, find it in manage tab, customization section.

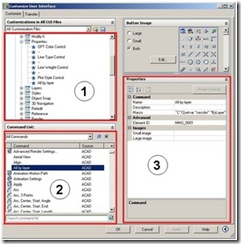
CUI browser is easier to use than creating old AutoCAD menu. There are 3 areas I would like to highlight
- All customization. Here is where you decide where you can access all AutoCAD tools. Either you want to put it in ribbon, tool bar, right click context menu, and even double click.
- Command list. Here is all your AutoCAD commands. When you create a new one, it will appear here.
- Properties. Here is where you can change the properties. After creating new command, you will have to define what it should do.
Let’s start. Right click on command list (2), and select new command from context menu. Rename it. Give it name ‘All ByLayer’ without quote. You can see the animation here.
Now, we have created a command. But it doesn’t know what to do yet. We have to tell it what it should do by typing macro in properties area (3). Type this macro on the macro field.
^C^C(setvar “cecolor” “ByLayer”) (setvar “celweight” -1) (setvar “celtype” “ByLayer”)
^C^C will cancel everything. Similar to pressing [esc] twice. Then we tell AutoCAD to change current color to ByLayer. Then current lineweight to ByLayer, and finally current line type to ByLayer.
Give a description that makes sense. This is optional.
We have created a new command, and give instruction what it should do when it’s executed. But AutoCAD doesn’t know yet, where you want it can be accessed. Now find it in command list. We named it ‘All ByLayer’ before.
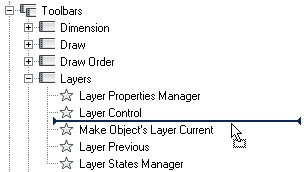
Click and drag it to the place where you want it appear. In this example below, I put it on my layer toolbar. You can also put it on right click context menu (more about this later) or double click!

Click OK on this CUI browser to finish our work. Now take a look on your layer toolbar (or anywhere you put it before). Is it there? Try it!
You can place it anywhere you want to. In this post, you can add the new command to right click (or we call it contextual menu).
Not so hard right? Learning macro is one thing, but creating customization with CUI is a lot easier than MNU or MNS. Good luck!


This command string does not work. It returns an error:
Your Command String –
^C^C(setvar “cecolor” “ByLayer”) (setvar “celweight” -1) (setvar “celtype” “ByLayer”)
Error returned –
Command: (setvar “celtype” “ByLayer”) ; error: bad argument type: (or stringp symbolp): nil
Sorry. but you did not create a new command. You created a macro of existing commands and used a button to execute this string of commands.
goodmorning sir,
my name is piyushtyagi & i am a student of b.tech (from india ). first of all hw r u dear sir . so i know about u & i am so surprised to you . & i want some advised to you for my bright future & i hope you will help me .
thanks for regards,
piyushtyagi( india)