• Home
  • Training Books
  • Subscribe to Our Email Newsletter
  • About
    • Contributors
    • Feedback
    • Contact
    • Privacy policy
    • Cookie Policy
  • Bahasa IndonesiaBahasa Indonesia

CADnotes

CAD Tutorials and Best Practices for professionals and students

  • Featured
  • AutoCAD
    • AutoLISP
  • Revit
    • Revit Architecture Basic
    • Revit MEP Basic Tutorial
  • Inventor
  • MicroStation
    • MicroStation Basic Tutorial
  • CADnotes on YouTube
You are here: Home / Revit / Creating Custom Slope Roof

Creating Custom Slope Roof

September 28, 2022 by Edwin Prakoso Leave a Comment

In this Article...

  • The Slope Arrow Tool
    • Creating the Slope Arrow
  • Slope Arrow and Roofs Examples
  • To Sum Up

Creating a roof using a footprint is quite convenient. You can select a boundary line and activate the defines slope option.

The roof will have a slope perpendicular to the boundary line.

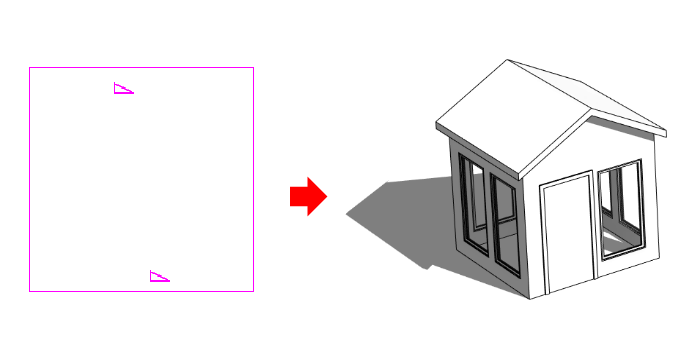
However, using the slope option in the boundary line provides limited results. It is not possible to create roofs like in the image below. They have slopes that are not perpendicular to the boundary lines.

The Slope Arrow Tool

You can create roofs with custom slopes using the Slope Arrow tool. You can find the tool in the contextual tab> draw panel.

Creating the Slope Arrow

You can draw the arrow to define the slope direction. The tail of the slope arrow must lie on the roof boundary. Otherwise, Revit will give a warning message.

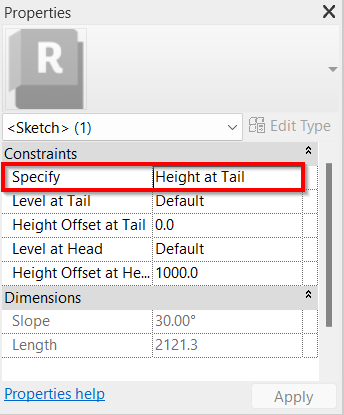
The slope arrow has properties. It means you have more control even if you use it in creating a perpendicular slope to the boundary line. Not only by slope angle, but you can define the roof elevation.

Slope Arrow and Roofs Examples

Let’s see some examples of roofs using the slope arrow.

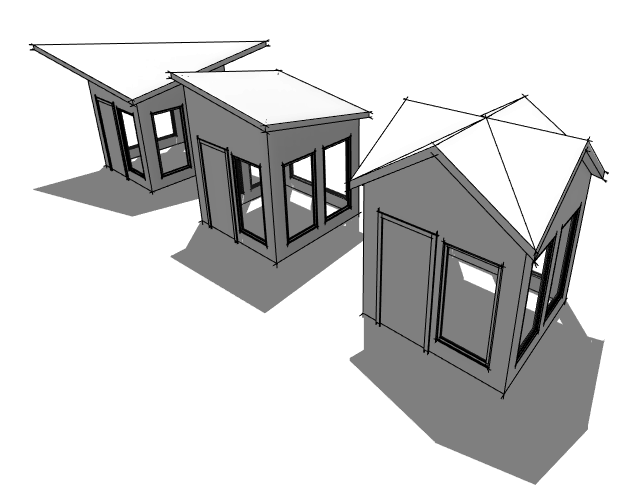
Below, the roof has a slope from one corner to the opposite corner of the roof.

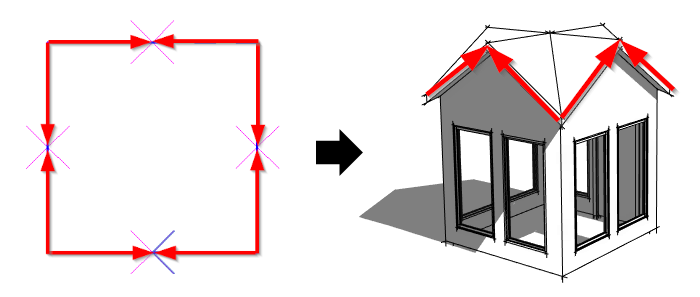
The next example is a roof with slopes from two opposite corners to the middle of the roof.

The last example is a gable roof. The slopes are from the corner of the roof.

To Sum Up

Using the defines slope option usually works for most roofs. However, sometimes you need more control to create your roof design. The slope arrow tool can help you to have more control, especially when the slopes are not perpendicular to the boundary line.

About Edwin Prakoso

I work as a Solution Consultant in Datech Solutions, Tech Data Indonesia. I've been using AutoCAD since R14 and Revit since Revit Building 9. I occasionally write for AUGIWorld magazine and I am also active in Autodesk discussion forum. I'm a member of Autodesk Expert Elite, an appreciation for individuals who give contributions to the Autodesk community.
Connect with me on twitter or LinkedIn. If you want to have my new articles sent to your email inbox, you can subscribe to the newsletter.

Filed Under: Revit Tagged With: Revit Tips

0 0 votes
Article Rating
Subscribe
Login
Notify of
guest

guest

This site uses Akismet to reduce spam. Learn how your comment data is processed.

0 Comments
Inline Feedbacks
View all comments
Join Our Free Email Newsletter
  Thank you for Signing Up
Please correct the marked field(s) below.
1,true,6,Contact Email,2 1,false,1,First Name,2 1,false,1,Last Name,2

Featured

What’s New in Revit 2021 – Part 3: Structure

See what’s new in Revit 2021 in structural discipline. We have some exciting enhancements in this area!

Recent Articles

  • Revit 2024.1 Update is Released
  • What’s New in Revit 2024: Bending Detail
  • What’s New in Revit 2024: The Dark Theme

Advertisement

New on CADnotes

  • Revit 2024.1 Update is Released
  • What’s New in Revit 2024: Bending Detail
  • What’s New in Revit 2024: The Dark Theme
  • Autodesk Build: Using Assets for Progress Tracking
  • My Home on the ACC Unified Platform

Meet the Authors

avatar for
avatar for
avatar for
avatar for
avatar for
avatar for

Get Connected

CADnotes on FacebookCADnotes on InstagramCADnotes on TwitterCADnotes on YouTube

© 2009 – 2023 CADnotes · Feedback · Privacy Policy · Become an affiliate

wpDiscuz