Technical drawing is the most important communicating tool in manufacturing industry. It’s a tool for an engineer to deliver information required for product making. The information can be shape, dimension, manufacturing process and simulation. Information given should be appropriate with requirement and function of product that would be made.
In special technical drawing for manufacturing process or worksheet making, sometimes we need additional note to clarify required information. The note usually typed manually by the designer. In particular case, the note even shows dimensions of product that will be made. Because of that, to avoid mistake in typing notes that contain dimension, it’s important to make standard note with automatic filling, where dimension in model will be filled into note automatically.
Case mentioned above can be found in gear making process. Generally, dimension of gear profile won’t be shown directly on gear drawing but separately in note form. Look at picture below.
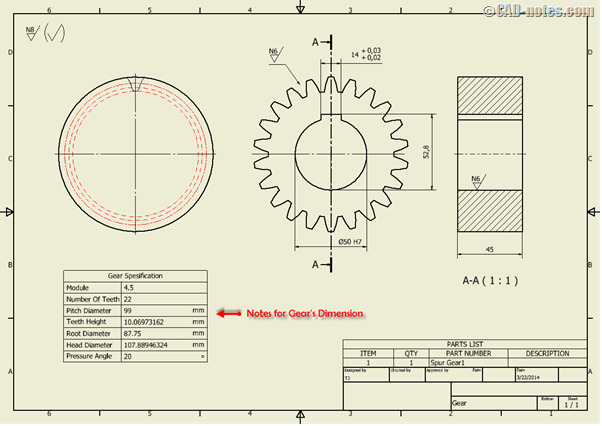
If we fill the note manually, there will be a possibility of error in filling. It will result the gear made is not compatible with specification required. For those reasons, this tutorial will discuss about making standard note with automatic filling method according to model simulated or model required.
As an example, we will discuss about making worksheet for gear manufacturing process. Here are the steps :
A. Spur Gear in Inventor
In this tutorial, I’ve made some models for spur gear. It will be useful for us to do some exercises. You can download it by link below.
To understand parameters of spur gear in Inventor, you can see at picture below.
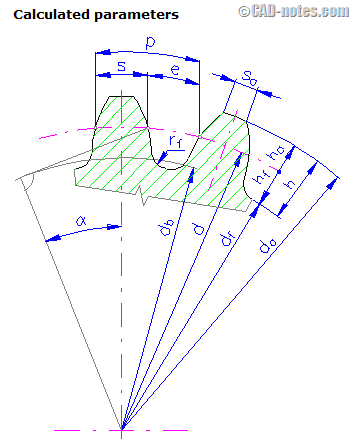
Where :
α : Pressure Angle
d : Pitch Diameter
df : Root Diameter
da : Head Diameter
h : Teeth Height
Source : Engineer’s Handbook in Autodesk Inventor Professional 2014.
B. Add Custom Properties into Spur Gears.
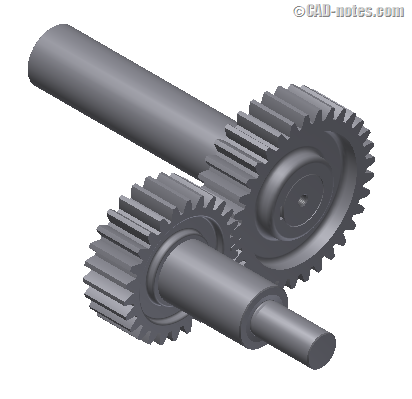
If you already downloaded the gears model, copy it to your project folder and open. Then, you’ll see a picture like the one below.
b1. Right click at “Spur Gear” in Model Browser and select “Export tooth shape” until “Export tooth shape” dialog box opened.
b2. Select “Pinion” in “Export” column, and set default for the other setting. Then click “OK”.
Inventor will open new part for this command. Save file with name “Pinion Gear”.
b3. Click “Parameters” on “Parameters” panel in “Manage” tab. So, parameters dialog box will be shown.
All parameters are dimensions that build shape of gear profile. But if we want to show dimensions for manufacturing process, we only need some dimensions such as :
- Module
- Number of Teeth
- Pitch Diameter
- Teeth Height
- Root Diameter
- Head Diameter
- Pressure Angle
And then, we will show those parameters in the drawing for additional note.
b4. Add “TeethHeight” parameter with this formula :

b5. Select “Add Numeric” on Add Parameter drop down menu at lower left “Parameters” dialog box.
b6. Fill the blank row with “TeethHeight” in “Parameter Name” column, “mm” for Unit Type, and fill the formula for the “Equation” column.
b7. Click “Done” to save the changes.
b8. Click “Add Rule” on the same panel and tab, and name it Gear – Rules. Then “Edit Rule” dialog box will open.
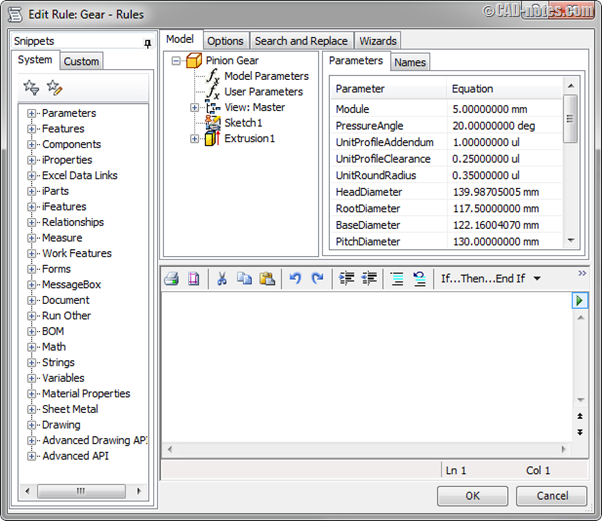
b9. Expand “iProperties” on “System” tab in right column of dialog box.
b10. Double click at “Custom”, and the new code will be filled into blank window.
iProperties.Value(“Custom”, “PropertyName”)
b11. Rename “PropertyName” in new code with Parameters that need to shown in the drawing (See part b3) .
Example :
iProperties.Value(“Custom”, “Module”)
b12. In this part we will synchronize between Custom Properties Model and Parameters of Pinion Gear. So, new code must be modified like this :

Don’t forget to add equal “=” between Custom Properties Model and Parameters.
Do same step to other Parameters, then the codes will be like this :
iProperties.Value("Custom", "Module") = Module
iProperties.Value("Custom", "NumberOfTeeth") = NumberOfTeeth

iProperties.Value("Custom", "PitchDiameter") = PitchDiameter

iProperties.Value("Custom", "TeethHeight") = TeethHeight

iProperties.Value("Custom", "RootDiameter") = RootDiameter

iProperties.Value("Custom", "HeadDiameter") = HeadDiameter

iProperties.Value("Custom", "PressureAngle") = PressureAngle
b13. Now, Custom Properties have been added to Pinion Gear and ready to use in the drawing.
C. Make Automate Notes
c1. Make drawing with ISO.dwg standard.
c2. Select “Pinion Gear” as first base part in our drawing. Keep “Orientation” in “Front” and “Scale” in “1:2”
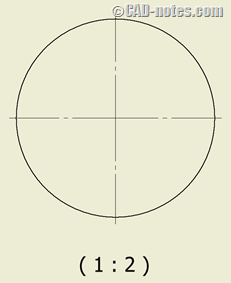
c3. Right click at this view and select “Find in Browser”. So, inventor will guide you to find this view in Browser. Expand this view until “Pinion Gear” part shown.
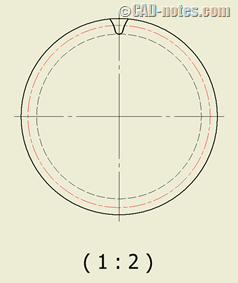
c4. Right click at “Pinion Gear” and select “Get Model Sketches” and profile of gear will be shown in the drawing. Modify sketch line properties until the drawing looked like picture below.
c5. Expand “Drawing Resources” in Browser. Right click at “Sketched Symbol” and select “Define New Symbol”. So, the drawing will change to Sketch environment.
c6. Make a table with Descriptions and Dimensions like picture below.
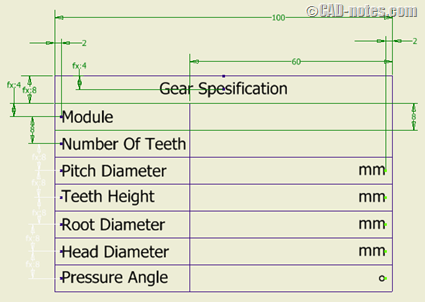
Note : Line of the table made by “Line” command.
c7. Click “Text” on “Draw” panel in “Sketch” tab. Place the text at column beside “Module” description on the table. And “Format Text’ dialog box will be shown.
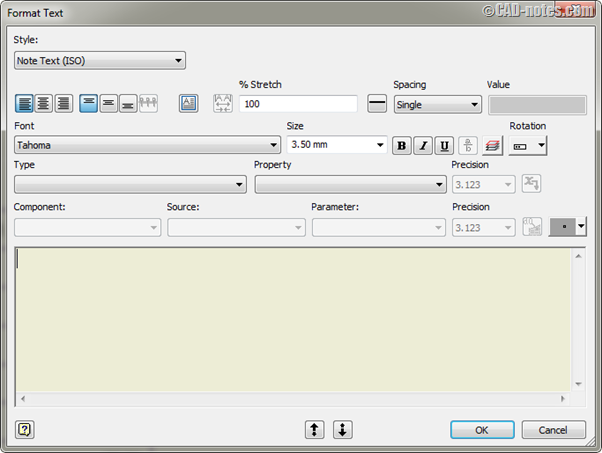
c8. Select “Custom Properties – Model” in “Type” drop down menu. Then select “Module” in “Property” drop down menu. After that click ![]() symbol to apply the change. And “Module” property will look like this.
symbol to apply the change. And “Module” property will look like this.
![]()
Click “OK” to save the changes.
Now “Module” parameter has been added to the table.
c9. Do same step to other parameters then the table will look like this :
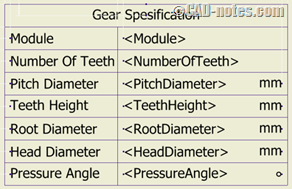
c10. Select “Finish Sketch” on “Exit” panel in “Sketch” tab. And save the note with name “Gear Specification”.
c11. And the table will be automatically filled by the same dimensions in Parameter of Pinion Gear.
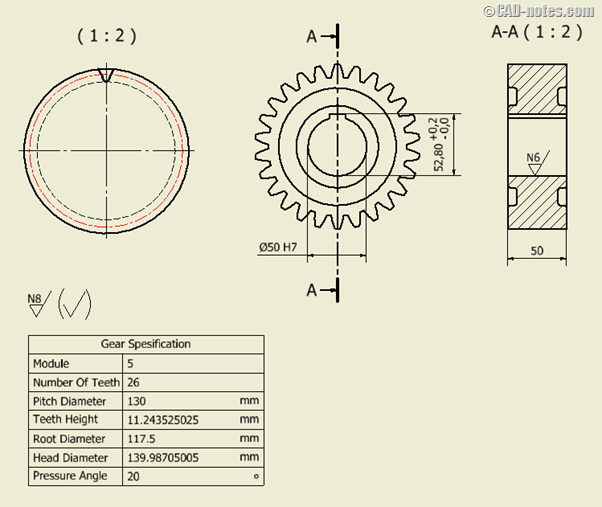
Now, the note that you have made can be used as a standard note for the other gears drawing. But, before make a gear drawing you have to fill custom properties in advance.
For example, you can repeat part b1 and b2. But in “Export tooth shape” dialog box you have to select “Gear” in “Export” column. And you will have other gear that you will use for exercise. Save this part with name “Gear”.
Now, after you added Parameters and Custom Properties required to make the drawing, you can insert this model into drawing have been made before. Please follow this step.
c12. Delete existing model and annotations in the drawing. And then insert “Gear” into drawing and modify the sketch line like before.
c13. Click “User” ![]() on “Symbol” panel in “Annotate” tab. Select “Gear Specifications” on the right column.
on “Symbol” panel in “Annotate” tab. Select “Gear Specifications” on the right column.
c14. Place the table like picture at part c11. Right click and select “Continue” to place the table.
Now the table will be automatically filled by the same dimensions in Parameter of Gear. And if you success in this exercises the drawing will look like the picture below.
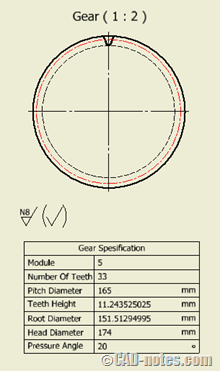
I hope you enjoy during do the exercises.
This tutorial is expected can be used in wider application in manufacturing processes. The solution in this tutorial is well used for companies working in the field of precision tooling or general manufacturing. Moreover, for the companies that use Inventor Parametric Modeling, this solution will be very useful.


Thanks for uploading this solution. I have a following question:
Is there a way to control the precision in the decimal places for the values in custom table?
For e.g,,in c11 for teeth height, can you change the precision to show only three(11.244) decimal places instead of nine (11.243525025)?
thanks you
very helpful ,That’s what i need to understand and you are clearly erase the doubt.
Thank you for your tutorial. The link to download the example is not complete. I can only download the iam-file, not the parts.
kindly Regards
Hans Joachim Kemmann
Hi Hans,
We apologize for the incorrect link. We have updated the link so you can download all the necessary files.