In this Article...
You have learned how to precisely specify points by their coordinates. However, sometimes we need other methods to define points. There are some drafting tools that we can use to help us in specifying points.
![]()
AutoCAD Object Snap
Object snap is a tool that you can use to refer for a location from existing objects. For example, a center point of an arc or circle. You can snap to a reference point after you see the snap symbol on that point. Below is an example for midpoint snap.

Object snap is only working when AutoCAD is asking you for a point. You will not see the object snap symbol when AutoCAD is not asking for point.
Object Snap Settings
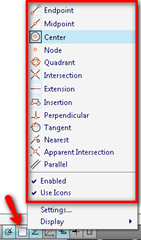
There are many modes of object snap you can use. Activating all of the object snaps is not a wise decision. You will find difficulties snapping to objects when you have complex drawing. You need to decide which object snaps you commonly use. To activate or deactivate object snaps, you can right click on object snap button, and choose the object snap.

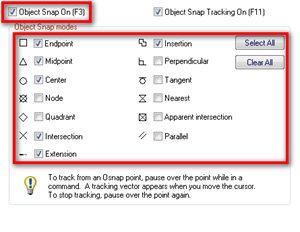
You can also click settings… to open the settings dialog box. You can turn off the object snap (for all modes of snap) or you can check/uncheck a single snap mode.

Hint: You can press F3 to turn on/off object snap.
Overriding Snap Mode
You have decided which object snaps you mostly use. However, you will need to use other snap mode eventually. And sometimes when the drawing become very crowded, you will wish only one snap mode is active. No need to change the object snap settings.
You can simply hold [shift], right click your mouse. AutoCAD will show you snap override context menu. This will ignore your object snap settings temporarily, and use only the snap mode you choose. Remember, you can only use object snap when AutoCAD is asking you for a point!
Polar Tracking
When you draw an object, and your pointer is about parallel to AutoCAD axis, what will happen? It’s getting sticky and the angle show multiplication of 90 degrees. This is the polar tracking. It will track your pointer when at certain angle and snap your pointer. You can type the relative distance without typing the angle. This is very useful when you need to draw parallel lines. Simply move your pointer, snapped to the axis and type the desired distance.
![]()
By default, it will track your pointer when it’s at 90 deg, 180 deg, 270 deg, and 360 deg. We can change the incremental value by right clicking the polar tracking button, and choose incremental angle from the list.
![]()
Try to take a look in settings dialog for more control.
Object Snap Tracking
Object snap tracking works with object snap. If you turn object snap off, then this tool will not work. This tool will help you to define a point from another point in an object.
In this example, I want to define a circle center 400 units to the right of a rectangle corner. So I activate circle tool, place my pointer above the corner point. Wait for a while until AutoCAD recognize the point, and move your pointer to the right. The dynamic input should say ‘extension:…’. Type the distance and press [enter].
![]()
You can use more than one point as reference. In this example, I use object snap tracking to find a rectangle center.
![]()
Or to find extended intersection from two lines.
![]()
I guess now you have enough knowledge to start drawing with AutoCAD precisely. We will start an exercise on the next tutorial.


Very good lesson
Hi Edwin,
For a couple of weeks my Object Snap tracking hasn’t been working at all. I’m running 2015 at the moment. I have all three Auto Track Settings “ticked”. The colour is still set as the default and I have the Object snap tools on, with the ‘apparent intersection’ and ‘intersection’ all on. Any help with this would be amazing
Lochie,
Have you tried to reset AutoCAD to default settings? Be careful, if you use any customization you will lose it after you reset the settings.
You can reset AutoCAD settings by following this procedure: http://knowledge.autodesk.com/support/autocad/troubleshooting/caas/sfdcarticles/sfdcarticles/How-to-reset-AutoCAD-to-defaults.html
Another great article. The author really is an expert for AutoCad and breaks everything down very nicely. For beginners or even experienced users this article is great to get started. Thanks.
hello edwin,
I still have another idea for Autocad choosing the correct object snap for what you want if the objekts are to near
namely you can push the tab-button and this will switch between the capabilities of your selectet objekt snaps
bye björn :)
Hi Björn,
Thank you for the additional info :) I'm kind of forgetting that.
Yes, we can press [tab] to cycle between near/overlapped snap points.