 Let’s continue our tutorial. You have tried several wall types in the previous Revit tutorial. You might find out that even Revit has many types of walls, you need to define your own types. This is what we are going to do now, creating our own wall types!
Type vs Instance Properties
First thing first. We will discuss the difference between instance and type properties before creating your own types.
What’s an instance? Every objects in your model is an instance. Some of them might use a same type. If you change a type properties, such as thickness, then every instance using it will use the new property.
But if you change instance property of a wall, it will not affect the others that use the same type. For example, if you change a wall height. It won’t affect other wall’s property. Try to open type properties dialog and instance properties dialog and compare them.
Creating a New Wall Type
Next, we will create a standard type of wall. This is the common type used in Indonesia, and I believe in Malaysia too.
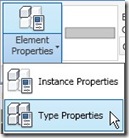
Activate wall tool. Click element properties, then select type properties. We don’t want to mess the original properties, so we will create a duplicate for this wall type. Click duplicate on type properties dialog box.

When Revit ask you for this type name, enter ‘Brick wall – 150mm’ then click OK. Now we will edit this type structure properties. Click edit button next to structure. It’s under construction parameter.
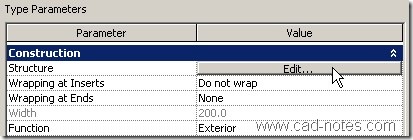
You will see next dialog box: edit assembly. Right now, there’s only one layer on this wall type. Change the layer thickness value to 110.
Adding More Layers
Click insert twice to add 2 more layers. Change the 1st layer you added, it’s function to Finish 1 [4] and the 2nd layer function to Finish [5]. Then change both thickness to 20.
Arrange the layers as you seen below. Select layer you want to move, then click up or down button. Layers on top of core boundary will lie on the exterior side. And layers on the bottom of it on the interior side.
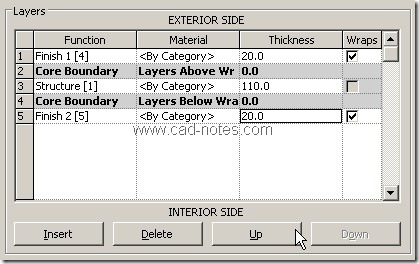
You have finish adding new layers, now we will define their materials. Click <By Category> in material column for Structure [1]. Click … button to open materials dialog box.
Select ‘default’ material, then click duplicate. Give this material name: brick wall structure.
![]()
Defining Pattern and Materials
Now, let’s change how this material will appear in our model. Change the cut pattern to Brickwork.
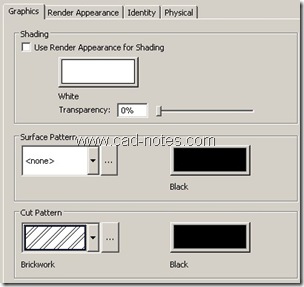
Click OK to close this dialog. Now do the same step above to define new materials for our wall finish. Define ‘interior finish’ and ‘exterior finish’ material. For this two materials, activate ‘use render appearance for shading’.
You don’t need to define pattern for this two. But you will need to define how they would look like when you render the model. Click render appearance tab.
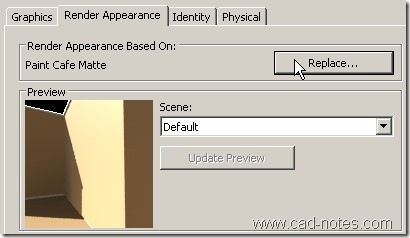
Click replace button to select render material you wanted. There are a bunch of materials you can use, without having to define it by yourself!
Remember: two materials definition. One for exterior side, and the other for interior side.
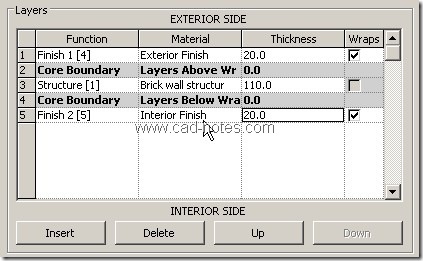
Select all your wall, change their type to our new wall type definition. Review your model in plan views. You might want to activate thin lines to see your model clearer. It’s on view tab of your ribbon.

Next, we are going to cover other type of Revit object. We will create floor.
*You can purchase this tutorial compilation in an e-book. Find out the books in our E-Store .


Have just found your notes. I am a novice user of revit. I wish to create new walls but cannot see any of the materials I want in the revit library. For example, I want to create a wall with an external layer of corrugated steel cladding on timber or metal strapping, on stud framing.
How do I add corrugated metal as a cladding? Or any other materials that are not included in the current libraries?
I look forward to your advice.
Hi Tony,
You can just create a rendering material for this purpose. Read this discussion why you should just use the rendering.
However, if you want to create it physically anyway, you can try this tutorial on the Knowledge Base.
I need to create a “Tire Wall” like what is used when building an Earthship house. Is there a way to create a new type of wall that would represent a tire wall?
Very useful, thank you so much.
Hi… Edwin how do you create vertical wall with 45° angle cut on top side.
Reply
Pravin
You can add a reveal in your wall family. Have you read this? https://www.cad-notes.com/creating-vinyl-siding-wall/
wall height u can change in properties pannel or in top at first before creating wall.
PLS COMMENT HERE IS THERE ANY POSSIBLE CHANGES APPLICABLE IN THIS 3D HOME CREATED BY REVIT ARCH. CLICK DOWN
http://arkiplans.blogspot.com/2012/09/3d-home-usi…
how do i change wall heights?
Hi Nick,
You can check it here: https://www.cad-notes.com/2009/06/finishing-your-walls…
How do you create a sloping wall?
Paul
Hi Paul,
there is no direct way to do it in Revit. You need to create wall by face or model the wall in place.