In this Article...
Revit has many ways and settings to control object appearance. This could be confusing for Revit users, either they are new or have used it for a while. The settings out of the box usually are good enough to get you started. However, we always need to change the appearance to conform our standard.

So this time, we will cover how you can change object appearance in Revit views. From the basic to overriding appearances in views.
About Revit Object Styles
The first thing you need to know is using Object Styles. Objects styles controls how objects appear in all Revit views. If you change it here, the object appearance in all view will change.
You can access Object Styles in Revit ribbon> Manage tab> Settings panel.

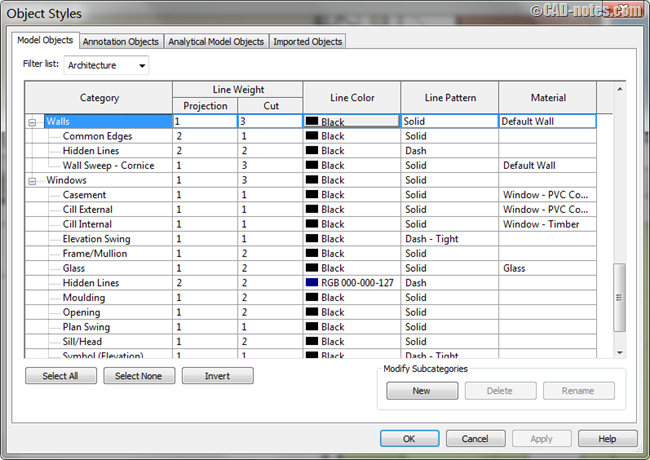
After you click the icon, you will see Object Styles dialog below. There are 4 tabs here. Object Styles allow you to control appearance of model objects, annotation objects, analytical model objects and imported objects.
The table shows several columns, the left most column is the object category. On the right side is the object property when it appears in your views.

Objects Line Weight
Let’s check the doors style.
The line weight for door projection is 1 and when it’s cut the line weight is 2. It means the door use the thinnest line weight when it appears in elevation, section and 3D view. Those are where typically doors are not cut.
When the door is cut in plan view, the line weight will be thicker. It uses 2. Remember, door in floor plan is cut as defined in view range. If you are not familiar with view range, you might want to read this article. And of course, if you place section line to cut a door, it will use line weight 2 as well.

Let’s cover about this further.
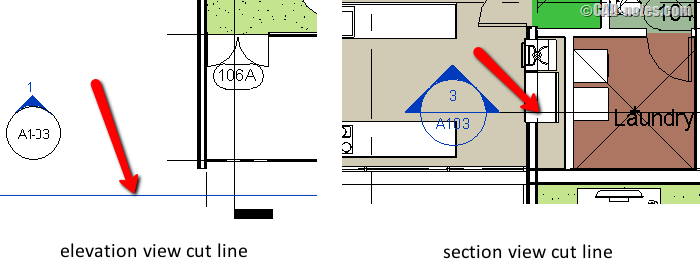
See the image below. The left image show where elevation view line take your model and create elevation view. All objects in front of that line will be visible in elevation view.
As you can see, the door 106A is not cut. The right image shows where the section view cut your model. The door in laundry room is also not cut.

Now let’s see how a floor plan is created. The line no. (2) is where the model is cut to create plan view. You can see the wall, door and window are cut here. So they will use line weight as defined in cut column.

Objects Line Color and Pattern
For line color and pattern, you can see only one column is available. You can choose other color or pattern by clicking the cell and choose other color or pattern.

Objects Material
The last column is for objects material. Objects will use value in this column, if material in object type is define <by category>.

Another condition when this object will be used is when you set the detail level to coarse. The object will use material defined here regardless what you set in object type.

Revit will only use material in object type when you set detail level to Medium or Fine.
Object Subcategory
Try to click (+) sign at the left side of object category. You will see the subcategories listed there. Most model objects have subcategories.
In this example is subcategories for windows.

You can see that you can define styles for each subcategory like the windows frame, glass and so on.
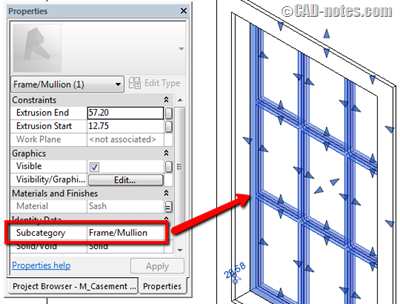
Usually, subcategories for objects are defined in family editor. For example, this window below is opened in Family Editor.
If I select the windows frame as shown below, I can see that the objects subcategory is Frame/Mullion.

Most of the subcategories name are self explanatory, but you might need to open the family in Family Editor to check the subcategories.
Category Filter List
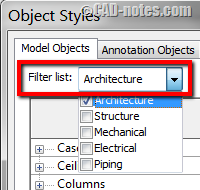
Categories that you see in the Object Styles list usually are the architectural objects. If you work with Revit in Building Design Suites bundle, you have all flavors of Revit. To view other category types, like structure categories, you need to change the filter list. You can choose multiple types from the list.

Conclusion
Object Styles is the basic settings to control objects appearance. If you want to change object appearance in all views, then you need to start here. We only cover model objects here, but the annotation, analytical and imported objects are similar. Same rules also apply there.
We cover more about controlling appearances using View Overrides.


[…] Controlling Revit Appearance: Object Styles […]
You guys are great…keep it up