Revit 2026 continues to focus on improving documentation efficiency, one of the most popular new feature is View to Sheet Positioning.
If you have ever spent hours manually dragging and aligning floor plans or details across dozens of sheets to ensure they sit in the exact same spot, you know how tedious that process can be. This new feature can automate that alignment.

In this post, you will learn:
- What View to Sheet Positioning is.
- How to configure and use the feature.
- Why Scope Boxes are critical for this workflow.
About View to Sheet Positioning
In previous Revit versions, we relied on Guide Grids or third-party add-ins to align views on different sheets. While Guide Grids help, they still require manual snapping for every single view.
The View to Sheet Positioning feature in Revit 2026 allows you to define a “Master View” position. Once established, you can instantly align other views on different sheets to that same coordinate. This ensures that when you flip through a PDF set, the building doesn’t “jump” around on the page.
Step-by-Step: Configuring and Using the Feature
The workflow is straightforward and integrated into the Sheet view properties. Here is how you can use it:
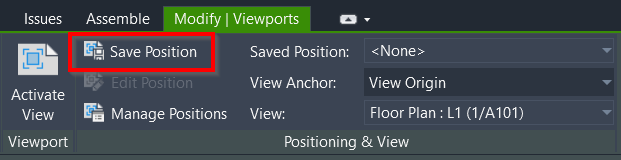
Place your Master View: Open a sheet and place your primary view (e.g., Level 1 Floor Plan). Position it exactly where you want it on the title block. Select the view then save the position by clicking the button on the Modify tab> Positioning & View panel.
Now when you need to align another view on a different sheet, you can refer the position with this saved position. With the view selected on the sheet, look at the Properties Palette. You will see a new parameter for Sheet Position. (Note: You can also access it on the ribbon> contextual tab.)
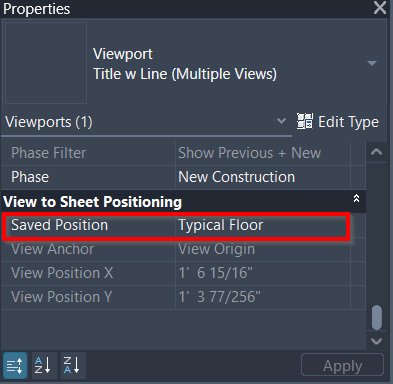
Select a Saved Position as the reference, and Revit will move the viewport to the matching coordinates automatically.
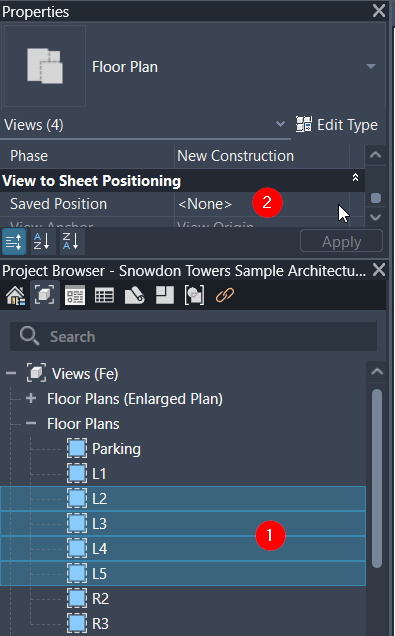
Pro Tip: You can select multiple viewports across different sheets in the Project Browser (1) and apply the positioning (2) settings in bulk to save even more time.
You can see how it works here
Importance of Scope Boxes
While you can align views using their centers, this is often unreliable if the view boundary varies between floors. This is where Scope Boxes become essential: by assigning a Scope Box to your views, you define a fixed boundary. If your Scope Box is correctly positioned, the View to Sheet Positioning tool will work perfectly every time, regardless of how much the building’s footprint variations between levels.
If you haven’t started using Scope Boxes for your project setup yet, this feature is the perfect reason to start.
Summary
The saved position in Revit 2026 is a small but powerful update for Revit users. It removes the guesswork and reduce time from sheet production. By combining this feature with a well-placed Scope Box, you can ensure your drawing sets are professional, consistent, and much faster to produce.
What do you think about this new feature? Will this replace the way you use Guide Grids, or do you prefer the old-school manual alignment? Share your thoughts in the comments!


This is all well and good if your view is the whole floor plan, the scope box and therefore view size will be the same size consistently across the sheets.
Unless it has changed in the latest versions, due to the inaccuracies of sizing scope boxes, all you have is drag grips with no fine control/alignment options over the actual boundary, your views will all be different sizes across the adjoining areas.
I know this because I am currently doing it on a large floor plan with multiple scope boxes that are all slightly different sizes because you can’t accurately size scope boxes.
Using a third party view alignment tool there are, albeit small, variations of the position of the view across the sheets as the distances to the gridlines to the edge of the scope boxes vary.
I missed out that I am using dependant views to cover a large floor plan. I have scope boxes for areas across the floor plan that are all slightly larger or smaller than the one next to it due to not being able to accurately control the size of of the scope box.