• Home
  • Training Books
  • Subscribe to Our Email Newsletter
  • About
    • Contributors
    • Feedback
    • Contact
    • Privacy policy
    • Cookie Policy

CADnotes

CAD Tutorials and Best Practices for professionals and students

  • Featured
  • AutoCAD
    • AutoLISP
  • Revit
    • Revit Architecture Basic
    • Revit MEP Basic Tutorial
  • Inventor
  • MicroStation
    • MicroStation Basic Tutorial
You are here: Home / Revit / Override Graphics in View by Element

Override Graphics in View by Element

August 26, 2021 by Edwin Prakoso Leave a Comment

In this Article...

  • Before You Start
  • Why Do We Need to Override by Element?
  • You May Want to Create a Specific View for It
  • How It Works
  • To Sum Up

There are several ways to control Revit view appearance. One setting can override the other. We covered them in the articles below:

  • Controlling Revit Appearance: Object Styles
  • Controlling Revit Appearance: View Overrides
  • 3 Benefits of Using Revit view filters

There is one more override that most of us don’t realize: override graphic in view by element.

Before You Start

Before you decided to use this, remember these:

  1. It is difficult to find which element is overridden, so you need to find a way to communicate it if you override graphics by element.
  2. This override only works in a specific view. It means the other view won’t be affected.
  3. You can use override graphics in view by element in a view that uses a view template.

Why Do We Need to Override by Element?

Ideally, we can use a view template to allow us to enforce the standards to all views. However, for a certain purpose, we can have a little freedom. For example, you want to present the view for a presentation or for a brochure, like an example below.

See: https://3dme.xyz/CompellingRevitViews

Overriding the setting by element is the easiest way to do it. You can quickly change the color, line thickness, or pattern for artistic purposes.

You May Want to Create a Specific View for It

If you want to use the view for a different purpose like presentation, then you should create a duplicate and override it by element in there. You don’t want to mess with the views that you use for printing. Rename the view to let your team knows the view is there only for a specific purpose.

The reason I emphasize this is because many Revit users are against override by element. It is not easy to find the elements you have overridden and it can look against the company standard.

How It Works

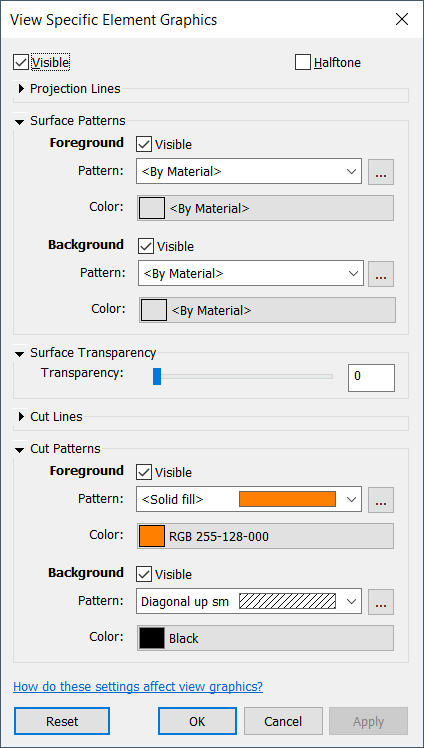
You can select one or more elements then right-click, choose Override Graphics in View> By Element.

The settings are exactly the same as Object Styles and Visibility Graphics Override. If you are already familiar with the setting, then the properties below should be no problem for you.

If you are not familiar with it, then check these articles:

  • Controlling Revit Appearance: Object Styles
  • Controlling Revit Appearance: View Overrides

To Sum Up

Revit has so many ways to change the view appearance. Each of them is useful for a different purpose. One can be strict and make it easier to maintain company standards, and the other one can give you the freedom to quickly make a presentation.

Whatever you use, make sure it doesn’t disrupt your workflow and standard.

About Edwin Prakoso

I work as a Sr. Consultant in PT Cipta Satria Informatika. I've been using AutoCAD since R14 and Revit since Revit Building 9. I occasionally write for AUGIWorld magazine and I am also active in Autodesk discussion forum. I'm a member of Autodesk Expert Elite, an appreciation for individuals who give contributions to the Autodesk community.
Connect with me on twitter or LinkedIn.

Filed Under: Revit

0 0 votes
Article Rating
Subscribe
Login
Notify of
guest

guest

This site uses Akismet to reduce spam. Learn how your comment data is processed.

0 Comments
Inline Feedbacks
View all comments

Featured

30 Tips and Tricks to Work Better with Revit

Revit is pretty straightforward to use. But it doesn’t mean that we can’t find something new to increase our productivity. Either you are new to Revit, or already use it for years, there are always new things we can learn!

Recent Articles

  • Autodesk Construction Cloud Activity Log
  • Exporting AutoCAD Plant 3D Model to Navisworks
  • Autodesk Data Connector for Power BI is Now Available

Advertisement

New on CADnotes

  • Autodesk Construction Cloud Activity Log
  • Exporting AutoCAD Plant 3D Model to Navisworks
  • Autodesk Data Connector for Power BI is Now Available
  • Autodesk Forma Design Contest
  • Revit 2025: Toposolid Enhancements

Meet the Authors

avatar for
avatar for
avatar for
avatar for
avatar for
avatar for

Get Connected

CADnotes on FacebookCADnotes on InstagramCADnotes on TwitterCADnotes on YouTube

© 2009 – 2025 CADnotes · Feedback · Privacy Policy · Become an affiliate

wpDiscuz