• Home
  • Training Books
  • Subscribe to Our Email Newsletter
  • About
    • Contributors
    • Feedback
    • Contact
    • Privacy policy
    • Cookie Policy

CADnotes

CAD Tutorials and Best Practices for professionals and students

  • Featured
  • AutoCAD
    • AutoLISP
  • Revit
    • Revit Architecture Basic
    • Revit MEP Basic Tutorial
  • Inventor
  • MicroStation
    • MicroStation Basic Tutorial
You are here: Home / AutoCAD / Faking a Door With Material Texture

Faking a Door With Material Texture

August 4, 2010 by Edwin Prakoso 6 Comments

Imagine this: you are an interior designer, and one day your client show you a brochure or a catalog.

“I want my front door like this. Can you put it in your model and render it for me? And make the rendered model nice.”

What do you think if your client want a door like below?
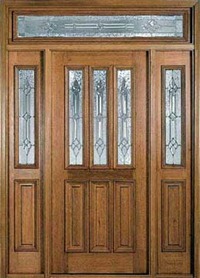
classic door

It definitely take some time to create it. And become harder if your client is quite hard to be satisfied. He may come back later and want another door model!

If you want to represent a complex object like that, especially for quick presentation, you don’t need to model it. In the previous tutorial, we created a painting with material texture. Well, you can do the same with this door! I’ve seen many people have used this trick. However, some people never use it. When I show it, many of them are surprised. So let’s see how we can do it.

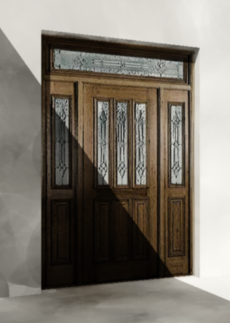
I quickly model walls, floor, and a door like this. The door is simply a 3D solid box.
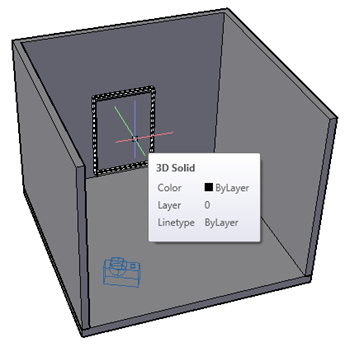
3d_solid

Then I created a rendering material using the image. I set the scale to match the solid geometry size.
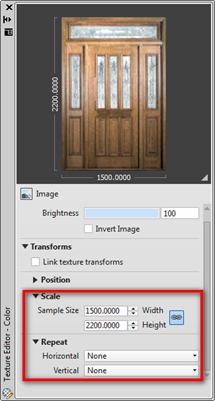
texture_transforms

How long do you need to create that?

This is the image I rendered in medium quality. Not bad for a few minutes modeling. I wonder how it would take to actually create the model…
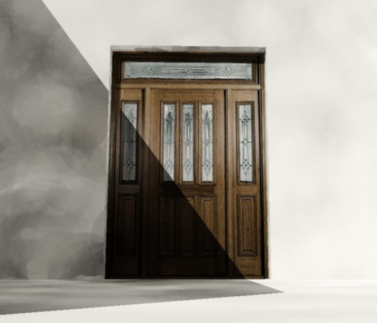
door_front_final final_door

About Edwin Prakoso

I work as a Sr. Consultant in PT Cipta Satria Informatika. I've been using AutoCAD since R14 and Revit since Revit Building 9. I occasionally write for AUGIWorld magazine and I am also active in Autodesk discussion forum. I'm a member of Autodesk Expert Elite, an appreciation for individuals who give contributions to the Autodesk community.
Connect with me on twitter or LinkedIn.

Filed Under: AutoCAD Tagged With: autocad 3D, rendering material, rendering material texture

0 0 votes
Article Rating
Subscribe
Login
Notify of
guest

guest

This site uses Akismet to reduce spam. Learn how your comment data is processed.

6 Comments
Inline Feedbacks
View all comments
Sandra
Sandra
11 years ago

Nice tip!
One quick question though. Would it be possible to conjugate this with cutouts, so one could actually have the light come thru the windows?

Sandra

0
Reply
Edwin Prakoso
Edwin Prakoso
Author
Reply to  Sandra
11 years ago

I’ve never tried that! It’s a great idea. I’ll try that and will back to you.

0
Reply
Nick
Nick
13 years ago

Hi Edwin
My trick has been copy and paste the jpeg or bitmap onto the drawing.  Can you tell me the pros and cons of the two different method?

0
Reply
Edwin Prakoso
Edwin Prakoso
Reply to  Nick
13 years ago

Pasting image to a model has limited capability. If you want more control, you need to create a material. You can add bump for texture, transparency, etc.

0
Reply
rojali
rojali
14 years ago

don't try that

the glass door cannot works as glass view

0
Reply
Melchior
Melchior
14 years ago

The result looks very nice. I'm gonna try that one too..

Thanks

0
Reply
wpdiscuz   wpDiscuz

Featured

What’s New in AutoCAD 2021?

Autodesk released AutoCAD 2021. What’s new? Is there something that you expected? Find out here.

Recent Articles

  • Autodesk Construction Cloud Activity Log
  • Exporting AutoCAD Plant 3D Model to Navisworks
  • Autodesk Data Connector for Power BI is Now Available

Advertisement

New on CADnotes

  • Autodesk Construction Cloud Activity Log
  • Exporting AutoCAD Plant 3D Model to Navisworks
  • Autodesk Data Connector for Power BI is Now Available
  • Autodesk Forma Design Contest
  • Revit 2025: Toposolid Enhancements

Meet the Authors

avatar for
avatar for
avatar for
avatar for
avatar for
avatar for

Get Connected

CADnotes on FacebookCADnotes on InstagramCADnotes on TwitterCADnotes on YouTube

© 2009 – 2025 CADnotes · Feedback · Privacy Policy · Become an affiliate

wpDiscuz