• Home
  • Training Books
  • Subscribe to Our Email Newsletter
  • About
    • Contributors
    • Feedback
    • Contact
    • Privacy policy
    • Cookie Policy
  • Bahasa Indonesia

CADnotes

CAD Tutorials and Best Practices for professionals and students

  • Featured
  • AutoCAD
    • AutoLISP
  • Revit
    • Revit Architecture Basic
    • Revit MEP Basic Tutorial
  • Inventor
  • MicroStation
    • MicroStation Basic Tutorial
You are here: Home / Revit / Creating a Perspective Floor Plan in Revit

Creating a Perspective Floor Plan in Revit

September 20, 2021 by Edwin Prakoso Leave a Comment

In this Article...

  • Preparing Reference Views
  • Create a New 3D View
  • Creating the Perspective Floor Plan
  • Video Guide
  • To Sum Up

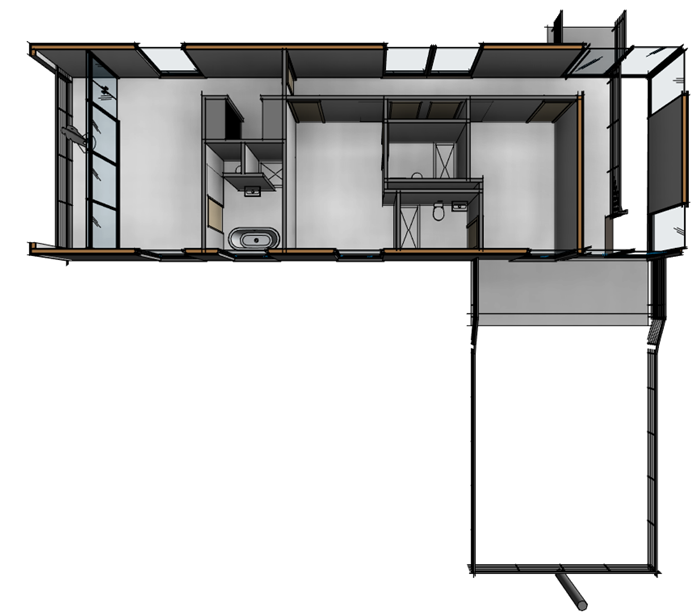
One benefit of having a 3D model is you have options on how to present the model. You can present it in 2D floor plans, elevations, reflected ceiling plans, or sections. And for a presentation, of course, you can show it in 3D. And what about a perspective floor plan like below?

It is also easy to do. Let’s see how to make it quickly, just in a few steps.

Preparing Reference Views

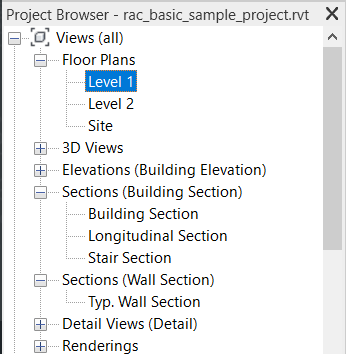
Before we create the view, you need to prepare a reference view first. If you want to refer to a floor plan, it is likely that you already have it. But if you want to create a perspective section, create the section first.

Create a New 3D View

Create a new 3D view.

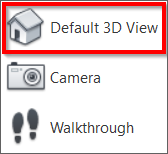
You don’t need to create it with a camera; you can easily convert it to a perspective view later.

Rename this view. Don’t use the default {3D} name. Revit might change the settings back to the default view settings. If the {3D} view doesn’t exist, Revit will create a new one with default settings.

Creating the Perspective Floor Plan

The tool to make the 3D view to refer to a floor plan is at the Home icon.

Right-click the icon. Choose from the contextual menu Orient to View.

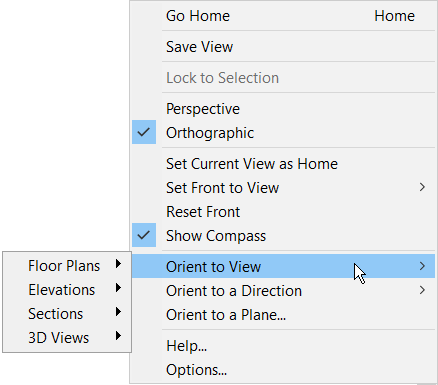
You have options to orient the 3D view to a floor plan, elevation, section, or another 3D view. Choose Floor Plans, then the floor plan that you want to use.

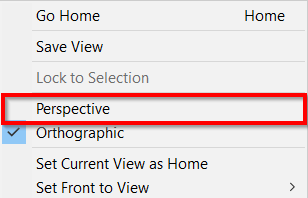
To convert this view to a perspective view, right-click the home icon, then choose Perspective from the contextual menu.

Video Guide

If you have a problem, refer to the video below to create a perspective floor plan.

To Sum Up

If you have a BIM model, there are many ways you can represent it. As you can see, it is easy to create a compelling view! Not only as 2D views, 3D views, but also as information in a schedule.

About Edwin Prakoso

I work as a Sr. Consultant in PT Cipta Satria Informatika. I've been using AutoCAD since R14 and Revit since Revit Building 9. I occasionally write for AUGIWorld magazine and I am also active in Autodesk discussion forum. I'm a member of Autodesk Expert Elite, an appreciation for individuals who give contributions to the Autodesk community.
Connect with me on twitter or LinkedIn.

Filed Under: Revit

0 0 votes
Article Rating
Subscribe
Login
Notify of
guest

guest

This site uses Akismet to reduce spam. Learn how your comment data is processed.

0 Comments
Inline Feedbacks
View all comments

Featured

engineering drawing

Work Better with AutoCAD | Challenge 2: Template

After completing the 1st challenge, this week you will work with templates. Our goal is to reduce repetitive tasks.

Recent Articles

  • Autodesk Construction Cloud Activity Log
  • Exporting AutoCAD Plant 3D Model to Navisworks
  • Autodesk Data Connector for Power BI is Now Available

Advertisement

New on CADnotes

  • Autodesk Construction Cloud Activity Log
  • Exporting AutoCAD Plant 3D Model to Navisworks
  • Autodesk Data Connector for Power BI is Now Available
  • Autodesk Forma Design Contest
  • Revit 2025: Toposolid Enhancements

Meet the Authors

avatar for
avatar for
avatar for
avatar for
avatar for
avatar for

Get Connected

CADnotes on FacebookCADnotes on InstagramCADnotes on TwitterCADnotes on YouTube

© 2009 – 2025 CADnotes · Feedback · Privacy Policy · Become an affiliate

wpDiscuz