• Home
  • Training Books
  • Subscribe to Our Email Newsletter
  • About
    • Contributors
    • Feedback
    • Contact
    • Privacy policy
    • Cookie Policy

CADnotes

CAD Tutorials and Best Practices for professionals and students

  • Featured
  • AutoCAD
    • AutoLISP
  • Revit
    • Revit Architecture Basic
    • Revit MEP Basic Tutorial
  • Inventor
  • MicroStation
    • MicroStation Basic Tutorial
You are here: Home / AutoCAD / AutoCAD rendering tip: Using cutouts map for removing materials

AutoCAD rendering tip: Using cutouts map for removing materials

April 8, 2011 by Edwin Prakoso 4 Comments

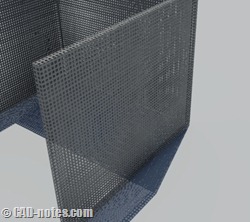
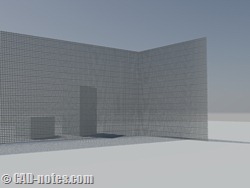
Do you ever need to create object like below when rendering? We may need to create something like this to create fences, add details to doors/windows or some other objects. If you usually create objects like this by actually subtracting the object, you may want to read more.

cutouts map rendering top cutouts map rendering

(click on image to see larger size)

I created simple solid object for the left image. And I simply add thickness for polyline for the right image. Then render it.

So how I can create holes for the objects? By defining rendering material.

We can accomplish the task by adding cutouts map to the rendering material. If you are not familiar with it yet, you may want to read this tutorial to create your own rendering material.

You can create your own map like below, or just save the image. I created the image below using rectangle and hatch tool. Then capture it. AutoCAD will remove the black color from your model when you render it.

transparency_map

Basically you need to create a generic material. This type of material allows you to add cutouts map. Then in materials editor palette, click cutouts to activate it.
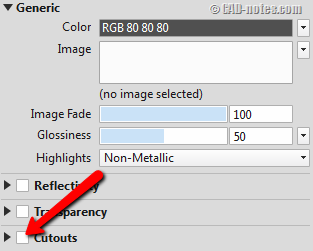
Cutouts

Now you need to define the image. Choose the image you created (or downloaded). You are done. Apply the material to your object, then try to render it.

Using this method is not only easier and faster. But also keeps your model simple. It means less time to model and render it. I would love to know how you use cutouts map. And you may want to share the rendering results, so we all can see it!
About Edwin Prakoso

I work as a Sr. Consultant in PT Cipta Satria Informatika. I've been using AutoCAD since R14 and Revit since Revit Building 9. I occasionally write for AUGIWorld magazine and I am also active in Autodesk discussion forum. I'm a member of Autodesk Expert Elite, an appreciation for individuals who give contributions to the Autodesk community.
Connect with me on twitter or LinkedIn.

Filed Under: AutoCAD Tagged With: autocad 3D, cutouts map, rendering material

0 0 votes
Article Rating
Subscribe
Login
Notify of
guest

guest

This site uses Akismet to reduce spam. Learn how your comment data is processed.

4 Comments
Inline Feedbacks
View all comments
sandeep
sandeep
11 years ago

Wonderful tip :)

0
Reply
Nick
Nick
13 years ago

Hi Edwin
" I created the image below using rectangle and hatch tool. Then capture it. AutoCAD will remove the black color from your model when you render it."
Can you please explain it step by step please as I can not follow?
Thanks.

0
Reply
Edwin Prakoso
Edwin Prakoso
Reply to  Nick
13 years ago

Hi Nick,
It was a simple drawing in AutoCAD. I created a rectangle, fill it with solid color then create an rectangular array.
To make it an image, all I need to do is to capture it (you can use SnagIt or press PrntScrn button). Or you can plot it to JPEG image.

0
Reply
rojali
rojali
14 years ago

NOT WORKS IN AUTOCAD 2007?

0
Reply
wpdiscuz   wpDiscuz

Featured

One AutoCAD, Seven Specialized Toolsets

AutoCAD 2019 has been released, with a big change. This is the special announcement Autodesk has been teasing you in the last few days. It’s not only AutoCAD 2019. You also get 7 specialized toolsets!

Recent Articles

  • Autodesk Construction Cloud Activity Log
  • Exporting AutoCAD Plant 3D Model to Navisworks
  • Autodesk Data Connector for Power BI is Now Available

Advertisement

New on CADnotes

  • Autodesk Construction Cloud Activity Log
  • Exporting AutoCAD Plant 3D Model to Navisworks
  • Autodesk Data Connector for Power BI is Now Available
  • Autodesk Forma Design Contest
  • Revit 2025: Toposolid Enhancements

Meet the Authors

avatar for
avatar for
avatar for
avatar for
avatar for
avatar for

Get Connected

CADnotes on FacebookCADnotes on InstagramCADnotes on TwitterCADnotes on YouTube

© 2009 – 2025 CADnotes · Feedback · Privacy Policy · Become an affiliate

wpDiscuz