Plotting AutoCAD drawing can be tricky. Especially for people who just learn AutoCAD. Saw several posts in the forum saying they are confused how to do it. Why the plot result is not correctly scaled. Plotting is actually very easy. Simple. Just click plot or publish then you’re done. But there are some rules and steps you have to do when you draw and arrange your model in layouts, it’s already started when you create your file!
1. Set Your Units!
The first rule is set your drawing unit correctly, and draw with that unit. I’m saw that many AutoCAD users actually don’t care about units. When they insert blocks with incorrect unit, it’s kind of messy. They have to rescale it manually. And this might sound weird, but some of them actually draw it by scaling it, just like drawing it manually on paper. Use appropriate template for your drawing. If you use metric, then use ISO templates. Or you may change the units after you draw. Basically AutoCAD only recognize two units in plotting: inch and mm. So the easiest for you is drawing in those units. Of course you can draw in meters, feet, or other units. But that’s a different story. Let’s talk about the basic first. Draw the object original size, not scaled. Draw all your objects. For annotations, there are two choices:
- Draw all your objects in model and annotation in layout
- Or you can annotate in your model and use annotation scaling (for AutoCAD 2008 or newer). We will discuss about this on separate post.
2. Set Your Page/Layout
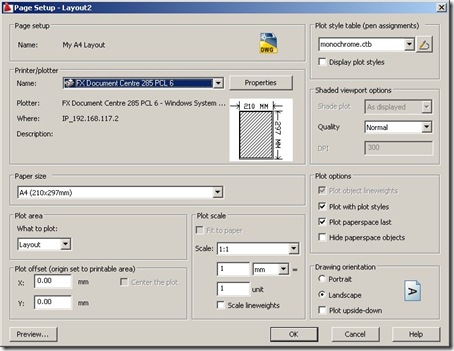
Next thing you should do is setup your page. Use layout, because it is easier to understand and easier to manage. Open your layout. We should already have a viewport. Delete it, we don’t need it at this time. We will create a new one, this one might will be seen too small or too large after we set our page. Now let’s set the page setup. Open your page setup manager. You can open it by right clicking over the tab name, then select page setup manager. Or by right click over quick view layout.

On your page setup manager dialog box, you can see a list of your layouts. Let’s create a new page setup. Click new, give it name such as ‘My A4 layout’, then click OK. This will open page setup dialog box.

Set this values below:
- Your printer/plotter type and sheet size.
- On what to plot, select Layout.
- Ensure plot scale 1:1.
- Plot style table you want to use.
We created this layout with real paper size. So we use scale 1:1. The only scaling we will do is scaling our objects view inside viewports. Click OK. Now click set current to apply the changes to your active layout. Your layout1 is ready. Open your layout2, then open page setup manager again. Select your previous page setup, then click set current. I believe there is an easier way, but can’t find it. I usually already have it setup in my template, or simply make a copy from existing layout. Do you have any suggestion how to apply the page setup to multiple layout?
3. Setup Your Title Block
Now you should see your real paper size. The dashed rectangle is the area where your printable area. Place your title block here. You can insert existing title block if you already have one, or draw a new one. Remember, this is 1:1 scale. So if you want to have 3mm height text, use 3mm as it heights.

4. Place Viewports and Set the Scale
Now we are ready to place our viewport. You can place it by clicking new in view tab, viewports section, new icon. Or you can use viewport configuration.

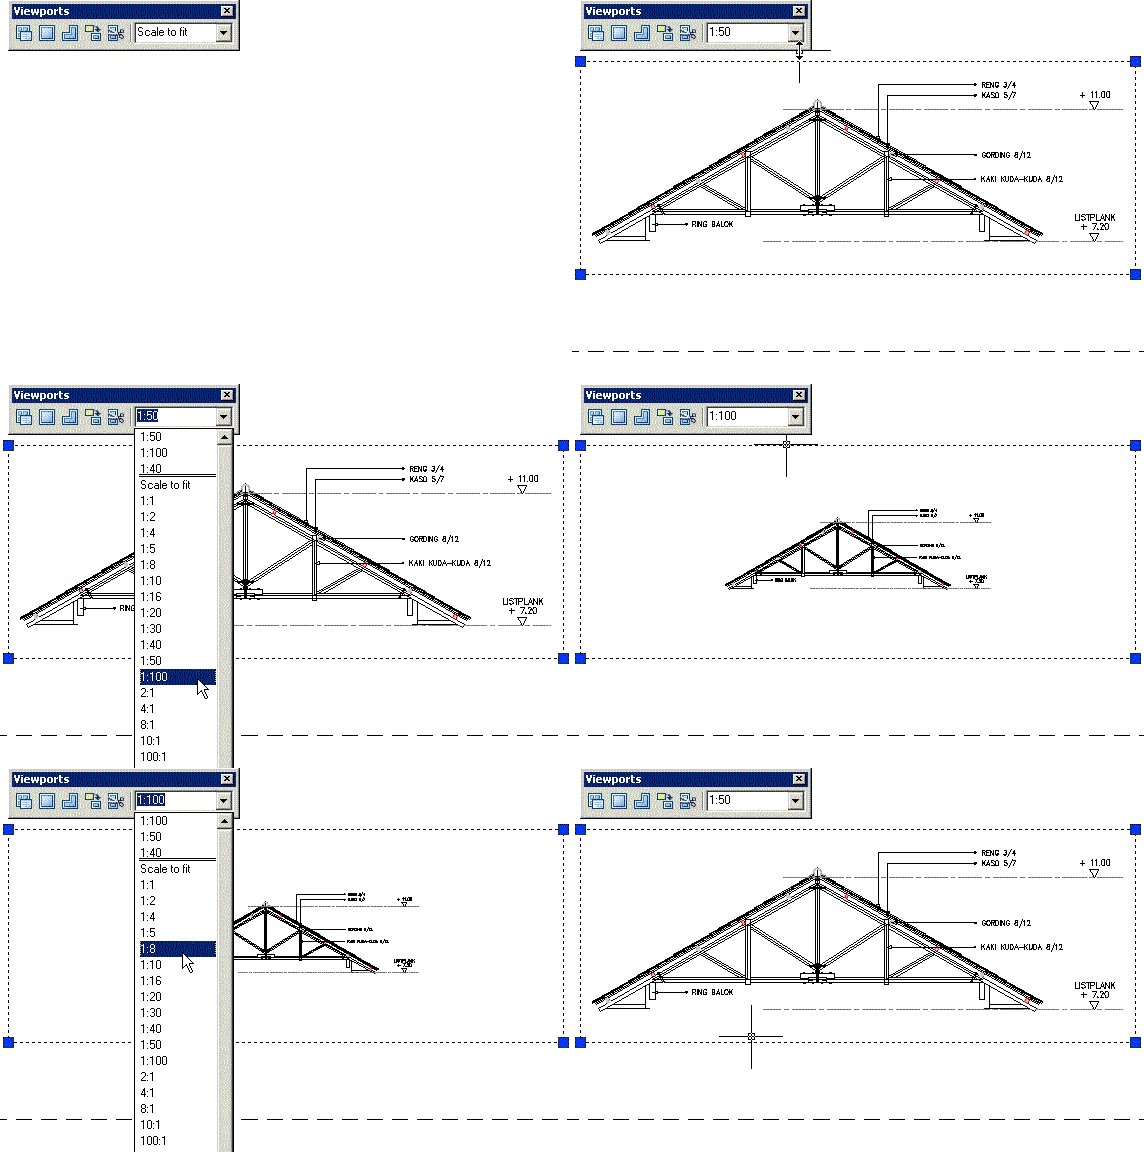
In the opened dialog box, select single standard viewport, then click OK. Draw your viewport as you desired. You should see all your drawing inside it. Or in the old way, I prefer to type MV then [enter] :) Next, set the scale. Select your viewport, and select the scale you wanted. You can do it from viewports toolbar or annotation scale bar.

5. Plot it!
Just activate plot by hitting [ctrl] + P or typing PLOT [enter]. Or of course, from menu or ribbon. Everything should be ready now, but check it first by seeing the preview. If you already familiar with it, you can try to publish multiple drawings at once. Not so difficult now, right? I’m looking forward if you have other plotting tips you would like to share.


Sir,
I am new to Autocad, please clarify me how could I set a paper plotting for an actual land.
The scale is 32″= 1 mile ( 63360″).
That means in paper 32″ equals to 63360″ land. So, the scale factor is 1″in paper= 1980″ in land.
Please show how to set the scales in dimension so that I could draw a plot in the given scale of 32″ = 1 mile.
quite tricky to plot..thanks for sharing
This page has been very helpful. Thank you.
I’m glad that you find it useful Daniel!
i cant print oversize A1 landscap
how to take print of drawing from autocad. and if i have to learn it then please guide me .
how to take print of drawing from autocad
I am currently using CAD 2017. I have set my units to Arch and inches. In Model space I have set my scale to 1″=8′ – 0″. However, in Paper space I have to zoom in just to see the drawing. I need to plot to 24 x 36 in a specific scale. How do I set everything so it plots to desired scale and it fills in paper and shows title block too?
David,
Are you familiar with Layout and Viewport? The dashed line in the layout is the printable area. So you need to create your title block in that boundary.
You can adjust the viewport scale by changing the scale as shown in point #4.
Thanks very much…. I can now do my structural Designs with scale and plot….
I am really grateful.
Thank you Edwin it is very good and helpful.God bless You!
Hello.. This isn’t what I need explanation on, I was talking about how to set up a new page while about to draw on auto cad..
Pls, I need a quick positive reply.
Thanks, Paul.
So helpful. I was doing whole thing wrong. Thank you.