In this Article...
In the last article, we learned about XREF concept. Let’s continue to the tutorial. How to attach a drawing as External Reference?
Let’s open AutoCAD and create a new drawing. Save the file as “My File.DWG”. This is your file that you will use for design. It’s the host file. You will attach more drawings to this file.
Attaching DWG
Before you start, find AutoCAD sample files in this folder: C:\Program Files\Autodesk\AutoCAD 2017\Sample\Sheet Sets\Architectural\Res.
Copy all files in that folder to D:\XREF Tutorial\Base.
In AutoCAD, make sure you are working on “My File.DWG”. Type XREF on the command line and press Enter. You will see the External References palette.
Click the arrow near the attach tool, select Attach DWG…
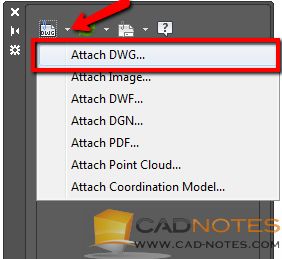
Select Structural Base1.dwg and click open.
Alternatively, you can type XATTACH on command line to attach a DWG file. Or ATTACH to attach all supported file types!
Attachment Options
You will see the options to attach this reference file. In this article, we will learn about scale, insertion point, and block unit. We will cover about Path type and Reference Type in other articles.
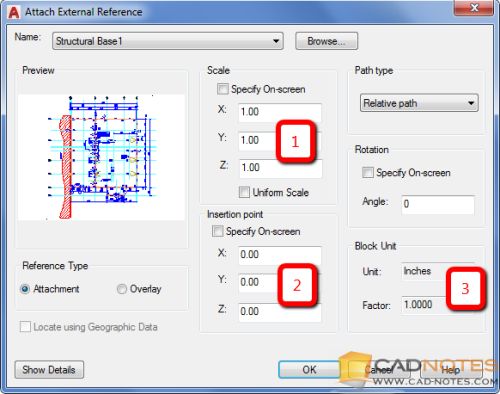
If you are familiar with AutoCAD block, this is a similar dialog box.
You can define the drawing scale (1) if necessary. We usually don’t need to change this. But if you need to work with different scale, you can change it. A good example to change this option is when you need to exaggerate the drawing scale for a road long section like this. For this tutorial, uncheck Specify on Screen and make sure all scales are 1.
Insertion point (2) will define where you want to place the reference file. I would suggest using 0,0,0. It would be easier to have the same coordinates for all files. For this example, uncheck Specify on Screen and all coordinates are 0.
Block Unit (3) is for review only. If your host file uses the same units as the reference file, the scale factor should be 1. If the host file and the reference file use a different unit, the scale factor will show the conversion scale.
Click OK to place the reference file.
You should see the reference file is now listed in External References Palette.
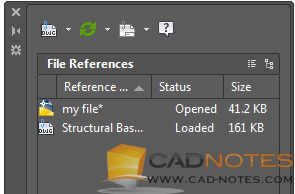
You can repeat the procedure if you need to add more reference files. Try to add Structural Base2.DWG.
Working with the Host File
Now you already have all references that you need. You can start working on your files and continue the design. You can continue to draw as usual.
We will continue our XREF tutorial and we will cover about Path Type.


