We have a tutorial how to create a Revit title block family from your DWG file. In that tutorial there is a discussion on how we can have custom labels on our sheets.
Let’s get started.
Open your title block family. If you created one from this Revit tutorial, you can use it.
Creating shared parameters
If you haven’t created a shared parameter file, refer to this tutorial.
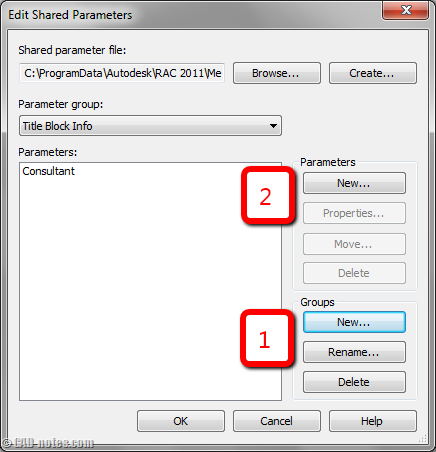
Go to manage tab on your ribbon. Click shared parameters in settings panel.

It will open a dialog box.
- Click new under groups. Type title block info then click OK. We will put every shared parameters related to title block here.
- Now let’s create a parameter. Click new button under parameters group.

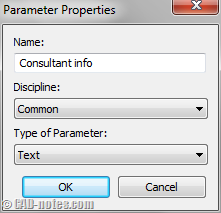
Name what custom information you want to show on your sheet. Here I want to show consultant information. Don’t forget to change the type to text.

Click OK. Repeat the steps above if you still have more custom information. After you finished, click OK to close the dialog box.
Add custom label to Revit sheet
Now let’s place the label to our sheet. Go to home tab. Click label in text panel.

Click where you want to place the label. This will open a dialog box.
Click add new parameter (shown by arrow below).

Another dialog box opened. Click select.
Choose your shared parameter then click OK. Click OK again until you see edit label (above dialog) the only dialog box opened.
Now you should see it’s in this dialog and selected.
![]() Click add parameter to label to use it.
Click add parameter to label to use it.
Click OK. Now we can see the label is updated.
If you have more labels you need in this sheet , repeat the steps above until you’re done.
Save the title block. Create a new project and load the template.
Adding parameter to Revit project
Now we are finished with the title block. Our next task is to use it in our project. You may want to create it in empty project file, so you can save it as a template. This will allow you to have them loaded every time you start your project.
With Revit project active, go to manage tab on your ribbon. Click project parameters.

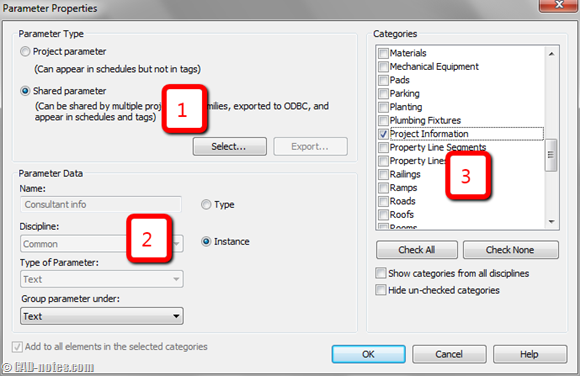
In opened dialog box, click add.
Another dialog box opened.
- Choose shared parameters then click select. Choose your shared parameter.
- Now you should see the data change.
- Check project information in categories.

We are finished now. Click OK.
Changing label values
We are done. We already have the parameters in our project, and labels in sheet to show them. Try to create a sheet using the family you customized before.
The label is still empty, but don’t be sad. We haven’t fill the project information yet. You do remember we put the parameter in project information category, aren’t you?
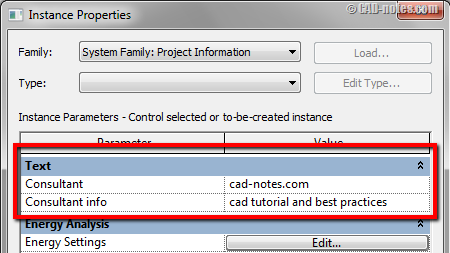
Click project information in manage tab.

Now you should see the custom parameters! Try to change the value and check your title block now.

They are now showing your custom Revit project information.
What kind of custom information you need to add in your title block? Can you add them using this method?


Hi!
I have made a title block on a sheet only to discover after hours of work that the information that I put on one sheet doesn’t show up on the other sheets. What I have done wrong?
Thank you.
a simple way is just create and insert a generic tag family with instance parameter in the sheet, and on the sheet link each text to a diferent text parameter.
watch the video below to understand better:
http://youtu.be/k2nf0hPEks4
hope it helps