• Home
  • Training Books
  • Subscribe to Our Email Newsletter
  • About
    • Contributors
    • Feedback
    • Contact
    • Privacy policy
    • Cookie Policy
  • Bahasa Indonesia

CADnotes

CAD Tutorials and Best Practices for professionals and students

  • Featured
  • AutoCAD
    • AutoLISP
  • Revit
    • Revit Architecture Basic
    • Revit MEP Basic Tutorial
  • Inventor
  • MicroStation
    • MicroStation Basic Tutorial
You are here: Home / AutoCAD / How to Keep Readable Text Orientation In AutoCAD

How to Keep Readable Text Orientation In AutoCAD

January 8, 2018 by Edwin Prakoso 1 Comment

In this Article...

  • Modifying Text Style
  • Creating the Attribute
  • Creating Tag Symbol
  • Creating the Block
  • Video Instruction

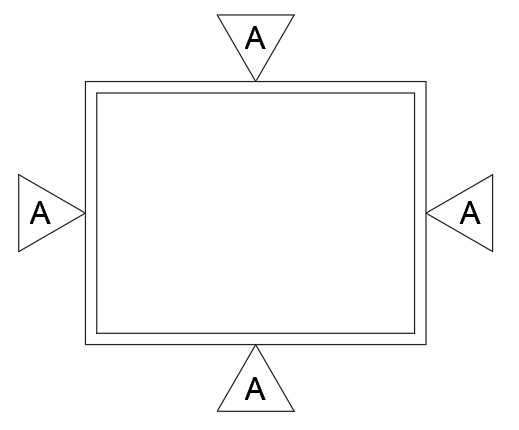
We often have to create a block with text or attribute that must always be readable. Even if we need to rotate the block, the text must have the same orientation. For example for this tag below. We can only make one; the text rotation will never change.

We just need to change an option in the Text Style.

Modifying Text Style

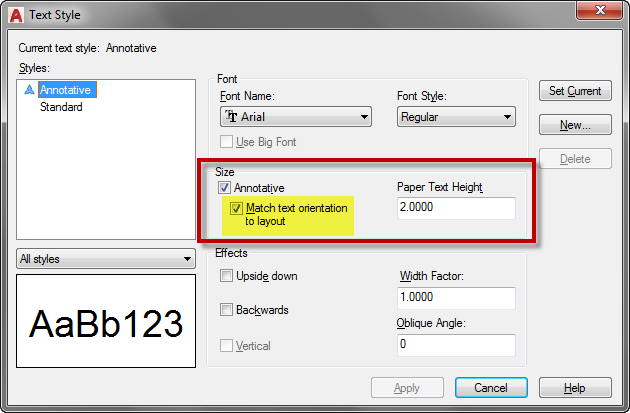
Open Text Style dialog. Type STYLE then press Enter.

Use the default Annotative text style or make a duplicate. This setting only active if you use an annotative text style.

Activate Match text orientation to layout. Optional: fill the Paper Text Height

If you are interested in learning more about Annotation Scaling, you can download the e-book for free on Autodesk App Store: Working with AutoCAD Annotation Scaling.

Creating the Attribute

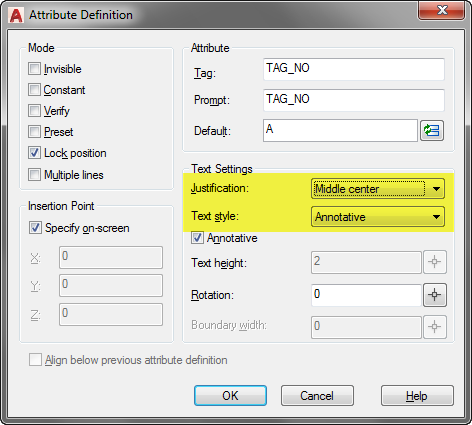
Open Attribute Definition dialog. Type ATTDEF then press Enter.

Fill Tag, Prompt, and Default fields. Change the Text Justification to Middle Center and Text Style to Annotative (see this image below).

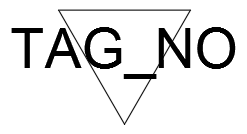
Place the tag in your drawing.

Creating Tag Symbol

Create the tag symbol as necessary. Place the symbol and make the attribute insert point coincident with the symbol center. We need the attribute to stay at the center, that is why we set the justification as middle center and the placement at the symbols center.
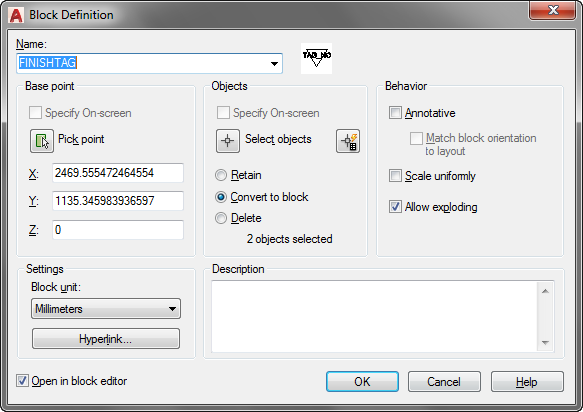
Creating the Block

Create the block as usual. Type BLOCK then press enter. Select the objects, define the pick point then click OK.

You cannot create Annotative Block with this behavior. Leave the option unchecked. You also cannot make it a Dynamic Block.

If you want to master AutoCAD Block, you can purchase our e-book here: AutoCAD Block Best Practices.

Now try to insert the block and see how it works.

Video Instruction

If you have problem following the tutorial, you can follow this video as a reference.

About Edwin Prakoso

I work as a Sr. Consultant in PT Cipta Satria Informatika. I've been using AutoCAD since R14 and Revit since Revit Building 9. I occasionally write for AUGIWorld magazine and I am also active in Autodesk discussion forum. I'm a member of Autodesk Expert Elite, an appreciation for individuals who give contributions to the Autodesk community.
Connect with me on twitter or LinkedIn.

Filed Under: AutoCAD

0 0 votes
Article Rating
Subscribe
Login
Notify of
guest

guest

This site uses Akismet to reduce spam. Learn how your comment data is processed.

1 Comment
Inline Feedbacks
View all comments
T NARASIMHA SWAMY
T NARASIMHA SWAMY
7 years ago

Nice note

1
Reply
wpdiscuz   wpDiscuz

Featured

5 Reasons Why You Should Use AutoCAD Block (Infographics)

Here are the reasons why you should use AutoCAD blocks. If you haven’t used it, this perhaps can encourage you.

Recent Articles

  • Autodesk Construction Cloud Activity Log
  • Exporting AutoCAD Plant 3D Model to Navisworks
  • Autodesk Data Connector for Power BI is Now Available

Advertisement

New on CADnotes

  • Autodesk Construction Cloud Activity Log
  • Exporting AutoCAD Plant 3D Model to Navisworks
  • Autodesk Data Connector for Power BI is Now Available
  • Autodesk Forma Design Contest
  • Revit 2025: Toposolid Enhancements

Meet the Authors

avatar for
avatar for
avatar for
avatar for
avatar for
avatar for

Get Connected

CADnotes on FacebookCADnotes on InstagramCADnotes on TwitterCADnotes on YouTube

© 2009 – 2025 CADnotes · Feedback · Privacy Policy · Become an affiliate

wpDiscuz