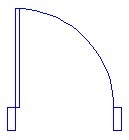
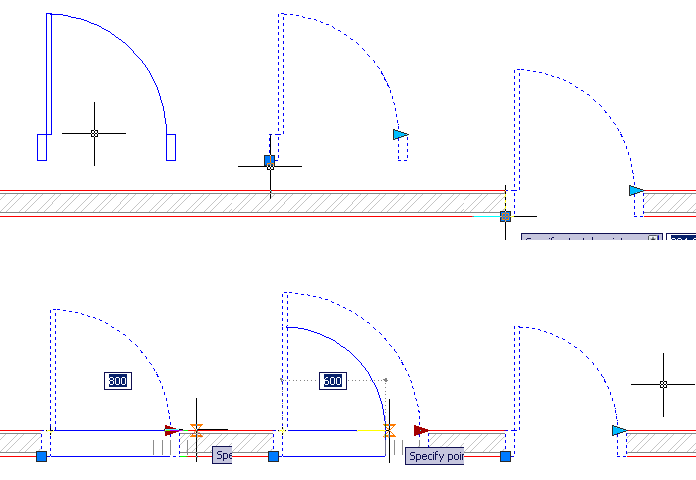
 This is the last object we are going to create using AutoCAD dynamic block. We are going to create a door. Basically it’s not that different with what we did with dynamic block before. But this time, we are going to learn about action properties in dynamic block. We are going to use wipeout as well.
Now, open your previous dynamic block tutorial file. We are going to create all of our dynamic blocks in a single AutoCAD file. This file will be our block library. We will create several dynamic blocks here. Don’t loose it until we finish our tutorial.
Creating the Geometry
In your AutoCAD file, create a new layer: A-Door, with color: blue, and lineweight: 0.09 mm. Set this layer as current layer.
Draw a 50×150 rectangle as the frame. Copy it to it’s right with 700mm distance. Draw a rectangle 30×650 as door panel. Then draw an arc for swing symbol to complete it.
The last thing we are going to add is a wipeout. Activate it, and draw a rectangle wipeout that covers the whole door width.
You will see the door frames are covered by the wipeout. Select the wipeout, right click, then from context menu select draw order>send to back.
Why do we use wipeout? We are going to host our door to a wall. We don’t want to trim or modify our wall after door placement. And modifying the wall length will be reported incorrectly. So we add wipeout to cover our wall later. We will try this at the end :)
Now as usual, create a block from this object. We will create it as dynamic block. Give it name ‘Single Door’. You can define insertion point wherever you think appropriate. Open your block in block editor.
Adding Parameters and Action
We are still using linear parameter. Add a linear parameter as below.
Delete the left arrow. Or you can change ‘number of grips value’ to 1 in properties palette.
There are 3 action we need to add, based to this parameter:
1. Add a stretch action to stretch our door width. Similar to what we do with adding action to dynamic block wall. This time we only need to create a small rectangle to include the right door frame and the wipeout.
2. Add scale action to resize the arc door swing symbol. This action is very simple to add. Just select the parameter, then select the arc. [ENTER] to finish.
3. Add another stretch action for resizing the door panel. Only select the door panel when this action ask you to select object.
Parameter and Action Properties
Placing those action is easy I believe. But we are not finish yet. We are going to limit the size. We don’t want AutoCAD users to change the door size without a guidance. We will change some parameter properties just like we did when we create column. Select the parameter. Change the Dist type to ‘List’ and click the … button to input distance value list.
Don’t forget to change this parameter name to something like ‘width’ or ‘door width’.
*You may want to use Increment. But since the last time we used it, I think it will be better to use list now.
Add more values to define your door width.
The last one, is changing an action properties. Not only parameter has properties! Remember the stretch action for the door panel? Where do you think the door panel will be stretch? Horizontally!
We need to change a property to override this behavior. Select this action, open your palette property. Under overrides category, change the angle offset to 90 degrees.
This will override the stretch action, it will stretch the door panel vertically even the parameter is stretch horizontally.
Ok, we are done! Save block, and close block editor.
If you have difficulties with the tutorial, you can watch this video. But sorry, this video don’t use WIPEOUT. But shouldn’t be a problem, because we are emphasizing on parameters and actions.
One more thing. We still can see our wipeout frame. Let’s turn it off. Activate wipeout, then type F [ENTER] to activate frame option. Type OFF [ENTER] to turn it off.
Command: WIPEOUT
Specify first point or [Frames/Polyline] <Polyline>: F
Enter mode [ON/OFF] <ON>: OFF
Regenerating model.
Try to stretch your door and don’t forget to try placing your door at walls!
*Notes:
- If you can’t see the wipeout covering your wall, select your wall and change the drawing order: send it to back.
- You might want to add flip actions so you don’t need to mirror it.


i have same problem with new2cad…when plotting, when the wall has lineweight in it,for example Im
making .15m thick of wall.. when I place my door at the wall that has
lineweight, the wall is still visible when i plot it, because the
lineweight overlaps the width of the door frame which is also .15m.. but
when i plot it with no value of lineweight,or just a line or default
lineweigth,it fits.. can we do something with it?
Hi again I am having problem, the arc is not scaling acording to the door, it offsets itself further from it, here`s the file http://dl.dropbox.com/u/68619218/door%20examples….
this is a great tutorial, I wanna to do this for a long time, now i can, so THANK YOU!
great tutorial – however when i added the flip action now when i stretch the door width, the door panel stretches in reverse e.g. if i stretch door width from 600 to 700, the door panel shrinks instead of stretching to suit
When I initially commented I seem to have clicked the -Notify me when new comments are added- checkbox and now each time a comment is added I get four emails with the same comment. http://cadtutorial.net Perhaps there is an easy method you can remove me from that service? Many thanks!
Hi Edwin,
I have a problem in simulating wireropes being wound on to a drum in Catia ..could you show me tutorial on this … it will be of immense help.
Thanks
Dear Edwin,
thanks for the tip. i checked it, the actual problem was with my selection for action parameters….. i think i had selected either the arc with the door panel or the door panel with the arc during their respective action parameter selection. i went back deleted all the action parameters and redid them and now the block function properly.
thanks because of you now i know how to make basic dyn. blocks. :)
Dear Edwin,
Thank you for the tutorial, they are amazingly and very easy to follow. i have a problem with my door block, when i stretch it the arc end points dont match with the door panel and the frames resulting in gaps between the two, initially it seemed to be an arc grip placement problem but after trying different location it still seems to do the same, any thoughts on it?
Hi Abbas,
Have you checked the parameters points? I suspect it has something to do with it.
In dynamic block single door, door panel do not stretch itself when stretching door width. I add linear dimension, stretch action, scale. I overwrite angle of offset for door panel to 90. It dosen't work.
Can you send the block to my email? I will take a look.
I have sent it to your email.
I think I know why.
For stretch1, your last action, you didn't put the red circle to the right arrow. You put it to the left, which has no arrow. Try to recreate the last action.
Your tutorials are the best I've found.
One problem, when I add the stretch action to the arc, it stretches fine at the top, but the bottom is too long – it appears to cut through the door frame. Any advice?
Suzanne,
I suspect that you didn't place the the grip correctly. Have you checked it?