One benefit that you can get from using block attribute is to preserve a text field. For example, if you make a title block as a block, you can edit the attributes to change the values. The title block is ready; it will be a standard for all drawings. The lines, the text style and text size are already set.
However, sometimes the attributes value are default. It would be easier for us to select the value from a list. For example, the scale information in view title is a default. 1:1, 1:2, 1:5 and so on. You can’t make a list of default values for block attributes. But there’s a workaround: using the Visibility States in Dynamic Block.
You can download the completed block here. You might want to play around with it before you start this tutorial.
We will see how we can make a list of default values using Dynamic Block.
Preparing the Block
I made this block for this tutorial. It has three attributes: drawing number, sheet number, and view title. I left the drawing scale empty.

You can create your block, or you can download the exercise file here. Open the block in Block Editor.
Working with Dynamic Block
We will use only one parameter: Visibility Parameter. This parameter will control which text will appear when we select a value.
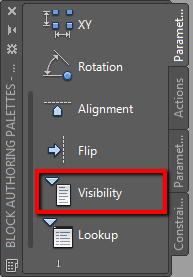
Adding Visibility Parameter
In Block Authoring Palettes, Parameter tab, click Visibility.
Place the parameter below the view title as shown below.

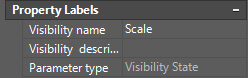
Optional: Select the parameter from drawing and change the Visibility name in the properties palette.
Adding Visibility States
Using single line text command, type SCALE 1:1 below the view title. This will be a default value, and we will not change it. So we use text.

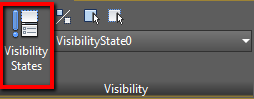
Now let’s save this visibility state. Open Visibility States Manager by clicking the icon on the ribbon, Visibility tab.
We need to rename this state for clarity. Click rename.
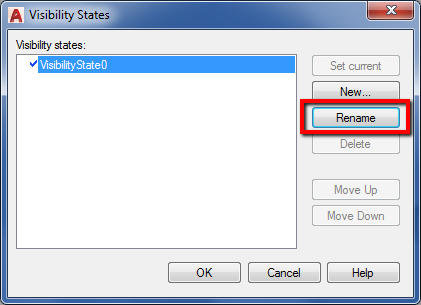
Give it name 1:1.
Create another Visibility State by clicking new. Give this one name 1:2.
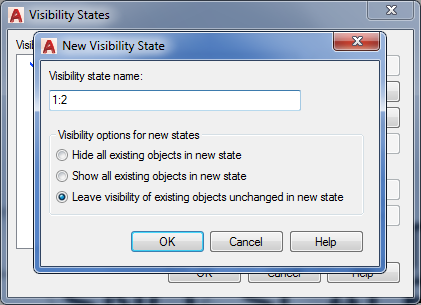
Click OK to close all dialog boxes.
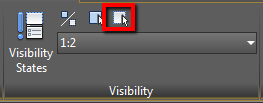
Make sure in the Visibility dropdown it shows 1:2, the last state we created. Change it if necessary.
We can see all objects are still shown. We need to hide the previous text for this state. Select text SCALE 1:1 you created before then click Make Invisible from the ribbon, Visibility tab.
Now we have the scale value empty. Create text SCALE 1:2 below the view title again.
At this point, you already have 2 Visibility States. Repeat the procedure above for other scales.
After you finished, try to change to each Visibility States to see if everything is correct.
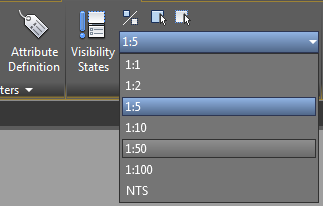
Save the block and close Block Editor. Click the arrow to change the Visibility States.

Adding custom scale
What if we need to use a custom scale? It’s not on the list, and we want the users to type it.
It’s easy. Open the block in Block Editor again. Create a new Visibility State named Custom. This time, instead of using text, use Block Attribute. Type ATTDEF and provide value as below.
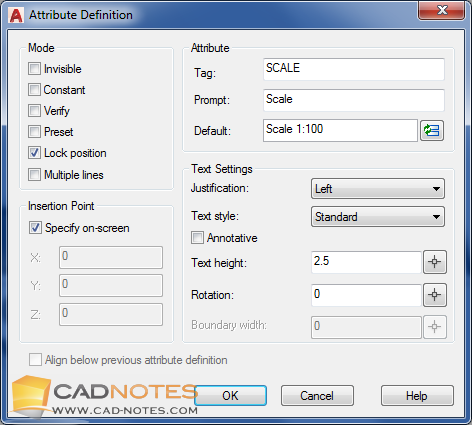
Save the block and close block editor. Before we continue, run ATTSYNC command to synchronize the new attribute.
Try to change the state to custom and edit the attribute.
The good thing about hiding attribute with Visibility State is, the field will not be shown when you insert the block. AutoCAD will only show it when you change the state to custom.
Conclusion
You can use Dynamic Block for many purposes. It might need a little setup, but it can be very useful.
However, there is a limitation. You can only use 1 Visibility State for one block. It means you can’t have multiple drop-down lists in one block. It’s very unfortunate because it would be very useful in the drawing title block.
What do you think about using the drop-down list with the Visibility States? Do you think it can help? And how do you plan to use it?
If you are new to AutoCAD Block or want to learn more about Dynamic Block, you may want to try purchasing our e-book: AutoCAD Block Best Practices. It teaches how to create a block, working with Attributes, creating Dynamic Block and many more.


My name is Domenico Monteleone I live in Canada Toronto Ontario and would want to know more about AUTOCAD and what I could do with AUTOCAD what are the required fields I need to look in to have a better understanding in AUTOCAD I would want to know more about AUTOCAD and what it can do for me in the long run could any one help me out please Thank you kindly have a beautiful Christmas enjoy
all of my blocks are annotative so they scale up or down according the viewport scale. My question, should I create my block when I’m in paper space or model space?
Hi Andy,
Creating the block is always in model space. But it depends on where you are going to use it. For paper space, you don’t need to create an annotative block. And depends on how you want the block to work, you can make it annotative for blocks that you use in model space.
Edwin: Clear and Concise on the Visibility States Tutorial. I’ve been using them since Dynamic blocks were introduced. I work in Electrical Design with lots of symbols. Imagine a contact either open or closed. Why not both in one block? or Fire Alarm Symbols where you bring in one block that has enough symbols via visibility states that you’ve actually brought in ALL your Fire Alarm symbols! No need to re-insert or even drag a new block from your palette menu. With a little planning, you end up with fewer blocks. Some of my Dynamic Symbol Blocks have as many as 20-30 Visibility States. Thanks for the nice explanation – I’m already sharing your methods with my co-workers.
Thank you for sharing this Garry :)
Yes, Visibility States are very useful to simplify the block library. But it seems to be overlooked feature in Dynamic Block!
That’s a nice tutorial. I’ve created/used dynamic blocks before, but not the visibility state. Always something new to learn …
I’m glad that you like it, Jim!
Yes there is always something new to learn, even if you already use it for decades!